Introduction
The Authress extension for LocalStack, our first community extension, enables running Authress directly on your machine. It provides a high-fidelity, fully local authentication and authorization service, which bypasses the need to rely on the live version for local development.
Ensuring your users can access your software while maintaining the privacy of their data and clean tenant separation is not a trivial challenge. It’s not just about supporting different login mechanisms and protecting the personal data included in the user identity. It is also about deciding who gets to access what as the users interact with the software. The logic to support all of these security concerns gets complex real quick, and that complexity further increases whenever your software supports different data access patterns, multiple user roles, or nested resource hierarchies.
Building an in-house authentication and authorization system may sound simple, but it’s a task rife with problems that you may otherwise not need to face. These include complying with privacy regulations, ensuring high availability, and monitoring for security incidents - to name a few. And that’s before accounting for all the edge cases that come up as your software and user base evolves. Authress directly tackles these challenges by providing a simple yet powerful API you can integrate into your software to take care of all your auth needs, from login and identity aggregation, to access control and endpoint protection.
What is Authress?
Authress is a login and access control API that lets you add authentication and granular authorization rules to any software you’re building. It’s easy to integrate into your project thanks to many different language SDKs, or, if you’re brave, directly over the REST API.
While developing your software, you need to provide a way for your users to access it securely. Depending on who your users are, you may need to support a variety of login methods, passwordless login, or SSO integrations. What’s more, your software is likely going to be used by different people, possibly also by different companies or tenants. This means that not all logged-in users are the same in terms of what they can access. If your access patterns are dictated by nested hierarchies, whether on the user group side, permission sets, resource side, or a combination of the above, decoupling access from identity becomes crucial for the security of your application.
Authress simplifies your software development by taking care of the complexity surrounding authentication and authorization. You only need to worry about your core functionality, what login methods to offer and what kind of access restrictions you want to put in place. You don’t even need to design all the access rules up front - Authress is inherently flexible and lets you easily change the permission schemas as your software evolves. It’s also inherently modular - whether it’s only user login, permissions, machine-to-machine authentication, or the entire auth stack, you can choose which parts to use.
Authress released Authress Local in July 2023 to provide a local running version for integrating login, authentication, authorization, API keys, and enhanced security into your service’s development & testing workflow. Authress Local mirrors the Authress Production API, enabling you to achieve a significant parity with the cloud service, and guaranteeing consistent performance when deployed in production.
Why run Authress as a LocalStack Extension?
LocalStack Extensions allow you to customize LocalStack by starting custom services in the same container while leveraging the existing ecosystem & feature set. With Authress Local as an Extension, you now have an easier and faster way to setup user management and access control for your application in a local environment.
The Authress extension for LocalStack replicates the Authress API, allowing you to integrate authentication & authorization directly into your locally running AWS applications. The Extension also allows you to jumpstart your development & testing workflows with Authress without an account. You can install the Authress extension using the LocalStack CLI or using the Extensions Library on the LocalStack Web Application.
The Authress extension is loaded by the LocalStack Extensions framework directly into your LocalStack environment. It works by dynamically starting up and configuring the Authress Local container. The locally running container provides a copy of the Authress API directly in your development environment so that you can:
- Authenticate users and generate JWTs offline without having to log in.
- Increase security during development by verifying your authorization checks are correctly configured.
- Validate SDK and API usage to catch any early bugs with your integration.
- Orchestrate complete integration tests combining your identity and authorization infrastructure with your AWS infrastructure already provided by LocalStack.
How to use the Authress extension for LocalStack
In this section, we’ll run a basic application that emulates authentication, authorization, user identity and role management by running the extension. For this tutorial, you’ll need to have the following prerequisites installed on your local machine:
Start your LocalStack container with your LOCALSTACK_AUTH_TOKEN environment variable set. You can use the following command to start LocalStack:
export LOCALSTACK_AUTH_TOKEN=your-auth-tokenEXTRA_CORS_ALLOWED_ORIGINS='*' localstack startThe EXTRA_CORS_ALLOWED_ORIGINS configuration variable allows the sample applications to send requests to the HTTP APIs running in LocalStack.
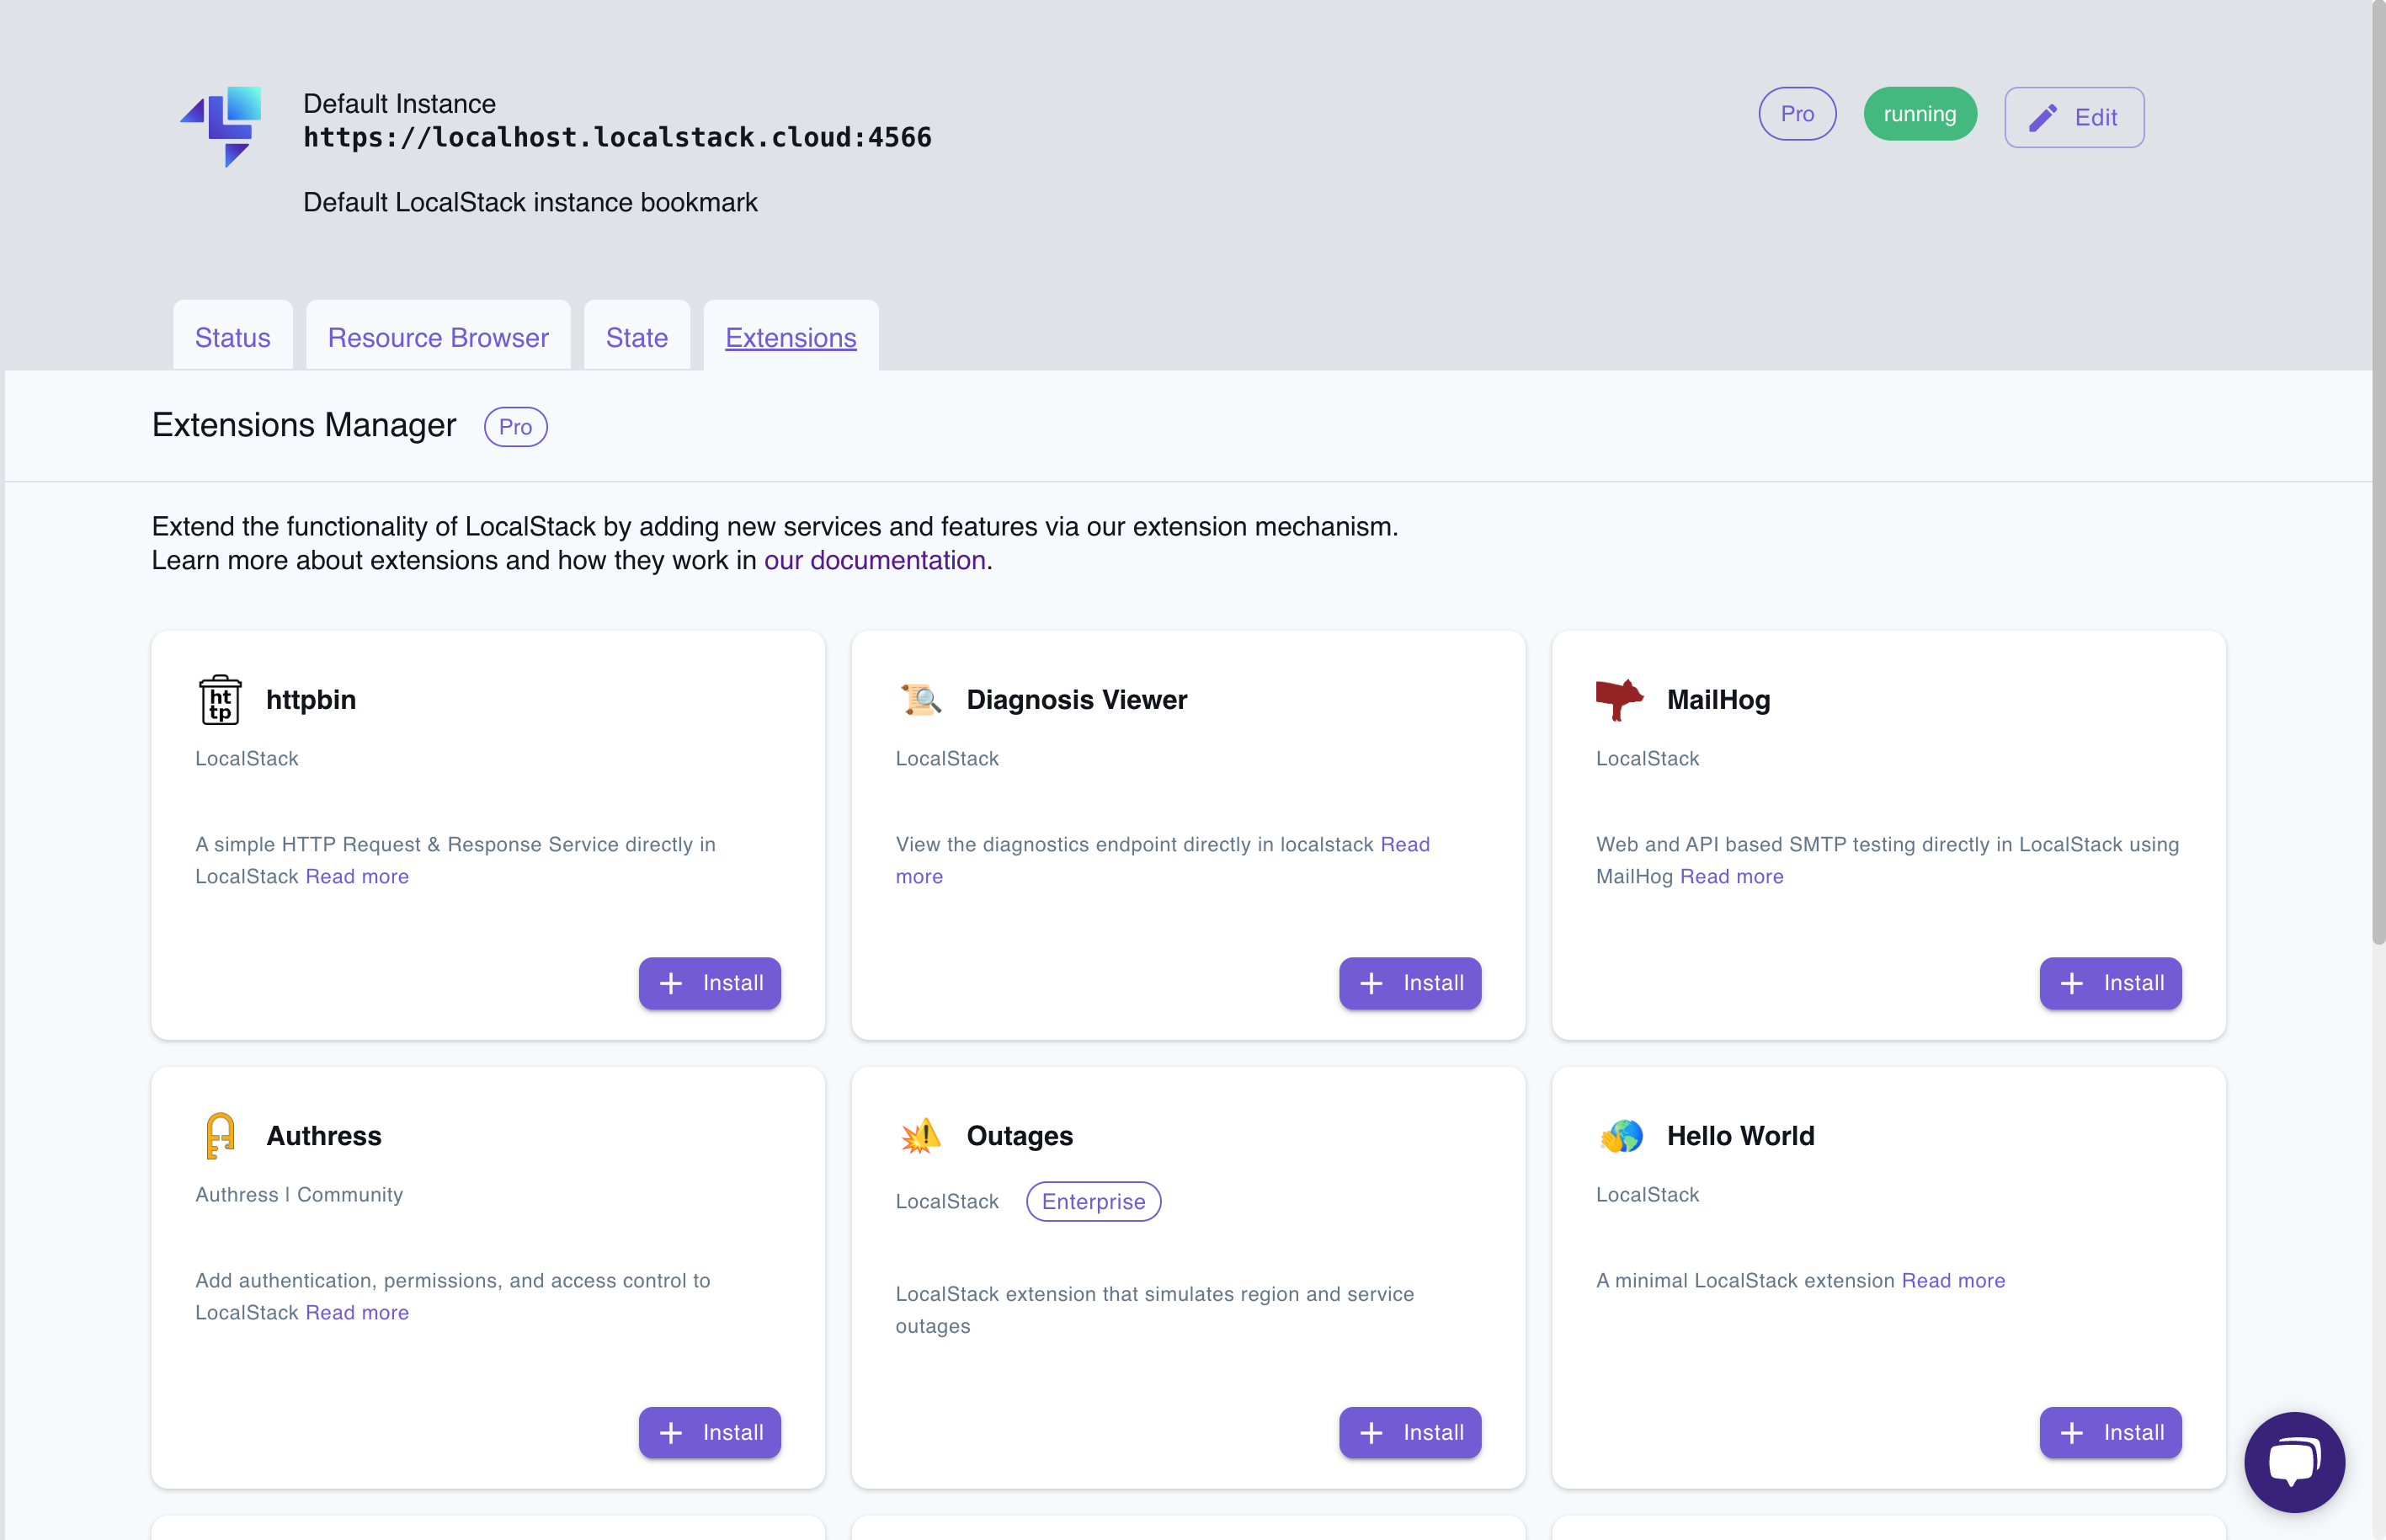
Install the Authress extension for LocalStack
To install the extension, you can either use the LocalStack CLI or the Extensions Library on the LocalStack Web Application. To install the extension using the LocalStack CLI, start your LocalStack container, configure your Auth Token (LOCALSTACK_AUTH_TOKEN) as an environment variable and run the following command:
localstack extensions install localstack-extension-authressYou will see the following output after the installation of the extension is successful:
[13:03:07] Extension successfully installed extensions.py:85┏━━━━━━━━━━━━━━┳━━━━━━━━━━━━━━━┳━━━━━━━━━┳━━━━━━━━━━┳━━━━━━━━━━━━━━┓┃ Name ┃ Summary ┃ Version ┃ Author ┃ Plugin name ┃┡━━━━━━━━━━━━━━╇━━━━━━━━━━━━━━━╇━━━━━━━━━╇━━━━━━━━━━╇━━━━━━━━━━━━━━┩│ localstack-… │ LocalStack │ 0.1.23 │ Authress │ localstack-… ││ │ Extension: │ │ │ ││ │ Authress │ │ │ │└──────────────┴───────────────┴─────────┴──────────┴──────────────┘Alternatively, you can navigate to the Extensions Library on the LocalStack Web Application. The library allows the installation and management of Extensions as simple as the click of a button. Click on the + Install button on the Web Application to install the extension on your local machine.
Irrespective of whether you use the CLI or the Extension Library to install the Extension, you will see the following in the LocalStack container logs:
2024-01-21T07:43:08.760 INFO --- [ MainThread] Authress : Starting up ghcr.io/authress/authress-local:latest as localstack-authress-af6bd0fc2024-01-21T07:43:08.762 INFO --- [ MainThread] Authress : setting up proxy to http://localhost:88882024-01-21T07:43:09.778 INFO --- [e_proxy_job)] Authress : Authress API Started on: http://authress.localhost.localstack.cloud:4566The Authress extension runs at http://authress.localhost.localstack.cloud:4566/. You can now configure API calls to the locally running authorization server specifying this URL as the Authress API URL in the Authress SDKs. In the following sections, we’ll see just how to do that.
Adding Authentication to your Application using Authress
Authress supports authentication and authorization. Here we’ll review how to configure one of the Authress Starter kits for authentication and authorization, however, if you already have an application you can use that instead. The application code is located in repositories on GitHub.
Below is a sample application that showcases a basic React example that uses Authress to log in (for other languages and frameworks, see the other starter kits). After logging in, you can navigate to the Authress protected page, which won’t be accessible to you unless you are logged in. Clone the repository onto your local developer machine with the following command:
git clone https://github.com/Authress/react-starter-kit.gitcd react-starter-kitAfter cloning the sample application, install the dependencies using the following command:
npm installYou can open the sample application in VS Code or your favourite IDE. Now that you have the extension running, navigate to the src/authressClient.tsx file, and complete the Authress configuration. Update the authressApiUrl to point at the extension URL, in the following manner:
loginClient = new LoginClient({ applicationId: 'app_default', authressApiUrl: 'http://authress.localhost.localstack.cloud:4566', });You can leave the rest of the configuration as it is, or make changes that suit your needs. While using the extension with other language SDKs, you can pass the local Authress API URL as the authressApiUrl or the authress_api_url (depending on which SDK you are using).
Running the Application
Navigate to the terminal and run the following command to start a local server:
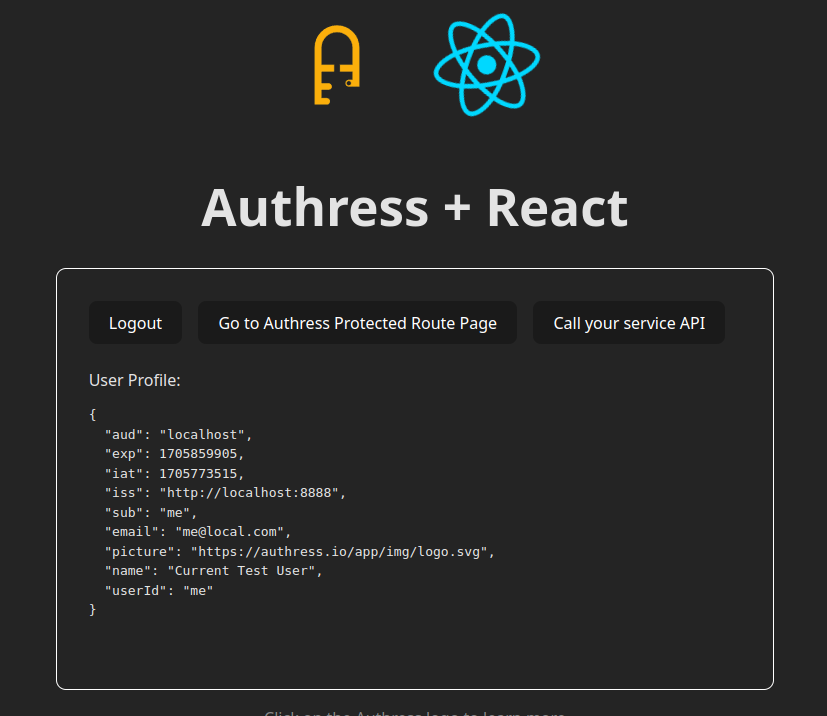
npm run startThe application will now be available on http://localhost:8080/. You can open the URL on your browser, and you will see the following page.
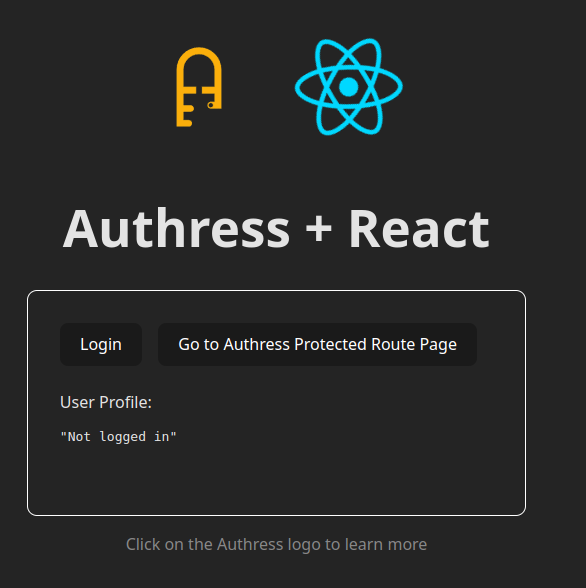
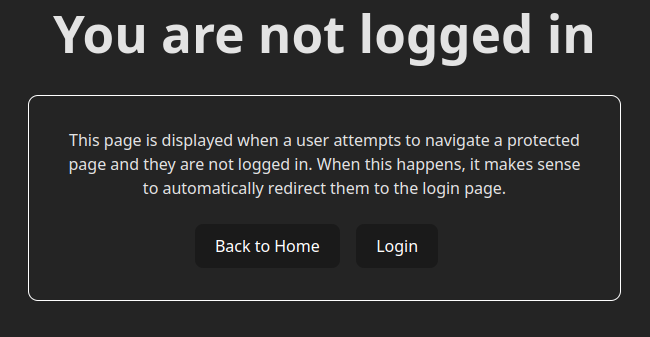
You can try navigating to the protected page by clicking on the Authress Protected Route Page. You will immediately see a page remarking that you are not logged in, and the application has prevented you from accessing a protected page.
On the main page or in the navigation bar, you can now click on Login, and you will be immediately logged in and redirected to the main page. On this page, you can now see a valid user authentication session with the user profile highlighted. Here, you will notice because you are offline, there is no redirection to the authentication page. Once your app is deployed to production a customized login box will appear to complete the login process.
Navigate to the LocalStack container logs to see the authentication APIs being triggered:
2024-01-10T09:01:10.725 INFO --- [ asgi_gw_0] localstack.request.http : OPTIONS /api/authentication => 2042024-01-10T09:01:10.793 INFO --- [ asgi_gw_0] localstack.request.http : POST /api/authentication => 200You can now click on the Authress Protected Route Page to see the protected page.
Adding Authorization to your application
Above, we successfully added authentication and user login to an application using the Authress React Starter Kit. Additionally, Authress can also provide authorization, access control, and api key management to web services. That means we can use the Authress extension for LocalStack to enable offline authorization.
Here, we’ll see how that works by using the Authress Starter Kit for Express. Alternatively, if you already have a running local application, you can add Authress authorization to that instead. For using the starter kit, clone the repository onto your local developer machine with the following command:
git clone https://github.com/Authress/express-starter-kit.gitcd express-starter-kitAfter cloning the sample application, install the dependencies using the following command:
npm installAs with the React application, the next step is to update the Authress configuration. Navigate to the src/authressPermissionsWrapper.tsx, and update the authressApiUrl to point at the extension URL.
const serviceClientAccessKey = 'sc_c.0.acc.MC4CAQAwBQYDK2VwBCIEIALXnuHrzrj++Q54hCHI/GvULrovX9SNis8+rFKgEM2v';const authressApiUrl = 'http://authress.localhost.localstack.cloud:4566';Make sure to also update the serviceClientAccessKey to any valid key. The one shared above can be used.
Testing your application authorization
Now that the service application is configured to use the extension, you can start the service. Navigate to the terminal and run the following command to start a local server:
npm run startIf the service starts correctly, you should see output from the local service:
> nodemon src/index.ts[nodemon] 2.0.21[nodemon] to restart at any time, enter `rs`[nodemon] watching path(s): *.*[nodemon] watching extensions: ts,js,json[nodemon] starting `node --loader ts-node/esm src/index.ts`(Use `node --trace-warnings ...` to show where the warning was created)App Running on http://localhost:8080
*******************************************Try hitting one of the existing endpoints: curl -XGET http://localhost:8080/accounts -H"Authorization: Bearer YOUR_TOKEN"
Since this is an API based service, we can validate it works correctly, by making a call to one of the protected resources in this service. If you are using your own application service, choose one of the available endpoints there.
The Authress Starter Kit for Express has user, account, and resource endpoints already available. Here you can test the resource endpoint. And to do that, we first need a valid access token. You can generate a valid access token in the Authress Management Portal or you can receive one from the Authress extension.
To get an access token from the Authress extension, run the following command:
curl -XPOST -d'{ }' \ http://authress.localhost.localstack.cloud:4566/api/authenticationThe result will be an access token within an JSON response:
200{ "accessToken": "eyJ0eXAiOiJKV1QiLCJhbGciOiJFZERTQSIsImtpZCI6ImF1dGhyZXNzLWxvY2FsIn0.eyJhdWQiOiJsb2NhbGhvc3QiLCJleHAiOjE3MDU4NjIzNjksImlhdCI6MTcwNTc3NTk2OSwiaXNzIjoiaHR0cDovL2xvY2FsaG9zdDo4ODg4Iiwic3ViIjoibWUifQ.F_PiFTg7ir0bDhet_AVs6aeIxbBycXUso-J7sUA22iWK6p4pOUFoyMJTr6ZD_GCEQqI314WMmjllK9GZ9spTBQ"}Copy out that access token and use it with the running application service:
curl http://localhost:8080/accounts/001/items/resource_001 -H "Authorization: Bearer eyJ0eXAiOiJKV1QiLCJhbGciOiJFZERTQSIsImtpZCI6ImF1dGhyZXNzLWxvY2FsIn0.eyJhdWQiOiJsb2NhbGhvc3QiLCJleHAiOjE3MDU4NjIyMDIsImlhdCI6MTcwNTc3NTgwMiwiaXNzIjoiaHR0cDovL2xvY2FsaG9zdDo4ODg4Iiwic3ViIjoibWUifQ.bXGudtoYcEjohAWtJLeUgGWeh5PtbXIXNCVa4EEasjag8TqZaYfJA6MaUs3KA8owYKxm2wZTszRNx2Ayd-n_Cw"
200{...}
Conclusion
Congratulations! You’ve successfully added authentication and authorization to your running application on your machine. You can further explore Authress APIs and their cloud offering for various use cases such as:
- Quickly adding user authentication to your application with an Authress Login Box
- Adding authorization and securing a Multitenant application architecture
- Implementing signup and user onboarding flows for enterprise businesses
- … and more!
The Authress extension for LocalStack makes it easy to manage and integrate authentication and authorization into locally-created cloud resources, and we hope to make your development process easier and faster! If you are interested in developing a LocalStack Extension to customize and extend your local development experience, check out our guide on building LocalStack Extensions.
If you have questions about Authress and how it enables login and role or resource-based granular access control, check out the Auth Academy or join their Developer community.