Introduction
We’re excited to announce our partnership with Shipyard, the ephemeral environment self-service platform, that allows you to spin up on-demand preview deployments via Kubernetes clusters to turbocharge your application lifecycle. With Shipyard, you can now deploy your cloud applications in short-lived environments to enable developer teams to run tests, preview features, and get alignment with cross-departmental projects. Shipyard also enables application previews on every pull request and simplifies monitoring, debugging, and deployment all from one dashboard!
LocalStack’s core cloud emulator enables developers to build, test, and deploy cloud & serverless applications locally. Shipped as a Docker image, you can use various integrations such as the docker CLI, Docker Compose, or Helm to start LocalStack in a developer environment. Shipyard allows developers to use Docker Compose configurations which are then automatically transpiled into Kubernetes manifests enabling you a pre-production preview of how your applications work! As such, LocalStack does not require any additional configurations and just enables you to start with a pre-defined Docker Compose setup.
In this blog, we’ll detail why you should be using ephemeral environments and how you can use LocalStack alongside Shipyard. We’ll also go through setting up an AWS-powered application on Shipyard & LocalStack, and how you can pre-seed infrastructure state using Cloud Pods!
What is Shipyard?
Shipyard is a platform that allows you to create on-demand ephemeral environments to run your tests against a production-like setup. It simplifies pre-production testing, compliance, and collaboration by generating an ephemeral environment preview for your full-stack application on every pull request (PR) to give you a near-production experience while building and testing features. Every environment is a single-tenant cluster, enabling Single Sign-On (SSO) authentication. This ensures that not only developers but also other stakeholders can quickly access and work on developing features with a simple click.
In addition, you can use Shipyard for:
- Gaining terminal access into your running containers for live debugging.
- Adding private container registries for pulling images during the build.
- Integrating with GitHub Actions, CircleCI, Datadog, Slack, and more.
- Creating snapshots for each named volume in your application setup.
- Monitoring your deployment while tracking build details & application history.
LocalStack has been in active partnership with Shipyard and both companies are on a mission to streamline the Software Development Life Cycle (SDLC) and provide frictionless developer experience. This partnership is in line with our shared vision of bolstering the DevOps methodologies while providing an improved testing process, quicker release cycles, and optimized cost utilization — all while adhering to security best practices.
We've just passed 150,000,000+ pulls for the official LocalStack Docker image 📈💪
— LocalStack (@localstack) June 19, 2023
Glad to see the community grow & propel our dream of a fully local cloud dev & test, powered by LocalStack! 🥳
Here's to the next milestone! 🥂#LocalStack #Docker #AWS #CloudDevelopment pic.twitter.com/ZCJre3mJOC
LocalStack’s cloud emulation capabilities allow you to create resources such as S3 buckets, DynamoDB tables, OpenSearch clusters, and more to replicate cloud environments. With significant recent enhancements to these services, you can now preview features in your cloud applications, and use additional features such as Cloud Pods to pre-seed your infrastructure state automatically. Upon creating a pull request, Shipyard automatically creates an ephemeral environment that allows you to test your application in a state that is infrastructure-identical to production, making it easy to collaborate asynchronously within and across your team!
How to use Shipyard with LocalStack?
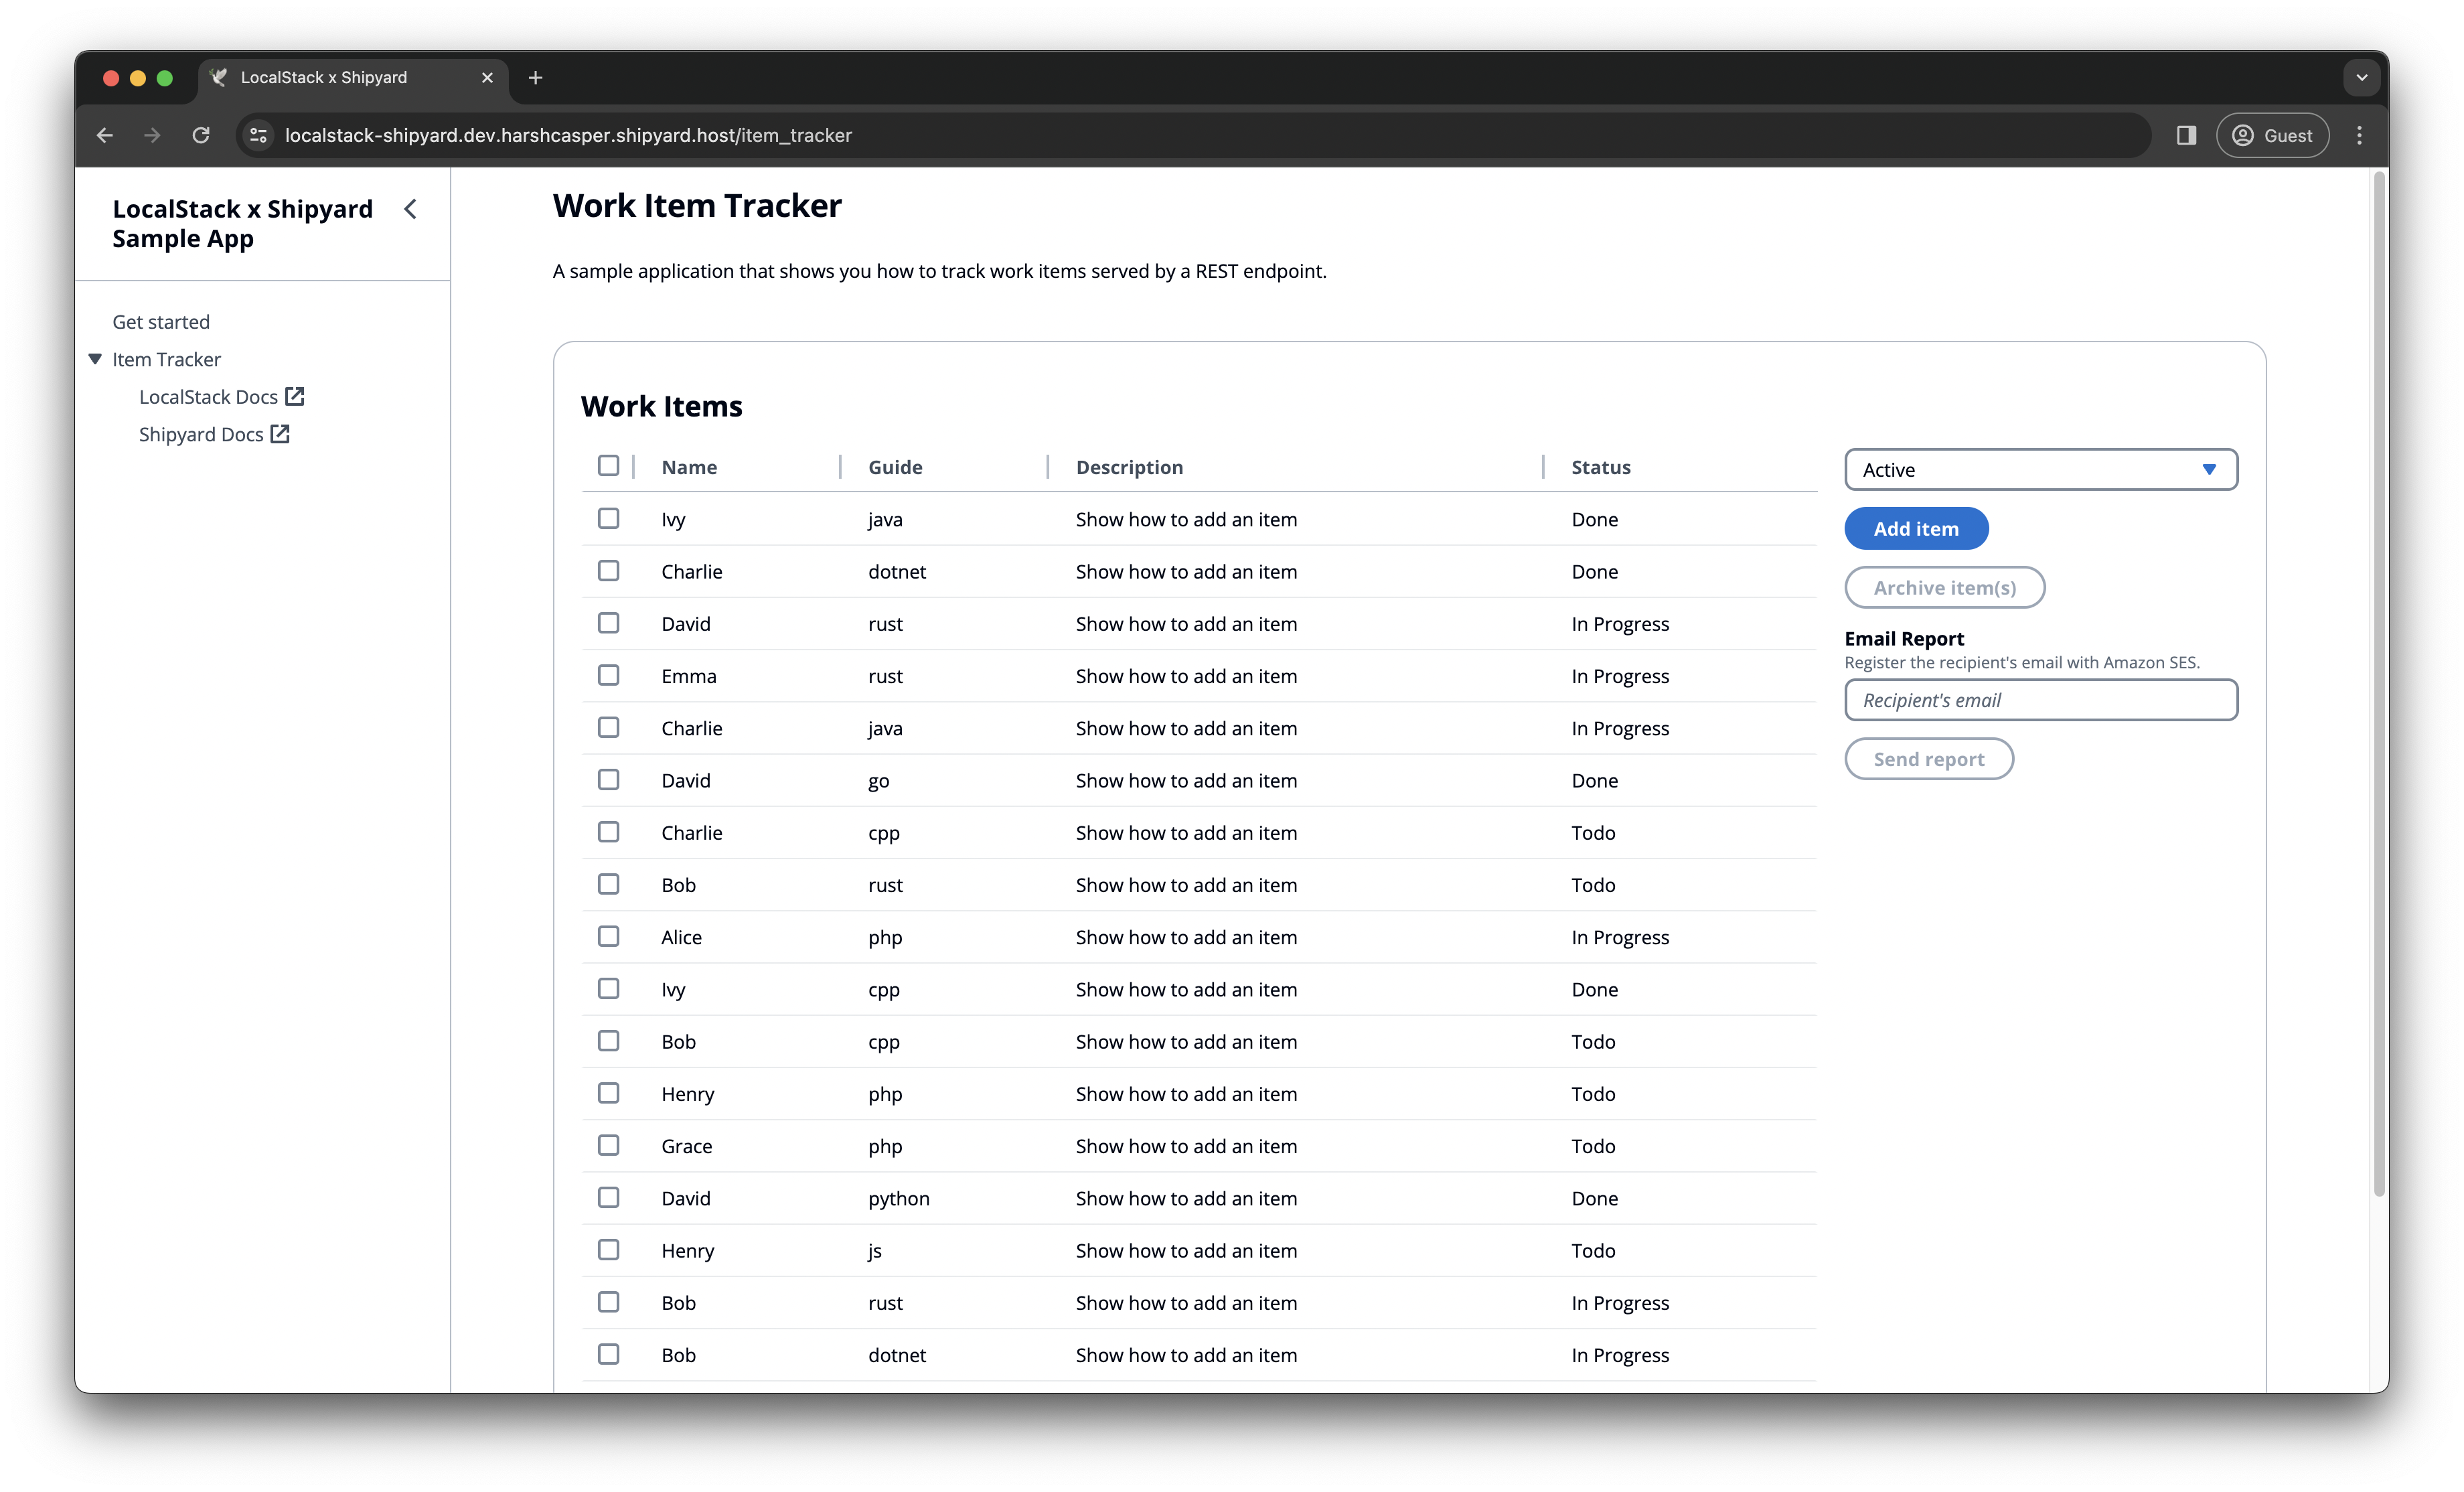
In this section, we’ll run a basic item tracker application on Shipyard using DynamoDB & Simple Email Service (SES) provisioned by LocalStack. The item tracker application allows users to submit data to a DynamoDB table using a ReactJS client and a Flask backend, using the AWS SDK for Python (boto3) using a basic CRUD interface. It then uses SES to mock the process of sending email reports of work items.
For this walkthrough, you’ll need to have the following prerequisites installed on your local machine:
- Docker & Docker Compose
- AWS CLI &
awslocalwrapper script - Shipyard account with an active subscription (sign up for a free trial)
- LocalStack Web Application account
localstackCLI withLOCALSTACK_AUTH_TOKEN
Set up the application on your local machine
The code for the solution in this post is in this repository on GitHub. To get started, fork the repository on GitHub. You can now use git clone to clone the repository onto your local developer machine:
git clone https://github.com/localstack-samples/sample-item-tracker-shipyard-applicationcd sample-item-tracker-shipyard-applicationReplace the GitHub repository URL with the URL of the forked repository. Open the code in your favourite code editor/IDE. You’ll be able to check out the Docker Compose configuration that sets up the application on your local machine. Here is what it looks like:
version: '3'
services:
  localstack:    container_name: "${LOCALSTACK_DOCKER_NAME-localstack_main}"    image: localstack/localstack-pro:latest    ports:      - "127.0.0.1:4566:4566"            # LocalStack Gateway      - "127.0.0.1:4510-4559:4510-4559"  # external services port range      - "127.0.0.1:443:443"    environment:      - LOCALSTACK_AUTH_TOKEN=${LOCALSTACK_AUTH_TOKEN:?}      - DEBUG=1      - DOCKER_HOST=unix:///var/run/docker.sock      - EXTRA_CORS_ALLOWED_ORIGINS='*'    volumes:      - "./init-aws.sh:/etc/localstack/init/ready.d/init-aws.sh"      - "localstack:/var/lib/localstack"      - "/var/run/docker.sock:/var/run/docker.sock"    networks:      ls:        ipv4_address: 10.0.2.20
  frontend:    container_name: react    labels:      shipyard.route: '/'      shipyard.primary-route: 'true'    build: 'frontend'    volumes:      - './frontend/src:/app/src'      - './frontend/public:/app/public'    ports:      - '3000:3000'
  backend:    container_name: flask    labels:      shipyard.route: '/api'    build: 'backend'    environment:      SHIPYARD_DOMAIN_FRONTEND: ${SHIPYARD_DOMAIN_FRONTEND-}      SHIPYARD_DOMAIN: ${SHIPYARD_DOMAIN}    ports:      - '8080:8080'    dns:      - 10.0.2.20    networks:      - ls
networks:  ls:    ipam:      config:        - subnet: 10.0.2.0/24volumes:  localstack:
In the above Docker Compose configuration, we have created:
- A
localstackservice which pulls thelocalstack/localstack-proDocker image and sets up an initialization hook that creates the AWS resources on the host machine. - A
frontendservice that installs the dependencies & builds the ReactJS application served on port 3000 using theDockerfilein thefrontenddirectory. - A
backendservice that installs the dependencies and starts a development Flask server on port 8080 using theDockerfilein thebackenddirectory. - An
lsDocker network that allows thebackendservice to use LocalStack as its DNS server and ensure that it can access the LocalStack container.
Additionally, you will notice that we have configured the Shipyard-specific service labels to specify the frontend domain, primary route, and main domain. This is useful in the context of a multi-domain environment like ours. You can check more about them on Shipyard’s documentation.
Start the application on your local machine
You can now start the application locally, by specifying the following command:
export LOCALSTACK_AUTH_TOKEN=<your-auth-token>docker-compose upThis will start the localstack, backend, and frontend services, exposing the user client to localhost:3000. You can navigate to the local user client to start interacting with the application by adding items which are fully persisted using the emulated DynamoDB table.
![]()
You can also use the REST API client to add items to the application by performing a POST request. Here is an example:
curl -X POST http://localhost:8080/api/items \ -H "Content-Type: application/json" \ -d '{"name":"Me","guide":"python","description":"Show how to add an item","status":"In progress","archived":false}'You can also use the REST API to get any existing active items using the following command:
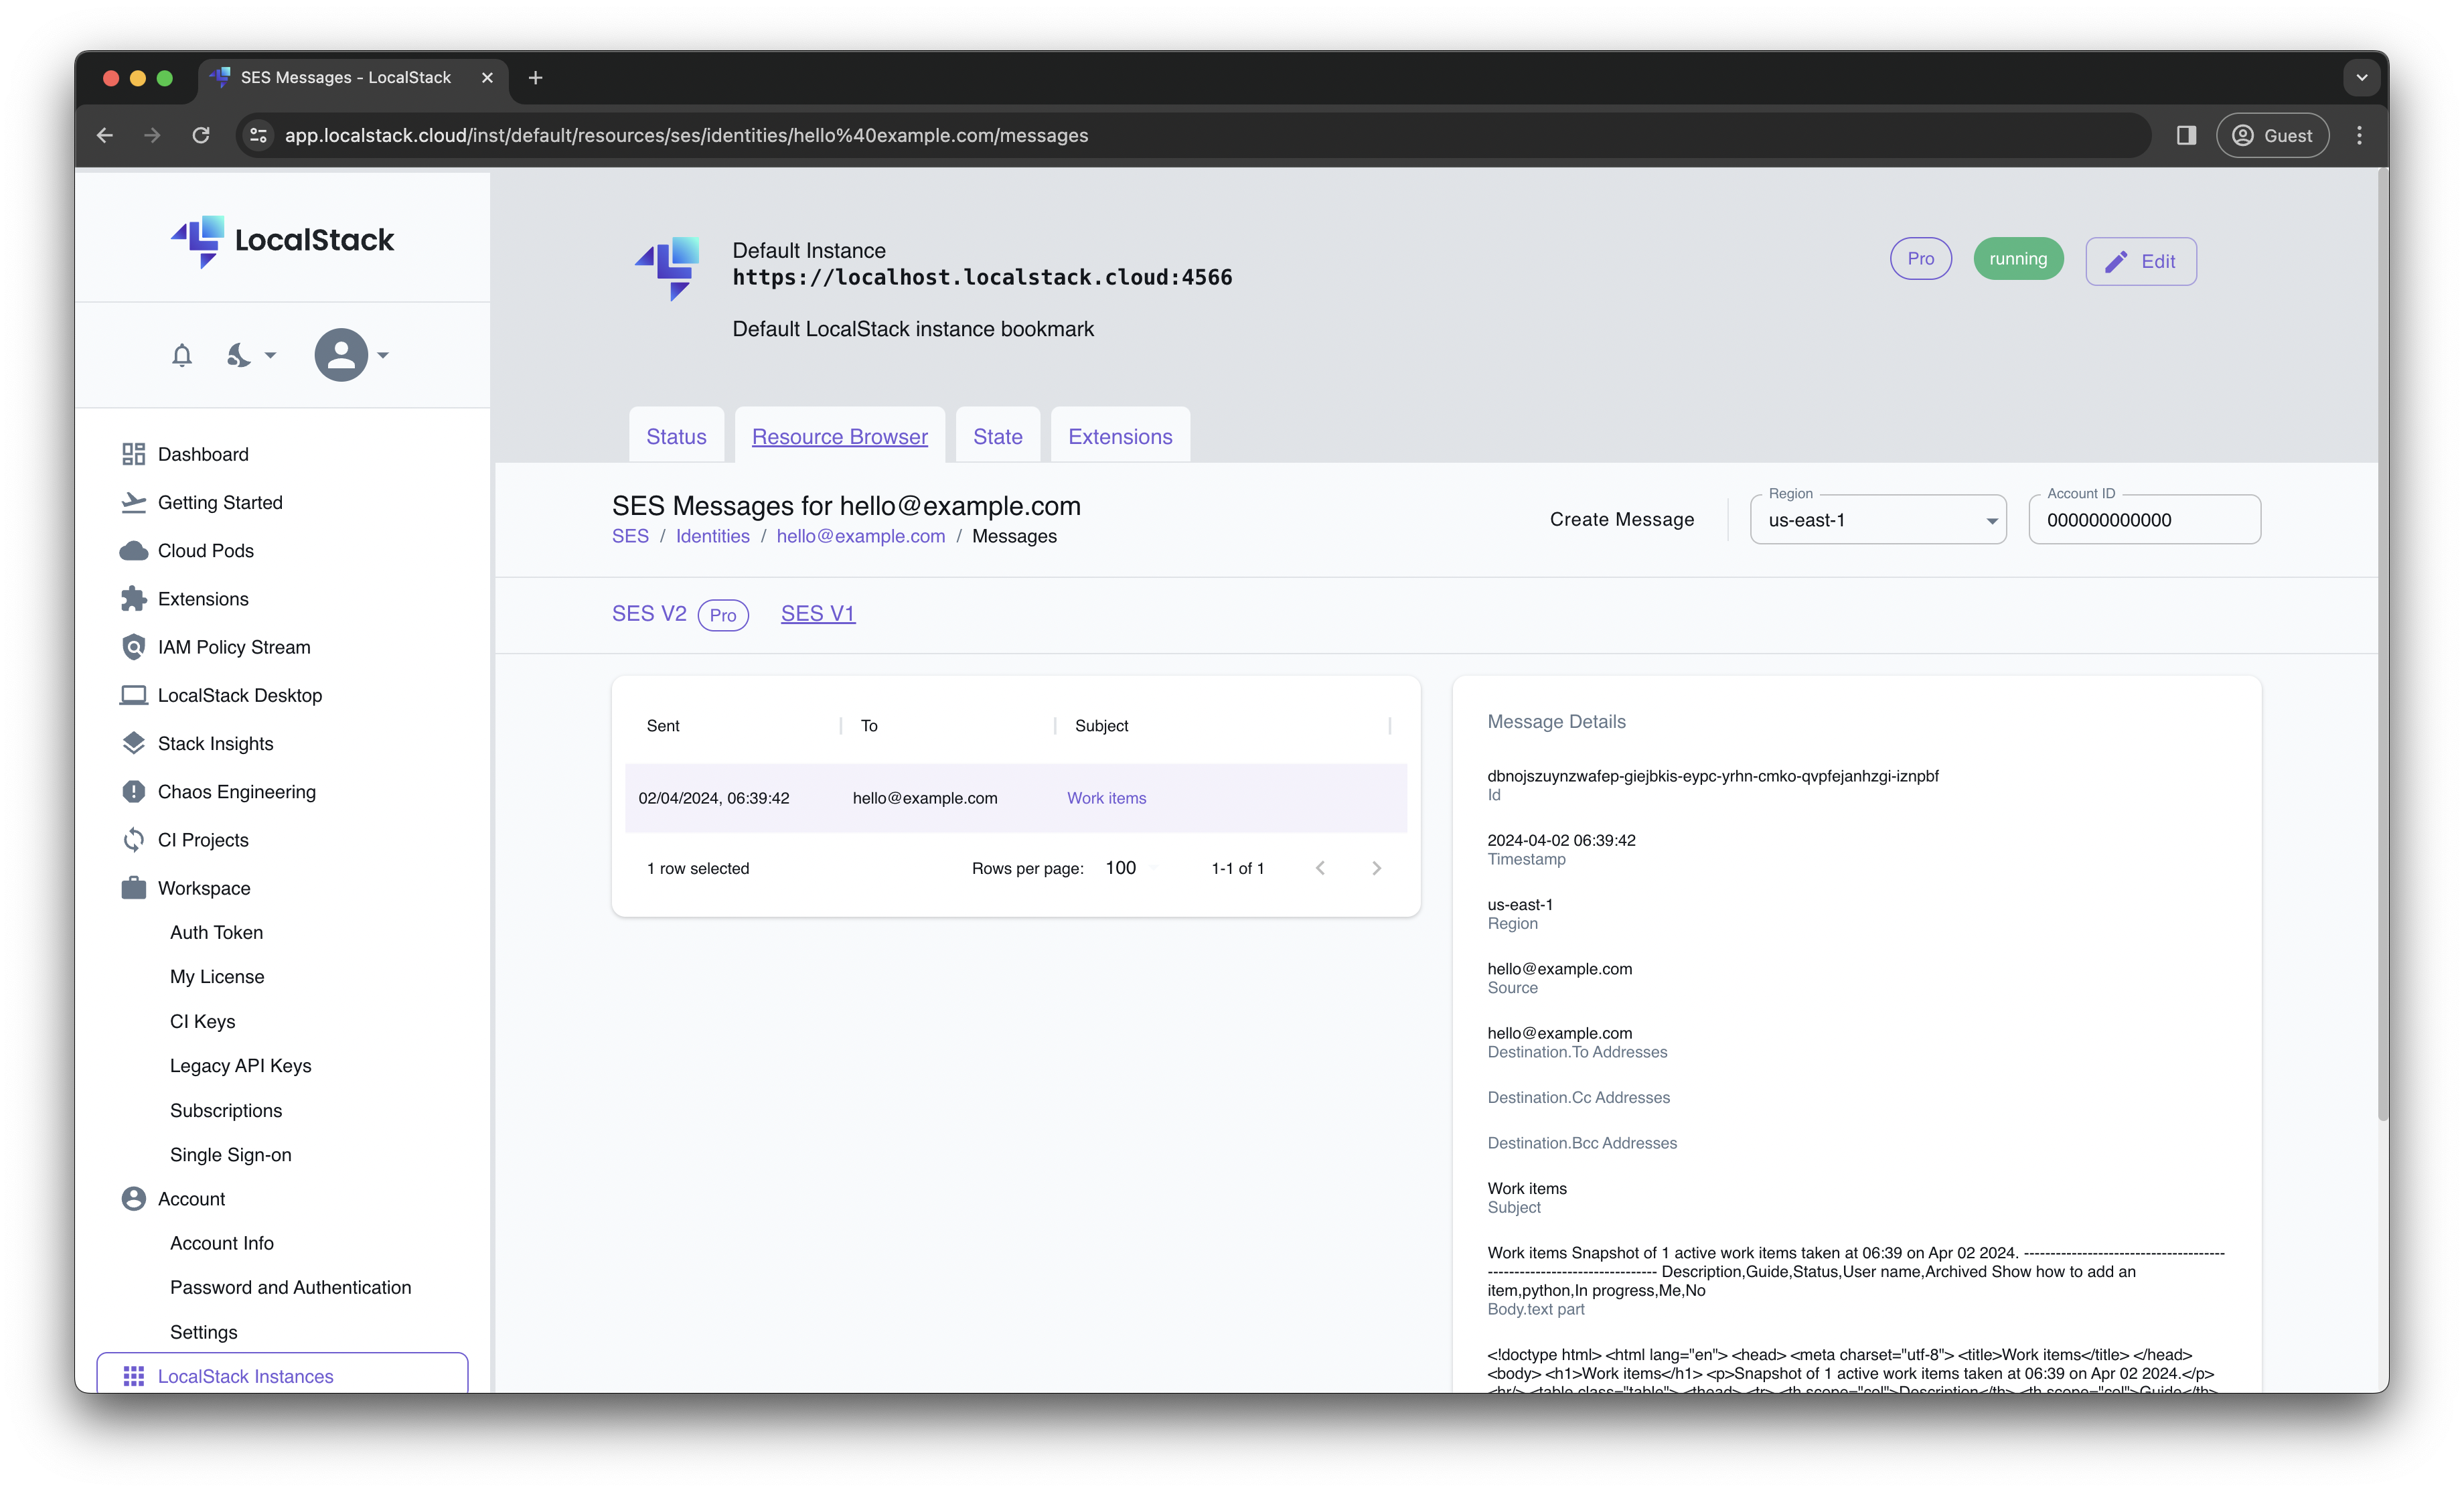
curl -X GET http://localhost:8080/api/items?archived=falseYou can fetch an email report by adding hello@example.com in the Email Report tab and clicking Send report. Navigate to the LocalStack Web Application, and you’ll be able to find the sent emails on the SES Resource Browser.
You can also scan the DynamoDB table you have deployed using the following command:
awslocal dynamodb scan --table-name doc-example-work-item-trackerIn the output, you will find the persisted data available.
Configure your application on Shipyard
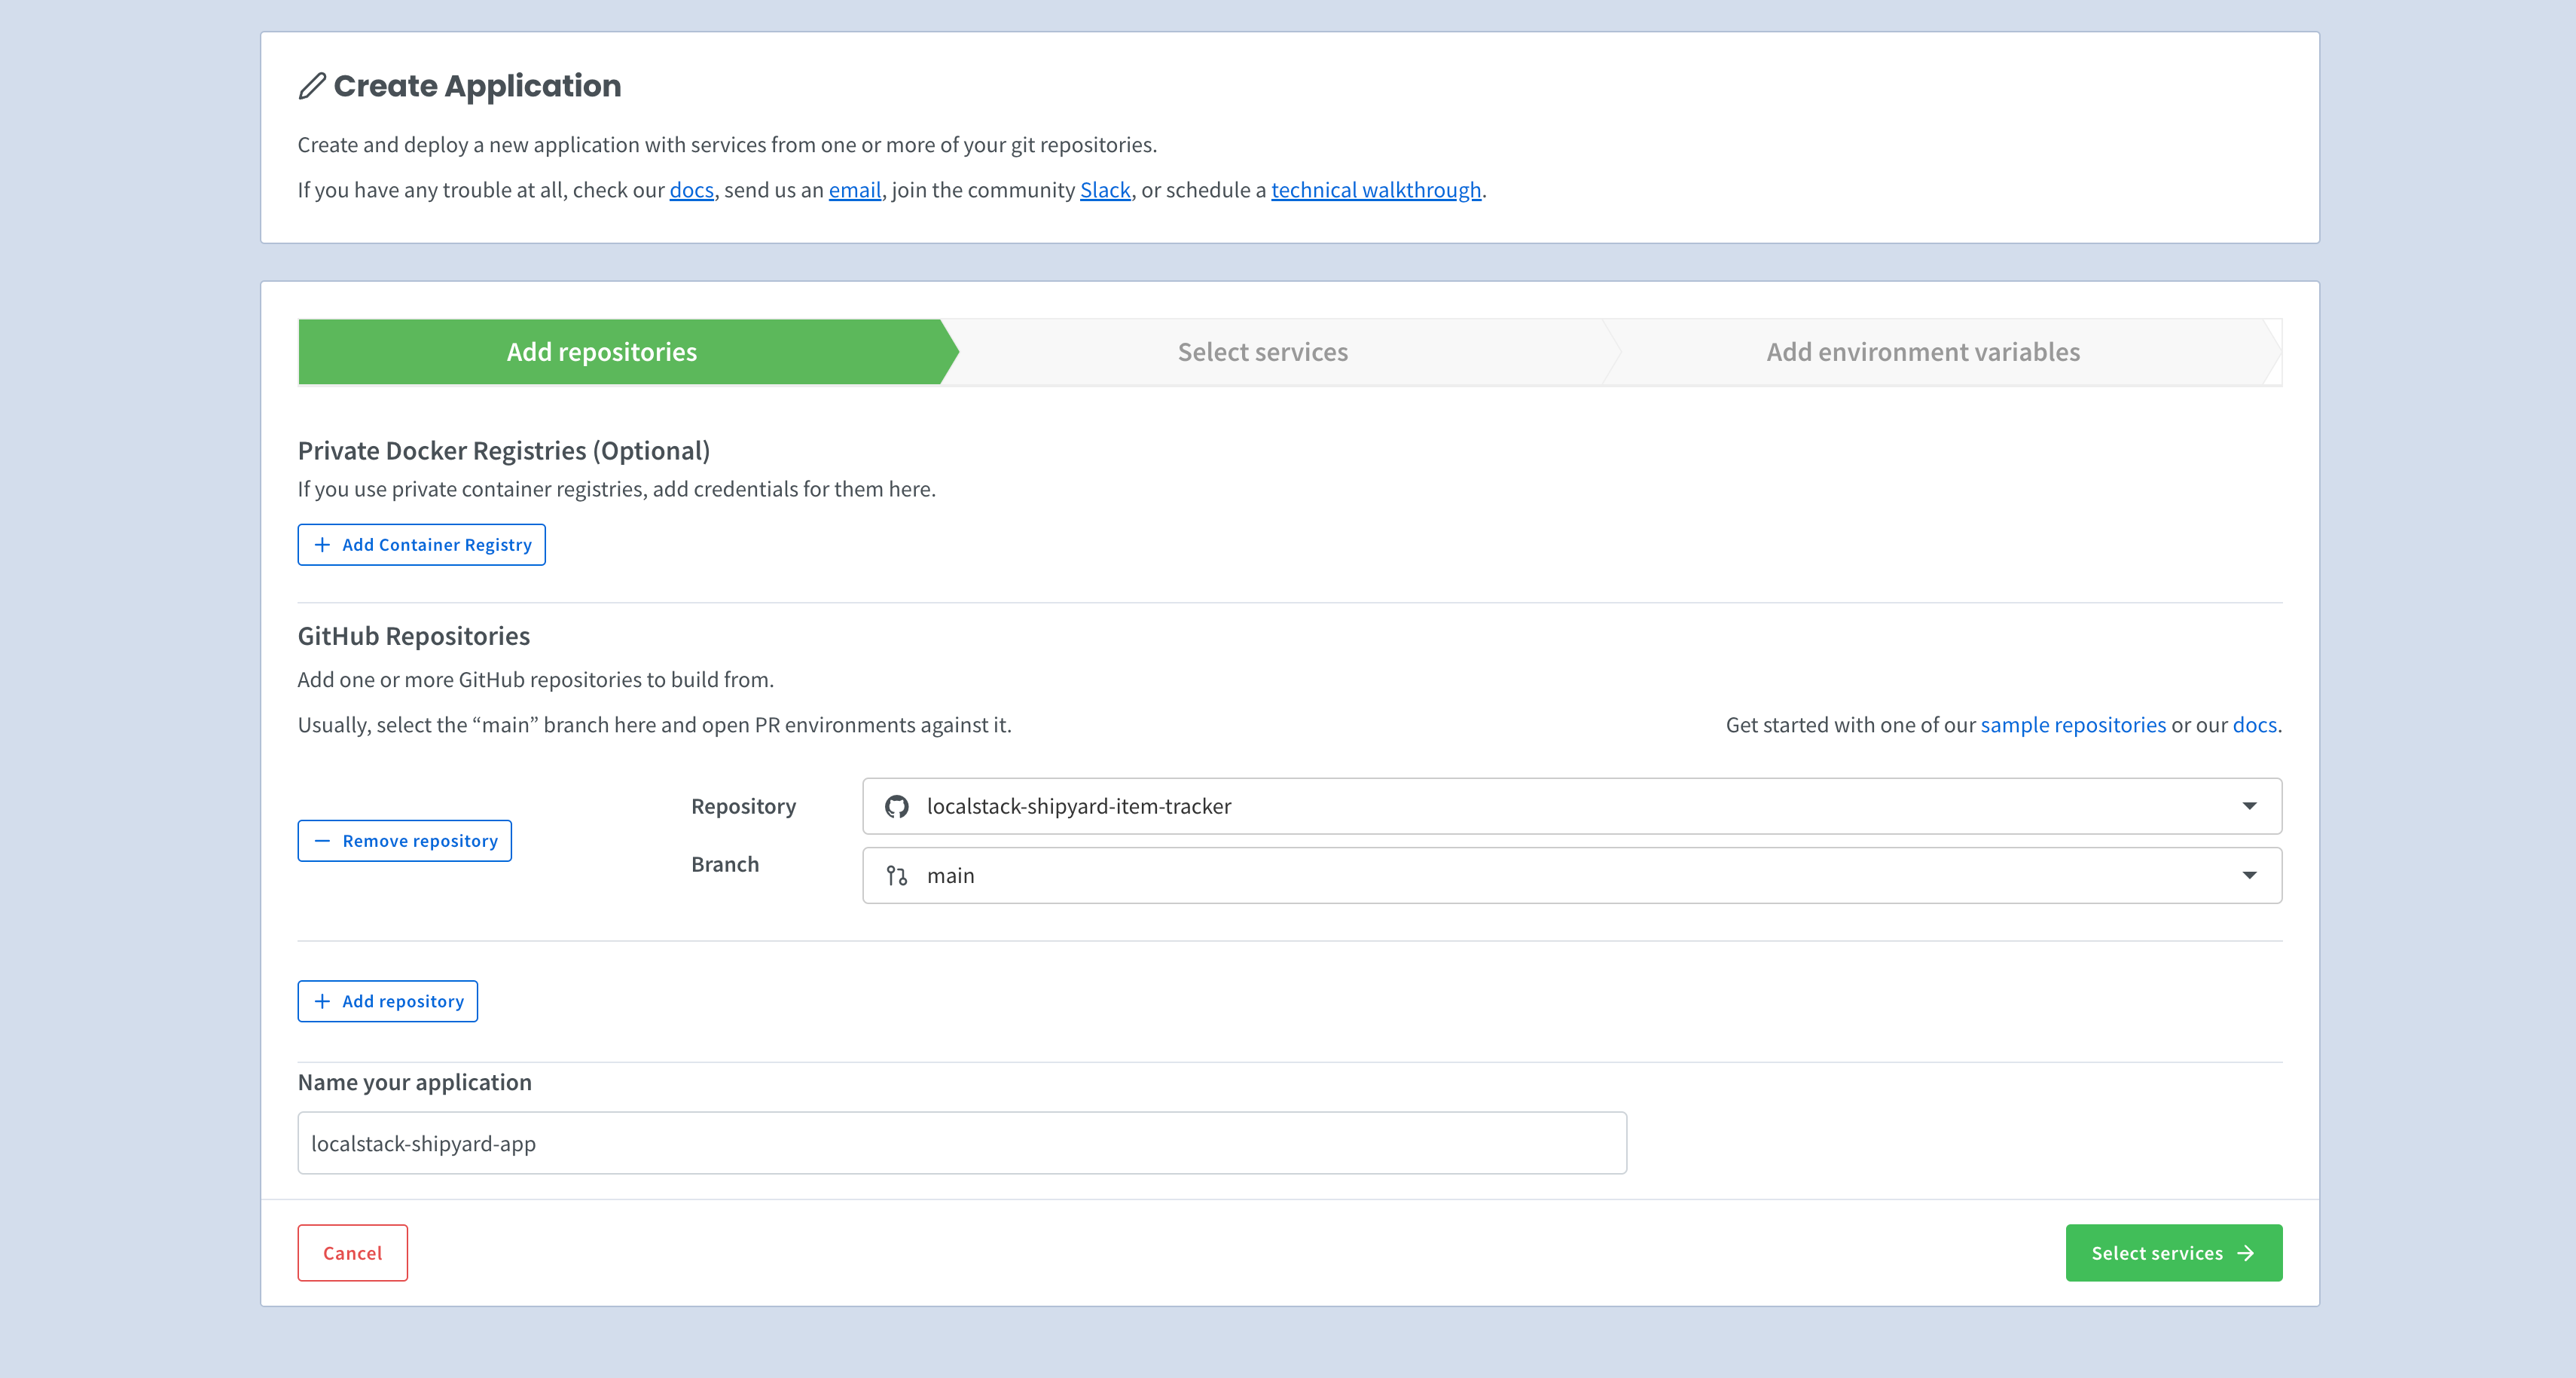
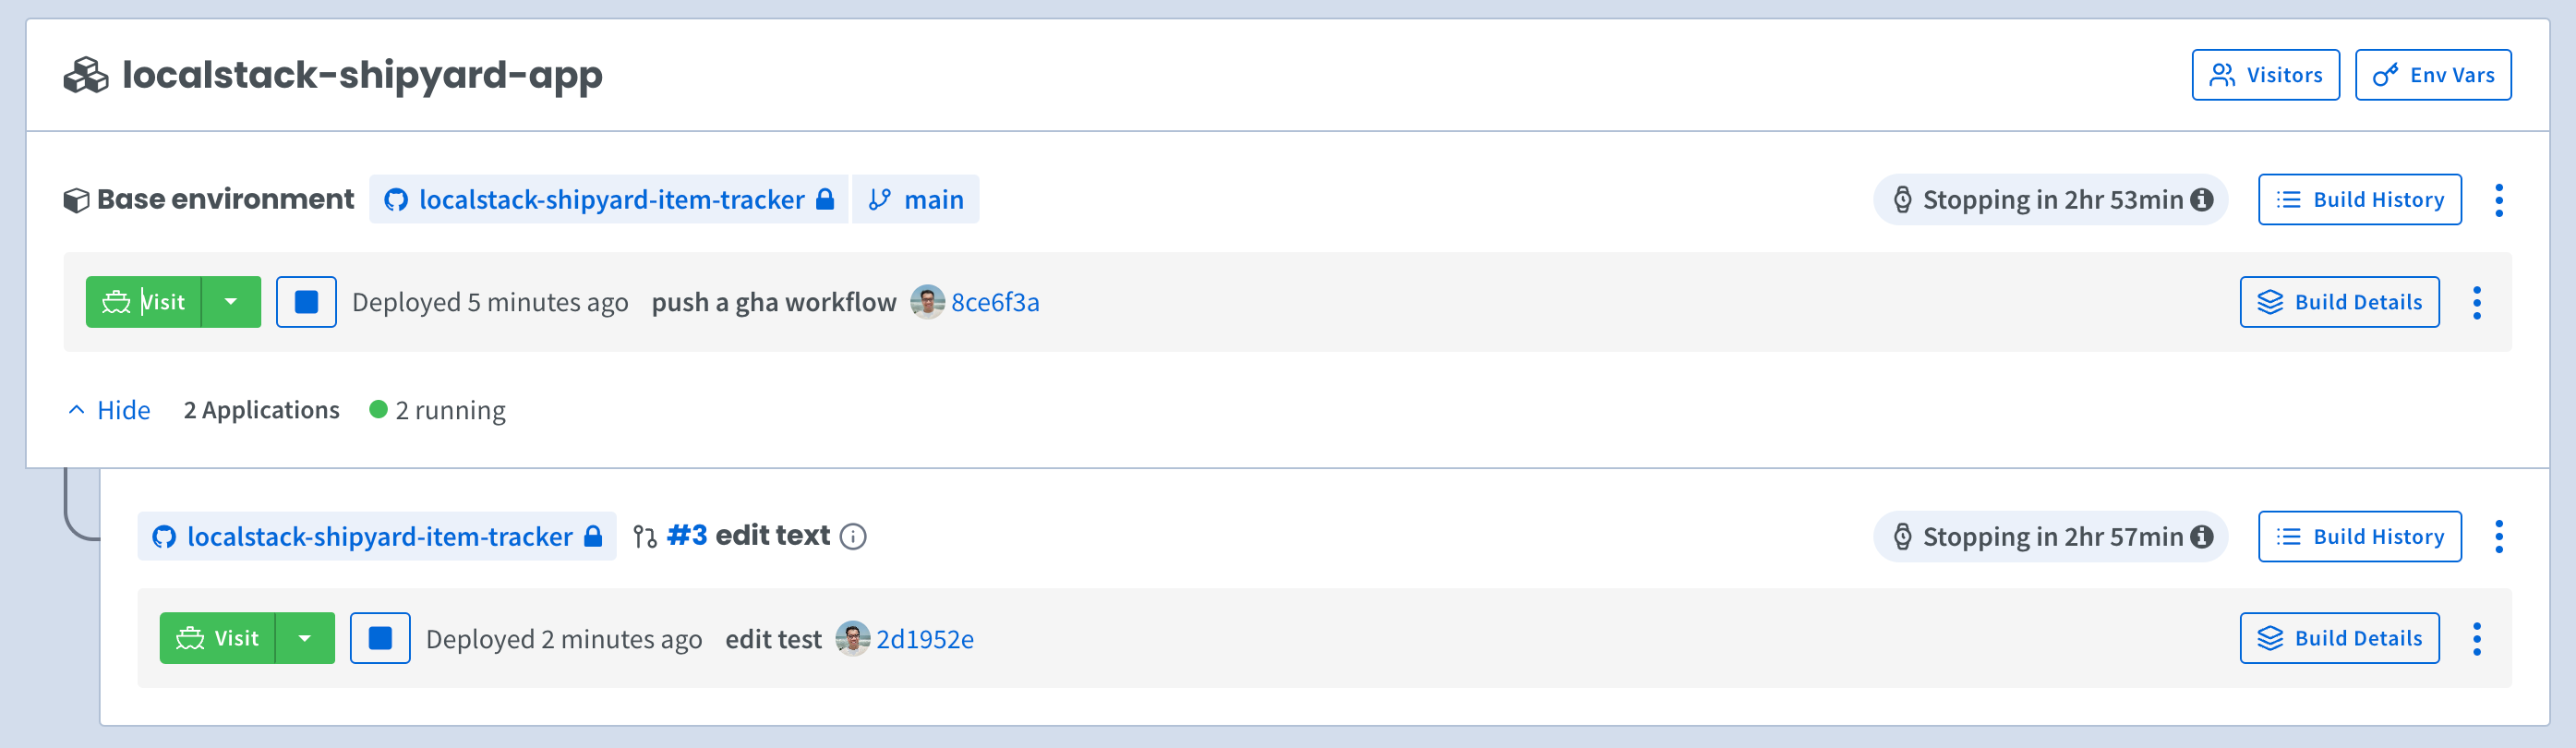
You can now create an ephemeral environment for your cloud application on Shipyard. Navigate to your Shipyard dashboard and click on + Application. Choose the GitHub repository you have forked and the main branch to start.
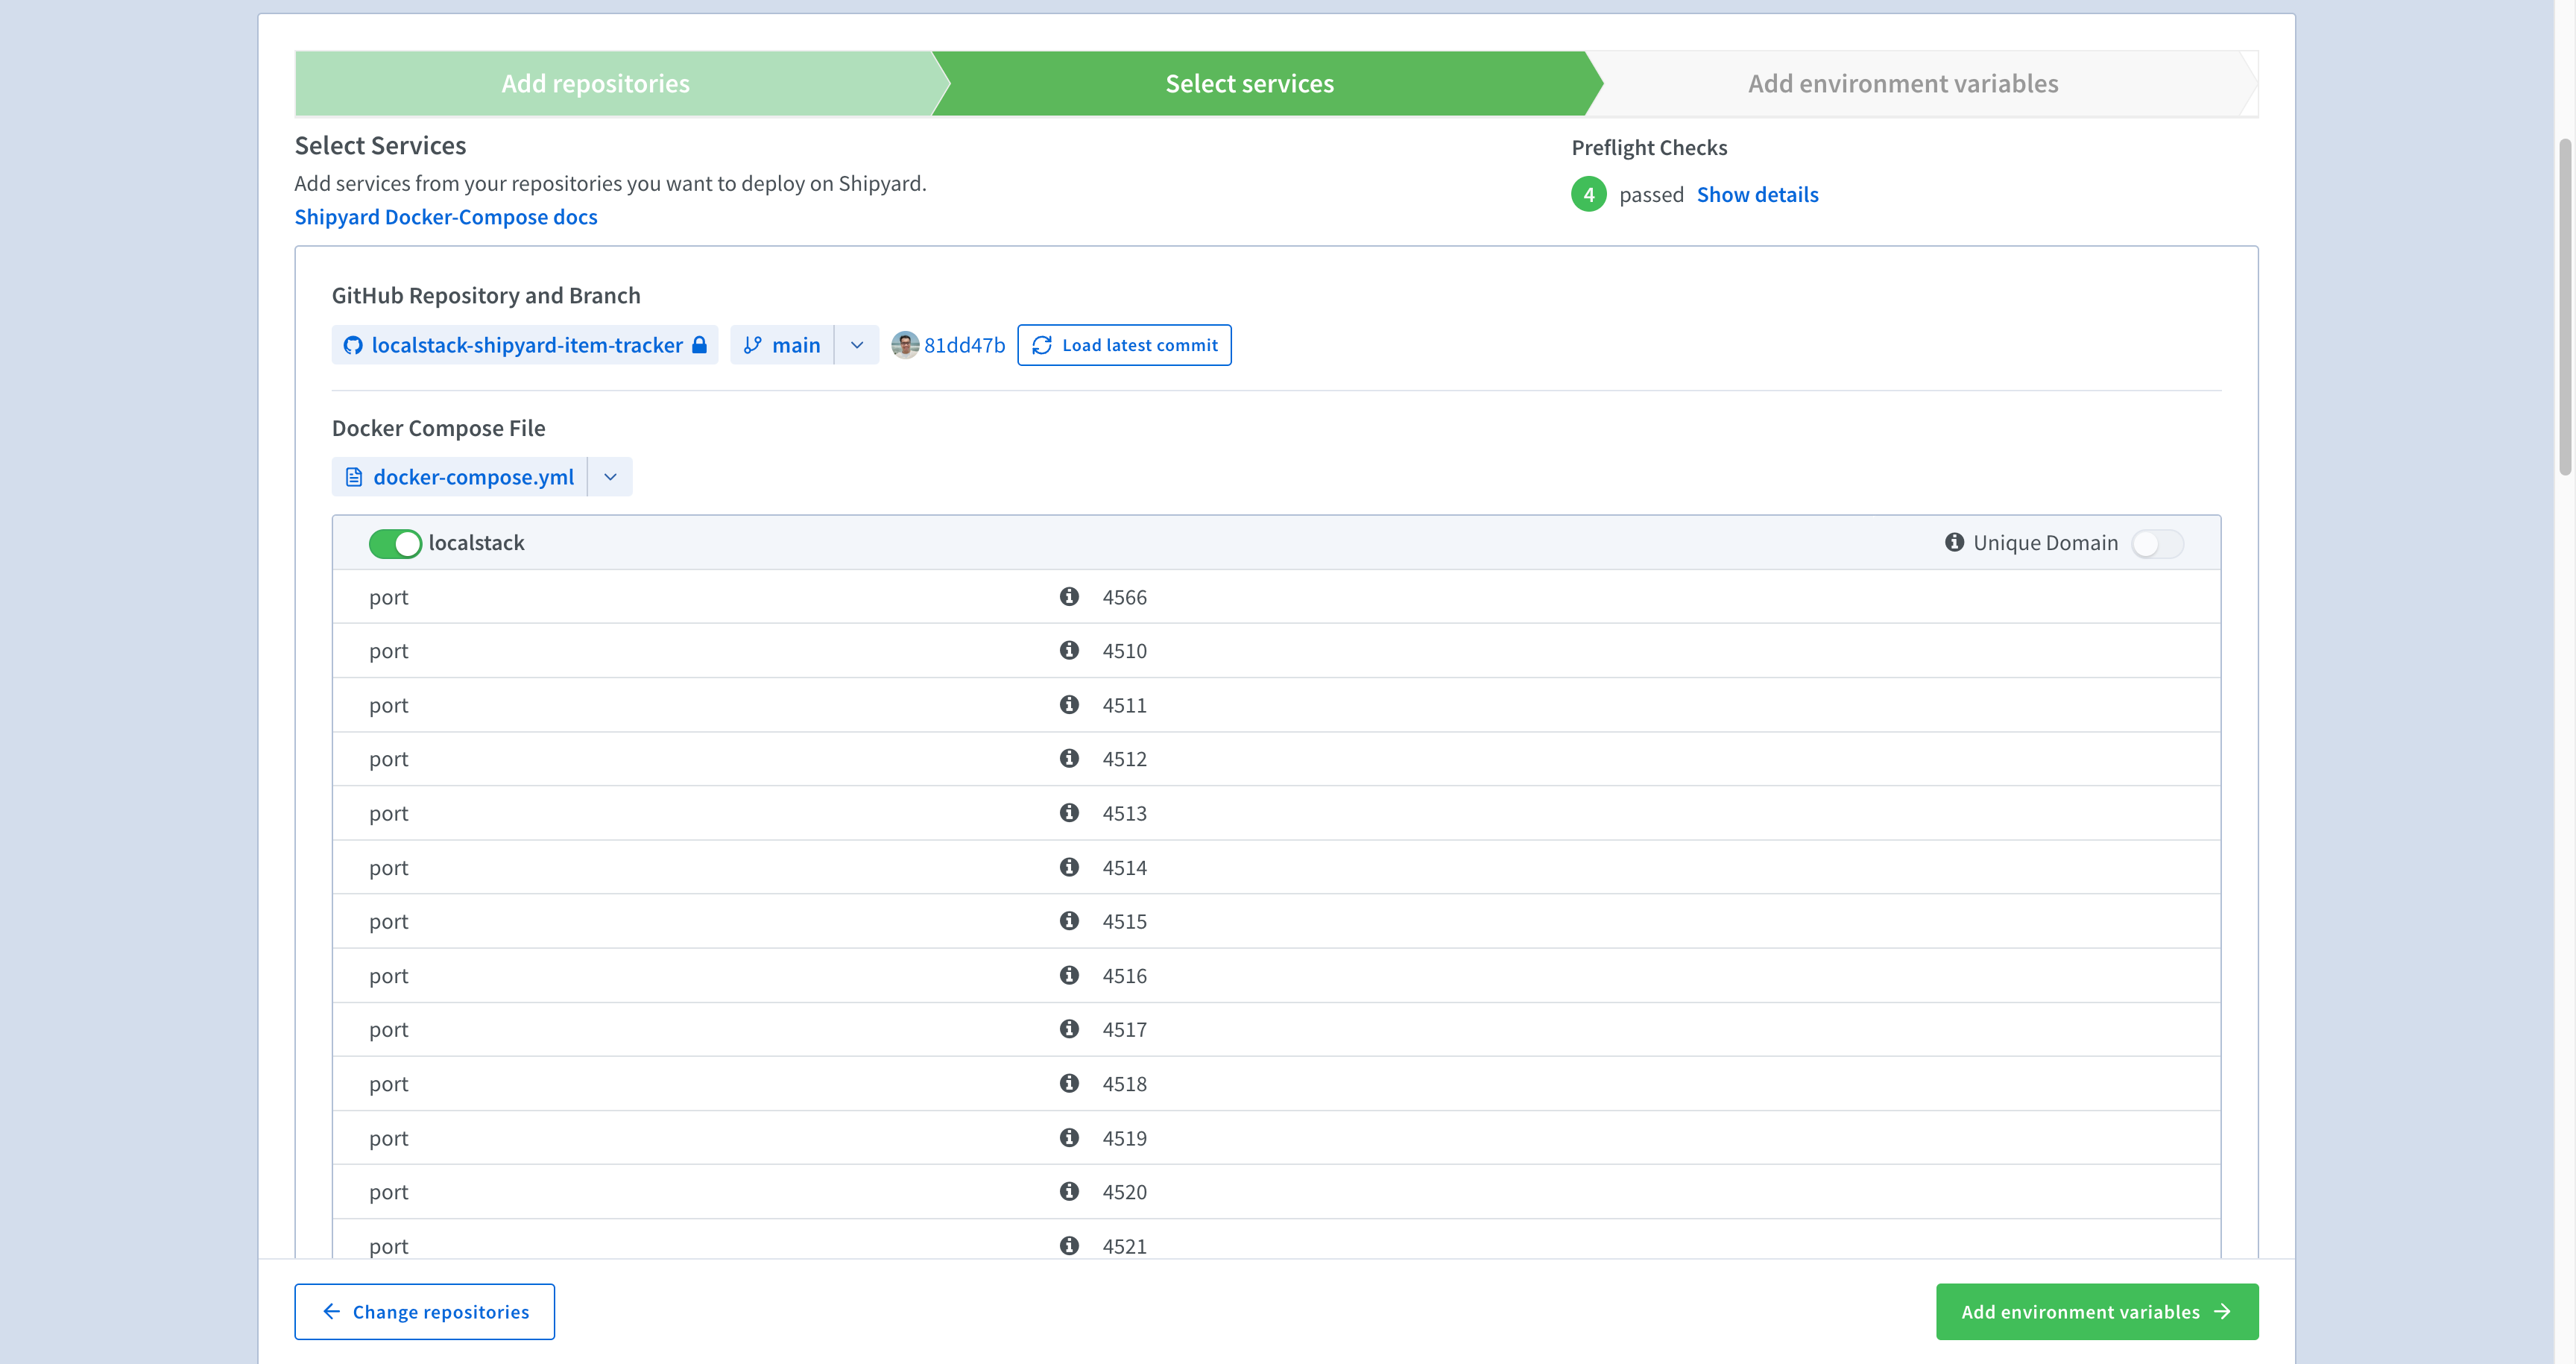
Click on the Select services to add services that you would like to deploy. These services are automatically selected from the Docker Compose configuration.
Click on the Add environment variables to go to the next step, and add the LOCALSTACK_AUTH_TOKEN as an environment variable to authenticate with LocalStack. Finally, click on Create application to get started with the first build of your application! After a successful build, you can now click on the Visit button on your application dashboard to navigate to the deployed application.
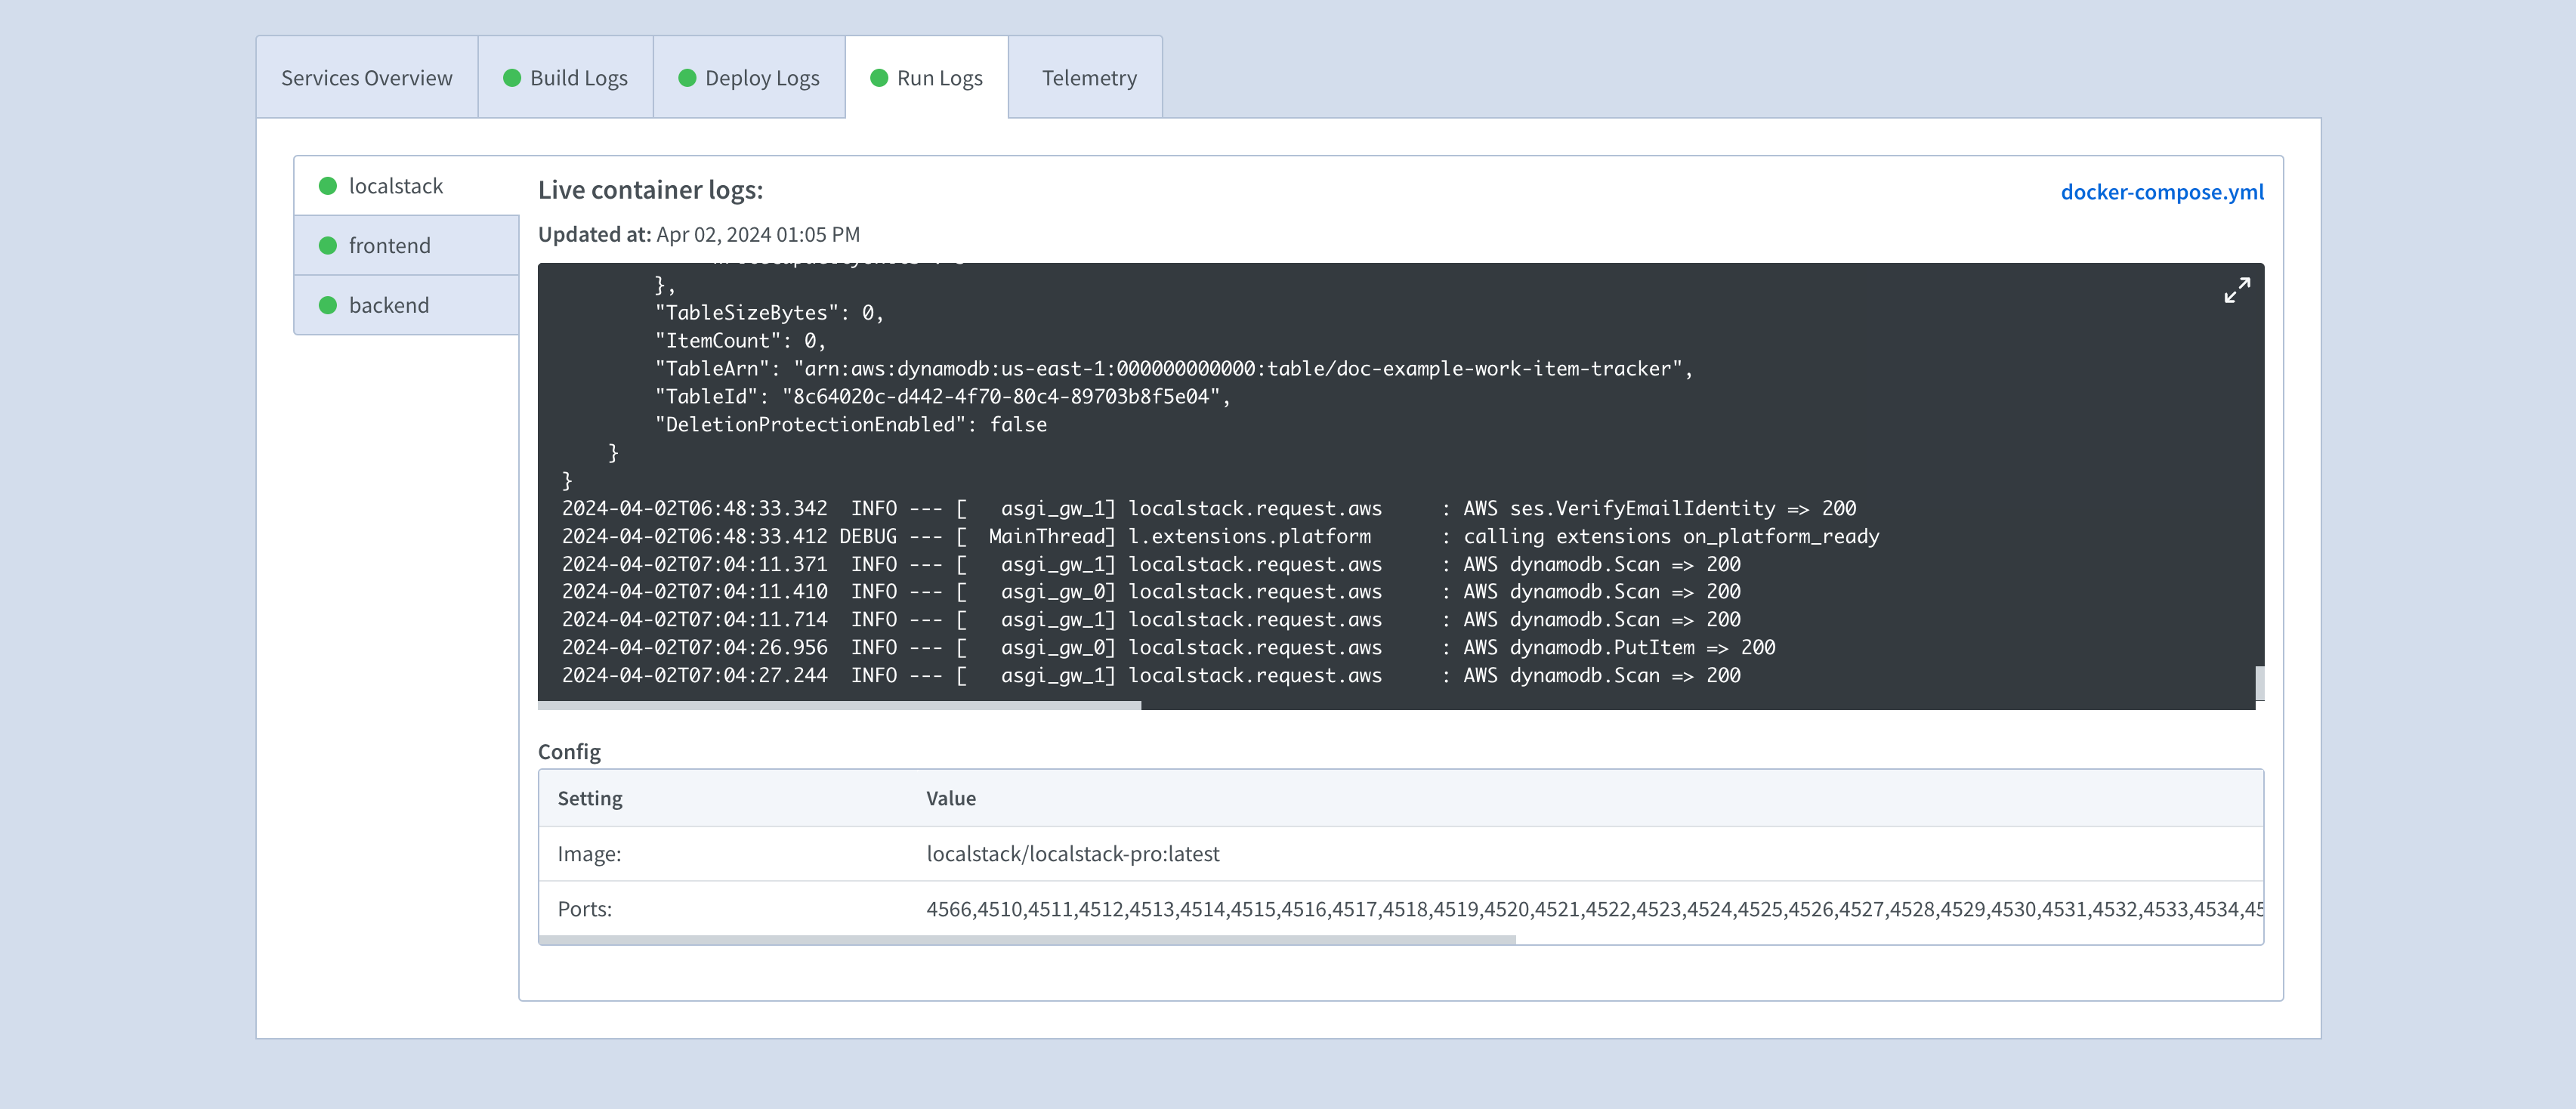
You can start interacting with the application, and review the run logs for your application’s services.
Enable previews for your ephemeral environments
You can now create previews for your ephemeral application deployed on Shipyard. The preview follows the lifecycle of a pull request (PR), and makes sure that:
- A new ephemeral environment is deployed in Shipyard with the new commits in the PR.
- The PR is updated with the deployed application URL and the build details for quick debugging.
The sample repository above has already been configured with a sample GitHub Action workflow. The workflow looks like this:
name: Deploy on Shipyard
on: [pull_request]
jobs:  deploy:    runs-on: ubuntu-latest    name: Deploy    steps:      - name: Checkout        uses: actions/checkout@v2      - name: Integrate Shipyard        uses: shipyard/shipyard-action@1.0.0        env:          SHIPYARD_API_TOKEN: ${{ secrets.SHIPYARD_API_TOKEN }}          SHIPYARD_APP_NAME: "localstack-shipyard-item-tracker"
The workflow uses the SHIPYARD_API_TOKEN. Add it to your forked GitHub repository using secrets in GitHub Actions.
Now create a new branch in your local repository, and make a small change. After making the changes, stage it, push the commits into the branch and create a new pull request. Shipyard will automatically start a new ephemeral deployment. You can see the workflow’s status and logs in the checks section of the pull request. After a few seconds, the workflow will add the preview URL. Click on it to see your changes in real time.
Use Cloud Pods to pre-seed infrastructure state
In various testing scenarios, you might often feel the need to create test fixtures or additional resources to bootstrap your testing environment and test your application. LocalStack’s Cloud Pods can facilitate and dramatically simplify this task. Cloud Pods allow you to take a snapshot of the state at any point in time, and then selectively restore, merge, and inject it into your LocalStack container.
In this scenario, you can pre-seed your previews with the DynamoDB state using a Cloud Pod that contains the state and configuration of the DynamoDB table. This Cloud Pod would be available in the Cloud Pod storage space on the LocalStack Web Application and can be used in CI to bootstrap the testing environment where the application is then deployed and tested. Moreover, each developer can pull the same Cloud Pod and run some local tests.
To create a Cloud Pod, navigate to the local application and run the following script that inserts some sample data into your DynamoDB table:
./scripts/seed.shYou can now take an infrastructure snapshot with the Cloud Pods using the following command:
localstack pod save item-tracker-applicationYou will see the following output in your terminal:
Cloud Pod `item-tracker-application` successfully created ✅Version: 1Remote: platformServices: dynamodb,sesYou can also navigate to the Cloud Pods browser, where you can find the newly created Cloud Pod stored on the LocalStack Web Application. Navigate to the local application setup, and add the following to your Docker Compose configuration file to auto-load the Cloud Pod, using the AUTO_LOAD_POD configuration, and remove the initialization hook.
AUTO_LOAD_POD=item-tracker-applicationThis will ensure that on the LocalStack container startup, the Cloud Pod will be loaded automatically thus pre-seeding your infrastructure state. The Docker Compose configuration will look like this:
environment: - LOCALSTACK_AUTH_TOKEN=${LOCALSTACK_AUTH_TOKEN:?} - DEBUG=1 - DOCKER_HOST=unix:///var/run/docker.sock - EXTRA_CORS_ALLOWED_ORIGINS='*' - AUTO_LOAD_POD=item-tracker-applicationvolumes: - "localstack:/var/lib/localstack" - "/var/run/docker.sock:/var/run/docker.sock"Commit and push this on the main branch of the repository. After a successful build & deployment, you can now visit the newly deployed application, to find the DynamoDB table successfully seeded in the application setup, which is further reflected in the web client.
In addition to preseeding your Shipyard environment, Cloud Pods can also be used at the “other end” of a pipeline, namely to store and push the state of the LocalStack instance after an ephemeral run has been completed. This allows you to replicate the same state onto the local machine, in case your integration test suite fails on the ephemeral environment.
Key Benefits
There are several key benefits of using Shipyard and LocalStack to develop & test cloud applications:
- Improve the development process for cloud infrastructure by allowing developers to test code changes in isolation and iterate quickly.
- Save time and money by eliminating the need to wait for staging to be configured and blocking other team members during the process.
- Facilitate collaboration across different teams by providing a freshly-configured pre-production environment for everyone to work in.
- Run your automated end-to-end (E2E) test suite and pre-seed your infrastructure & application state to allow more thorough testing.
- Streamline the login process (SSO) for your team to prevent anyone outside your organization from accessing your environments.
Conclusion
Congratulations! You’ve successfully deployed an AWS-powered cloud application on an ephemeral environment using LocalStack & Shipyard. With LocalStack, you don’t have to worry about losing your infrastructure state after tearing down your ephemeral environments after a quick round of testing. LocalStack allows you to persist the resources created on the host machine for extensive testing and further use Cloud Pods to pre-seed the infrastructure state as and when required!
You can further explore Shipyard and their offering for various use cases such as:
- Adding Datadog logging and integrating with LocalStack’s serverless resources, such as Lambda, EventBridge, SQS, and more.
- Using Shipyard’s volume management to revert the data in case of regression and load them across sibling environments.
- Monitoring key infrastructure metrics such as an overview of build and deploy times, CPU/Memory usage, and deployment timeline.
If you have any questions about configuring and running your project, drop by Shipyard or LocalStack community. We would love to hear your feedback about this integration. Happy cloud testing!