Developing cloud AI-powered apps with LocalStack and Ollama
Integrating Ollama and LocalStack offers a powerful solution for developing and testing cloud AI applications cost-effectively. Ollama simplifies interactions with large language models, while LocalStack emulates AWS services locally, allowing developers to thoroughly test and validate AI functionalities in a controlled environment.
Introduction
In today’s tech landscape, large language models (LLMs) and AI are transforming both tech-centric and traditional businesses. AI functionality is being integrated across various platforms to enhance user experience. However, developing and testing these AI integrations often requires extensive infrastructure, leading to high costs. LocalStack enables developers to build and test AI integrations locally, which accelerates the development process and avoids extra expenses.
In this tutorial, we’ll explore building an AI-powered chatbot using Ollama, a tool that lets users interact with information through natural language. For instance, on a government website, rather than navigating complex menus, you could ask a chatbot to find a specific form. We’ll start by setting up the entire system locally with LocalStack, then move to deploying it in the cloud.
Prerequisites
- AWS free tier account
- LocalStack account with a valid Auth Token
- Docker - for running LocalStack
- AWS CLI and AWS CLI local
- npm - for building the frontend app
Architecture Overview
To follow along with this post and get the React app, you can clone the repository for this project.
We will explore a comprehensive example of running Ollama on ECS Fargate. This example includes a backend with a VPC, a load balancer, multiple security groups, and an ECR service hosting our image. For simplicity, the frontend application will be a basic chat interface with a prompt field and an answer box.
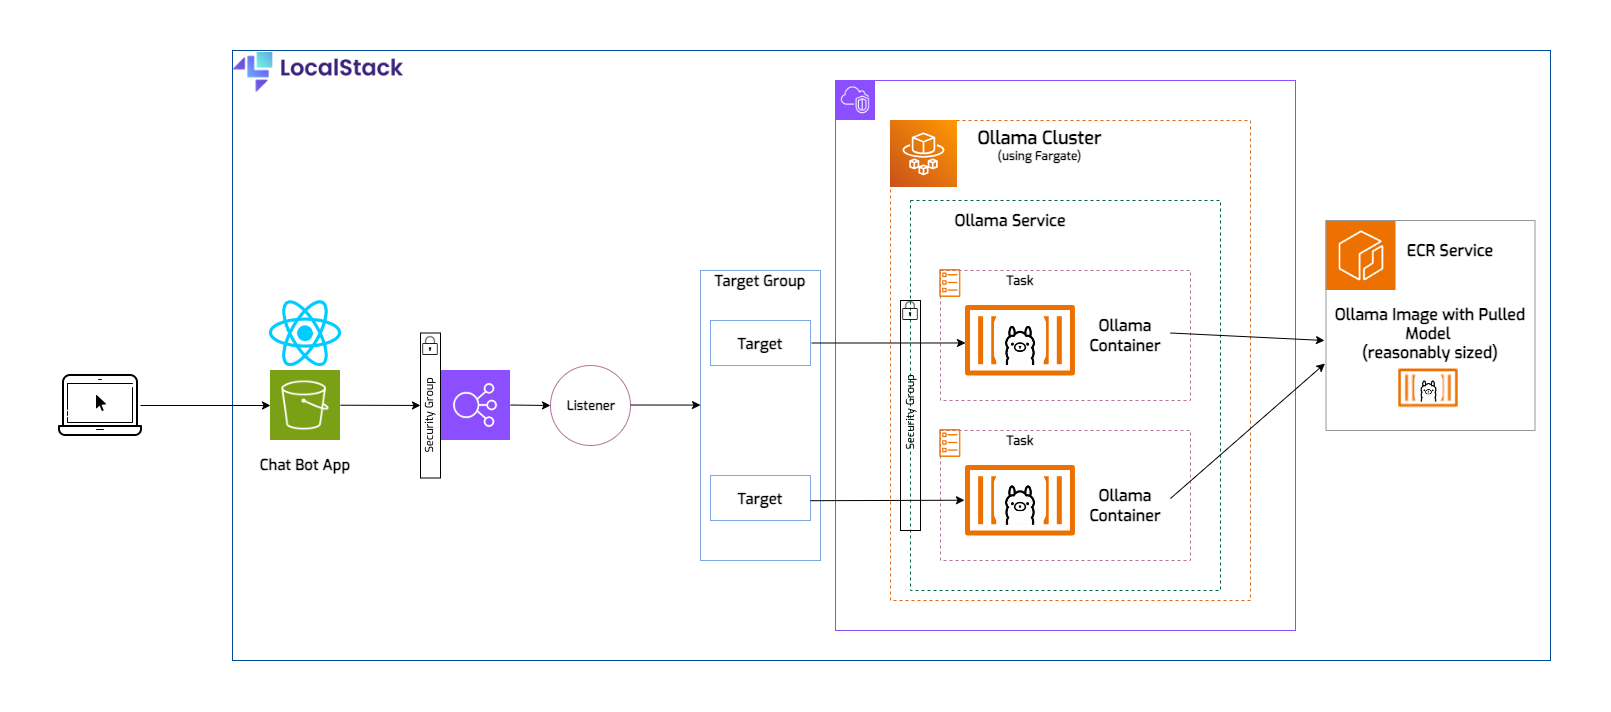
The React application could make a direct request to our Ollama container, but in the real world it’s not likely that you would run just one task and certainly not trying to access the container using its IP address. Ideally you should have multiple tasks running to ensure high availability, in case one of them encounters an issue, you can always rely on the others to take over. In front of the tasks you’ll need an application load balancer to handle the HTTP requests. This is how traffic is distributed across the containers. The load balancer will have a listener, which listens for client requests. The requests are routed to targets, which will be the IPs for the tasks/containers. The targets live in a target group, and that allows us to make configurations for all of them (for example, setting a routing algorithm, or healthcheck related configs). Our load balancer needs a security group that allows inbound traffic, and a second security group that only allows incoming traffic to the ECS service, which will run two tasks.
Why Ollama & Tinyllama

Ollama is an open-source platform that allows users to run large language models (LLMs) locally on their devices. In its essence, Ollama streamlines the tasks of downloading, installing, and utilizing a broad spectrum of LLMs, enabling users to discover their potential without requiring deep technical skills or dependence on cloud-based platforms. Most importantly, Ollama allows users to run their own specialized LLMs with ease.
Both tools are designed for local development, so using Ollama with LocalStack for building cloud applications offers several advantages:
-
Complete local development environment: Combining Ollama and LocalStack allows developers to run complex cloud applications entirely on their local machines. Ollama can handle large language models locally, while LocalStack handles the AWS services, creating a comprehensive and integrated local development environment.
-
Cost efficiency: Running applications locally avoids the costs associated with cloud resources during development and testing. This is particularly useful when working with large language models that can be resource-intensive and expensive to run in the cloud.
-
Faster iteration cycles: Local development with Ollama and LocalStack allows for rapid prototyping and testing. Developers can quickly make changes and see results without the delay of deploying to the cloud. This speeds up the development cycle significantly.
-
Consistent development and production environments: By using LocalStack to emulate AWS services, developers can ensure that their local development environment closely matches the production environment. This reduces the risk of environment-specific bugs and improves the reliability of the application when deployed to the actual cloud.
-
Improved Testing Capabilities: LocalStack provides a robust platform for testing AWS services, including ECS and Fargate. Running Ollama as a Fargate task on LocalStack allows for testing complex deployment scenarios and interactions with other AWS services, ensuring that the application behaves as expected before deploying to the cloud.
Tinyllama is a compact AI language model that stands out due to its efficient size and robust training. It occupies just 637 MB and was trained on a trillion tokens, making it not only mobile-friendly but also powerful enough to surpass similar-sized models. Designed as a smaller version of Meta’s Llama 2, it shares the same architecture and tokenizer, making it an ideal choice for development and testing, particularly with applications demanding a restricted computation and memory footprint. Depending on your needs, you can also replace it with a different, or more specialized model.
Running the application on LocalStack
Starting LocalStack
First thing we need to do is start LocalStack by using docker compose. This permits an easy visualisation of all the necessary configs.
Remember to set your LOCALSTACK_AUTH_TOKEN as an environment variable.
cd localstackexport LOCALSTACK_AUTH_TOKEN=<your_auth_token>docker compose upSome important configs
All the following configuration flags can be found in the docker-compose.yml file, in the localstack folder:
- DEBUG=1 - This flag enables debug mode in LocalStack. When set to 1, LocalStack provides more detailed logs, making it easier to trace issues.
- ENFORCE_IAM=1 - This configuration enables the enforcement of AWS IAM policies in LocalStack. Normally, LocalStack runs with simplified or no security checks to facilitate development.
- ECS_DOCKER_FLAGS=-e OLLAMA_ORIGINS=”*” - This setting is used to pass environment variables to Docker containers spawned by the ECS service within LocalStack. Specifically, we set OLLAMA_ORIGINS=”*” inside these containers to indicate that requests from any origin are allowed. This is relevant when integrating with web applications that may call APIs from various domains.
- DISABLE_CORS_CHECKS=1 - This flag disables CORS checks in LocalStack, for ease of development.
- DISABLE_CUSTOM_CORS_S3=1 - When set, this configuration disables the custom CORS handling for S3 services within LocalStack.
Building the React app
In the localstack folder, there’s a directory called frontend. To build the React application run
the following commands:
cd frontend/chatbot/npm installnpm run buildNotice the creation of the build folder. The npm run build command will create the static assets needed to run our
app, and they will then be uploaded to the S3 bucket.
Creating the stack
Now we can run the bash script containing AWS CLI commands to create the necessary resources. Let’s first have a look at some of the commands in the script and identify the resources they create:
export VPC_ID=$(awslocal ec2 create-vpc --cidr-block 10.0.0.0/16 | jq -r '.Vpc.VpcId')Creates a Virtual Private Cloud (VPC) with a specified CIDR block.
export SUBNET_ID1=$(awslocal ec2 create-subnet \  --vpc-id $VPC_ID \  --cidr-block 10.0.1.0/24 \  --availability-zone us-east-1a \  | jq -r '.Subnet.SubnetId')
export SUBNET_ID2=$(awslocal ec2 create-subnet \  --vpc-id $VPC_ID \  --cidr-block 10.0.2.0/24 \  --availability-zone us-east-1b \  | jq -r '.Subnet.SubnetId')
Creates two subnets within the VPC, each in a different availability zone.
export INTERNET_GW_ID=$(awslocal ec2 create-internet-gateway | jq -r '.InternetGateway.InternetGatewayId')
awslocal ec2 attach-internet-gateway \  --internet-gateway-id $INTERNET_GW_ID \  --vpc-id $VPC_ID
Creates an internet gateway and attaches it to the VPC.
export RT_ID=$(awslocal ec2 create-route-table --vpc-id $VPC_ID | jq -r '.RouteTable.RouteTableId')
awslocal ec2 associate-route-table \  --route-table-id $RT_ID \  --subnet-id $SUBNET_ID1
awslocal ec2 associate-route-table \  --route-table-id $RT_ID \  --subnet-id $SUBNET_ID2
awslocal ec2 create-route \  --route-table-id $RT_ID \  --destination-cidr-block 0.0.0.0/0 \  --gateway-id $INTERNET_GW_ID
Creates a route table, associates it with the subnets, and adds a route to the internet gateway.
export SG_ID1=$(awslocal ec2 create-security-group \  --group-name ApplicationLoadBalancerSG \  --description "Security Group of the Load Balancer" \  --vpc-id $VPC_ID | jq -r '.GroupId')
awslocal ec2 authorize-security-group-ingress \  --group-id $SG_ID1 \  --protocol tcp \  --port 80 \  --cidr 0.0.0.0/0
export SG_ID2=$(awslocal ec2 create-security-group \  --group-name ContainerFromLoadBalancerSG \  --description "Inbound traffic from the First Load Balancer" \  --vpc-id $VPC_ID \  | jq -r '.GroupId')
awslocal ec2 authorize-security-group-ingress \  --group-id $SG_ID2 \  --protocol tcp \  --port 0-65535 \  --source-group $SG_ID1
Creates security groups for the load balancer and the ECS service, allowing necessary traffic.
export LB_ARN=$(awslocal elbv2 create-load-balancer \  --name ecs-load-balancer \  --subnets $SUBNET_ID1 $SUBNET_ID2 \  --security-groups $SG_ID1 \  --scheme internet-facing \  --type application \  | jq -r '.LoadBalancers[0].LoadBalancerArn')
export TG_ARN=$(awslocal elbv2 create-target-group \  --name ecs-targets \  --protocol HTTP \  --port 11434 \  --vpc-id $VPC_ID \  --target-type ip \  --health-check-protocol HTTP \  --region us-east-1 \  --health-check-path / \  | jq -r '.TargetGroups[0].TargetGroupArn')
awslocal elbv2 create-listener \  --load-balancer-arn $LB_ARN \  --protocol HTTP \  --port 11434 \  --default-actions Type=forward,TargetGroupArn=$TG_ARN
Creates an internet-facing application load balancer and a target group, and sets up a listener to forward traffic.
awslocal ecr create-repository --repository-name ollama-serviceexport MODEL_NAME=tinyllamadocker build --build-arg MODEL_NAME=$MODEL_NAME -t ollama-service .docker tag ollama-service:latest 000000000000.dkr.ecr.us-east-1.localhost.localstack.cloud:4510/ollama-service:latestdocker push 000000000000.dkr.ecr.us-east-1.localhost.localstack.cloud:4510/ollama-service:latestCreates an ECR repository, builds the Docker image, and pushes it to the repository.
awslocal ecs create-cluster --cluster-name OllamaCluster
awslocal iam create-role \  --role-name ecsTaskRole \  --assume-role-policy-document file://ecs-task-trust-policy.json
export ECS_TASK_PARN=$(awslocal iam create-policy \  --policy-name ecsTaskPolicy \  --policy-document file://ecs-task-policy.json \  | jq -r '.Policy.Arn')
awslocal iam attach-role-policy \  --role-name ecsTaskRole \  --policy-arn $ECS_TASK_PARN
awslocal iam update-assume-role-policy \  --role-name ecsTaskRole \  --policy-document file://ecs-cloudwatch-policy.json
awslocal iam create-role \  --role-name ecsTaskExecutionRole \  --assume-role-policy-document file://ecs-trust-policy.json
export ECS_TASK_EXEC_PARN=$(awslocal iam create-policy \  --policy-name ecsTaskExecutionPolicy \  --policy-document file://ecs-task-exec-policy.json | jq -r '.Policy.Arn')
awslocal iam attach-role-policy \  --role-name ecsTaskExecutionRole \  --policy-arn $ECS_TASK_EXEC_PARN
awslocal iam update-assume-role-policy \  --role-name ecsTaskExecutionRole \  --policy-document file://ecs-cloudwatch-policy.json
Creates an ECS cluster and IAM roles with necessary policies for task execution.
awslocal logs create-log-group --log-group-name ollama-service-logsawslocal ecs register-task-definition \ --family ollama-task \ --cli-input-json file://task_definition.jsonCreates a CloudWatch log group and registers the ECS task definition.
awslocal ecs create-service \ --cluster OllamaCluster \ --service-name OllamaService \ --task-definition ollama-task \ --desired-count 2 \ --launch-type FARGATE \ --network-configuration "awsvpcConfiguration={subnets=[$SUBNET_ID1,$SUBNET_ID2],securityGroups=[$SG_ID2],assignPublicIp=ENABLED}" \ --load-balancers "targetGroupArn=$TG_ARN,containerName=ollama-container,containerPort=11434"Creates an ECS service with the specified configuration, linking it to the load balancer.
awslocal s3 mb s3://frontend-bucketawslocal s3 website s3://frontend-bucket --index-document index.htmlawslocal s3api put-bucket-policy --bucket frontend-bucket --policy file://bucket-policy.jsonawslocal s3 sync ./frontend/chatbot/build s3://frontend-bucketCreates an S3 bucket, configures it as a website, sets the bucket policy, and syncs the frontend build to the bucket.
If you decide to use the AWS console to create all your resources, some of the complexity of these commands will be abstracted, and some services will be created as dependencies of other resources.
You can run the full commands.sh script and watch the LocalStack logs for updated information on the resources, as they get created.
If you choose to, you can also manually run these commands, one by one, as you go through this article.
bash commands.shUsing the app locally
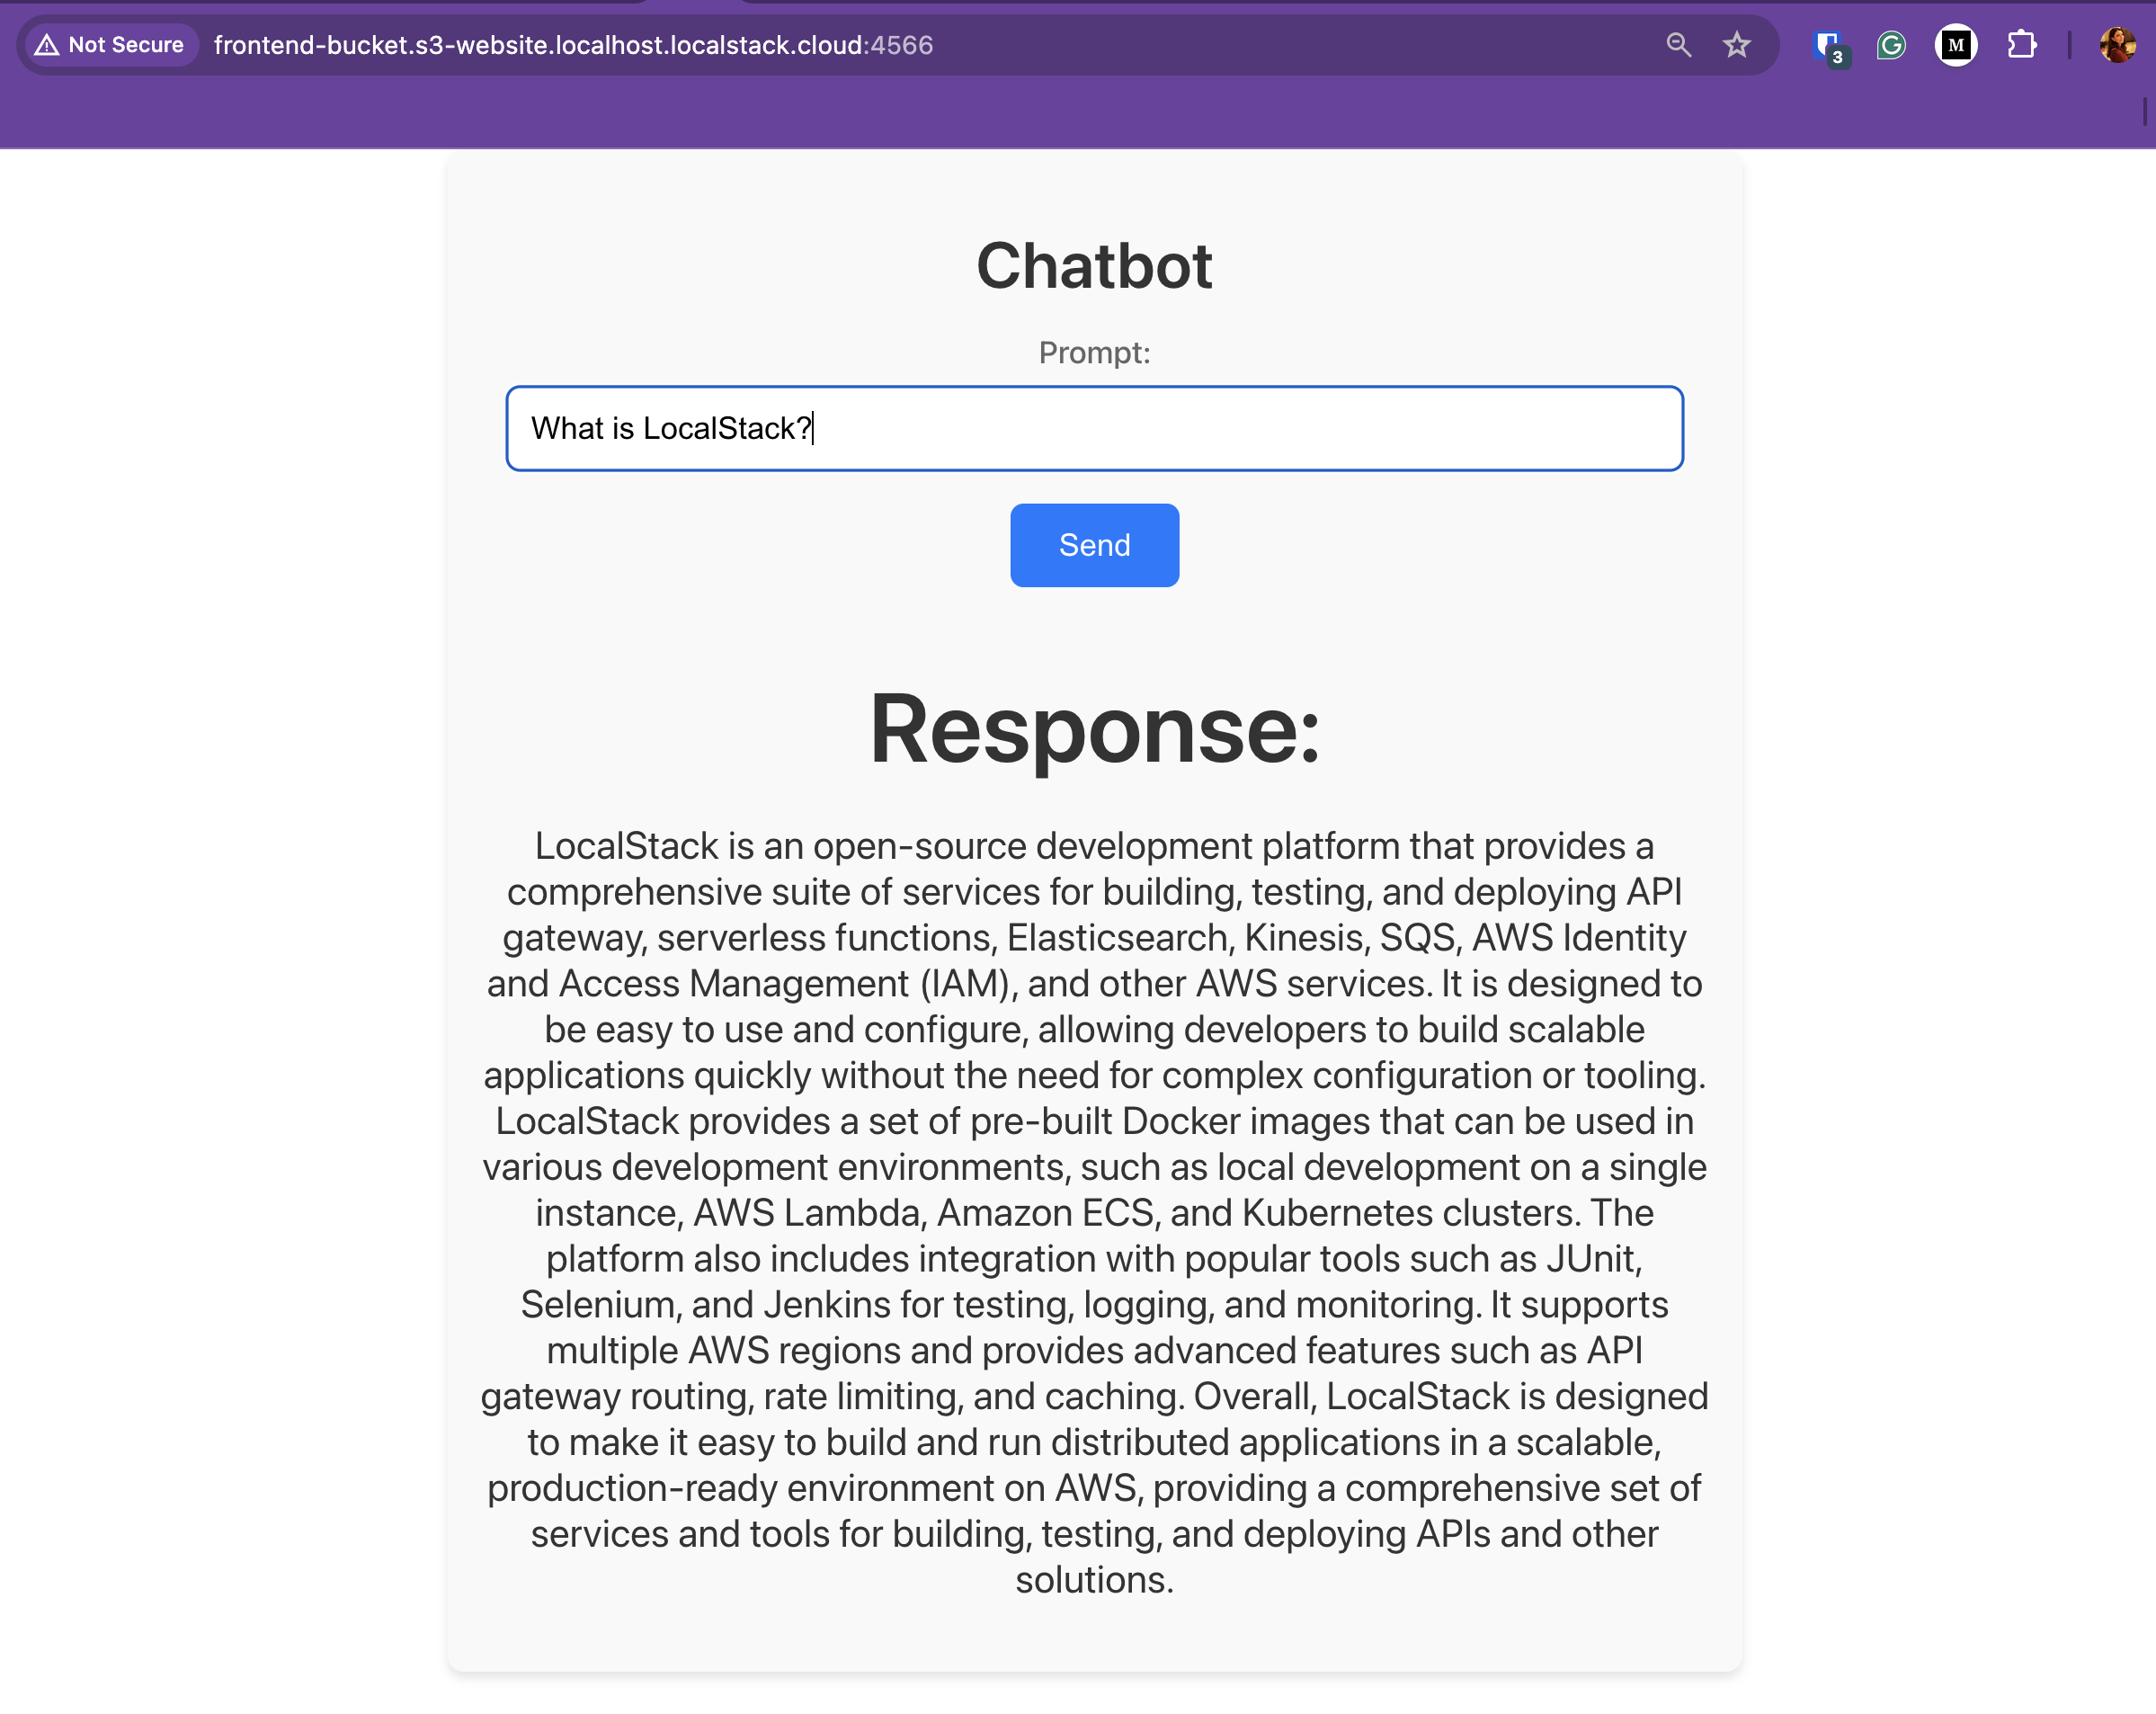
Now that everything is deployed, you can go to the frontend application and try it out. In your browser, navigate to
http://frontend-bucket.s3-website.us-east-1.localhost.localstack.cloud:4566/ and start typing your question. It takes a few seconds,
and then the full answer appears:
If you look at the App.js, located in frontend/chatbot/src, you’ll notice the POST call payload contains a field stream: false.
For simplicity purpose we’re going to receive our answer from the LLM “in bulk”, rather than streamed. This take a few seconds to
generate, and then it is fully received.
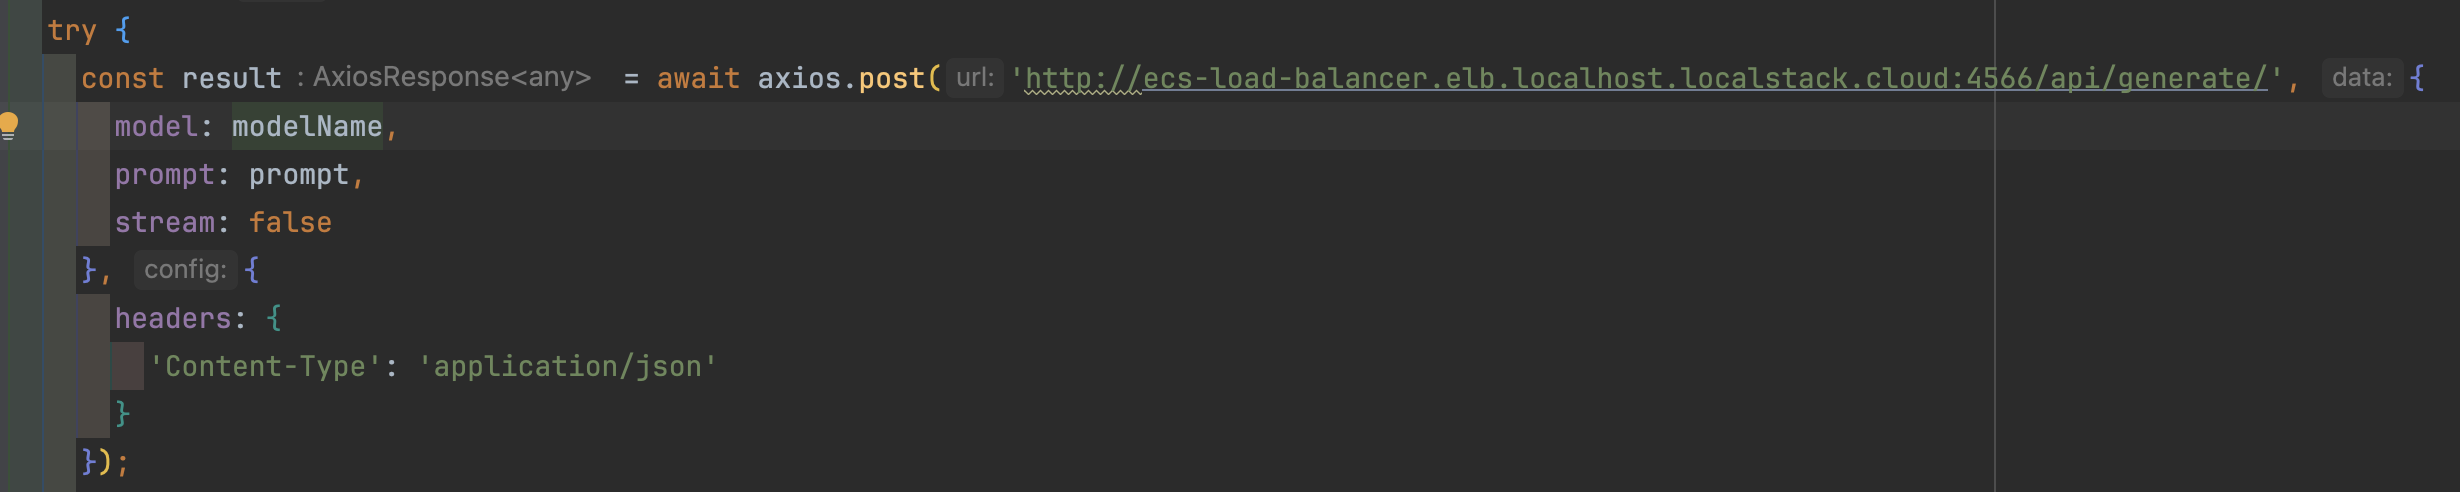
The backend call will be made to the load balancer, at http://ecs-load-balancer.elb.localhost.localstack.cloud:4566/api/generate/, so we don’t have to worry
about how we access the task containers.
Running on AWS
To run this stack in the real AWS cloud, we need to make some small adjustments.
The ready to deploy resources are in the aws folder, and they are the same as the ones for LocalStack, except:
- The AWS account number needs to be provided, so wherever you find
<your_account_number>, it should be replaced with the 12-digit key (task_definition_aws.json,commands-aws.sh). - A new bucket name needs to be set, as it needs to be unique, so the
<your_bucket_name>placeholder has to be replaced with a name of your choice (commands-s3-aws.sh,bucket-policy.json). - Since on AWS you don’t know the final DNS name of the load balancer, and we need it for the frontend component, we’ll build the app and upload the files to the S3 bucket only after creating the stack.
The
commands-aws.shscript will export and write the load balancer DNS name into the.envfile, where the React app can pick it up from. This is generally easier using LocalStack because the DNS name of the load balancer is always as defined by the user.
The steps to getting this project on AWS are:
- Make the aforementioned changes to your files.
- In the
awsroot folder runbash commands-aws.sh. - Build the React app:
cd frontend/chatbotnpm installnpm run build- Create the S3 bucket and prepare it to host the frontend application, by running
bash commands-aws-s3.shin theawsfolder.
After the first step, you can test the backend by running the following command:
export LB_NAME=$(aws elbv2 describe-load-balancers --load-balancer-arns $LB_ARN | jq -r '.LoadBalancers[0].DNSName')curl $LB_NAMEIf you get a message like the following, give it a few more seconds until the Fargate instances are up and running and you should see the
Ollama is running response.
<html><head><title>503 Service Temporarily Unavailable</title></head><body><center><h1>503 Service Temporarily Unavailable</h1></center></body></html>After building the GUI part and uploading it to the S3 bucket, you’ll be able to access your chatbot at this address:
http://<bucket-name>.s3-website.us-east-1.amazonaws.com/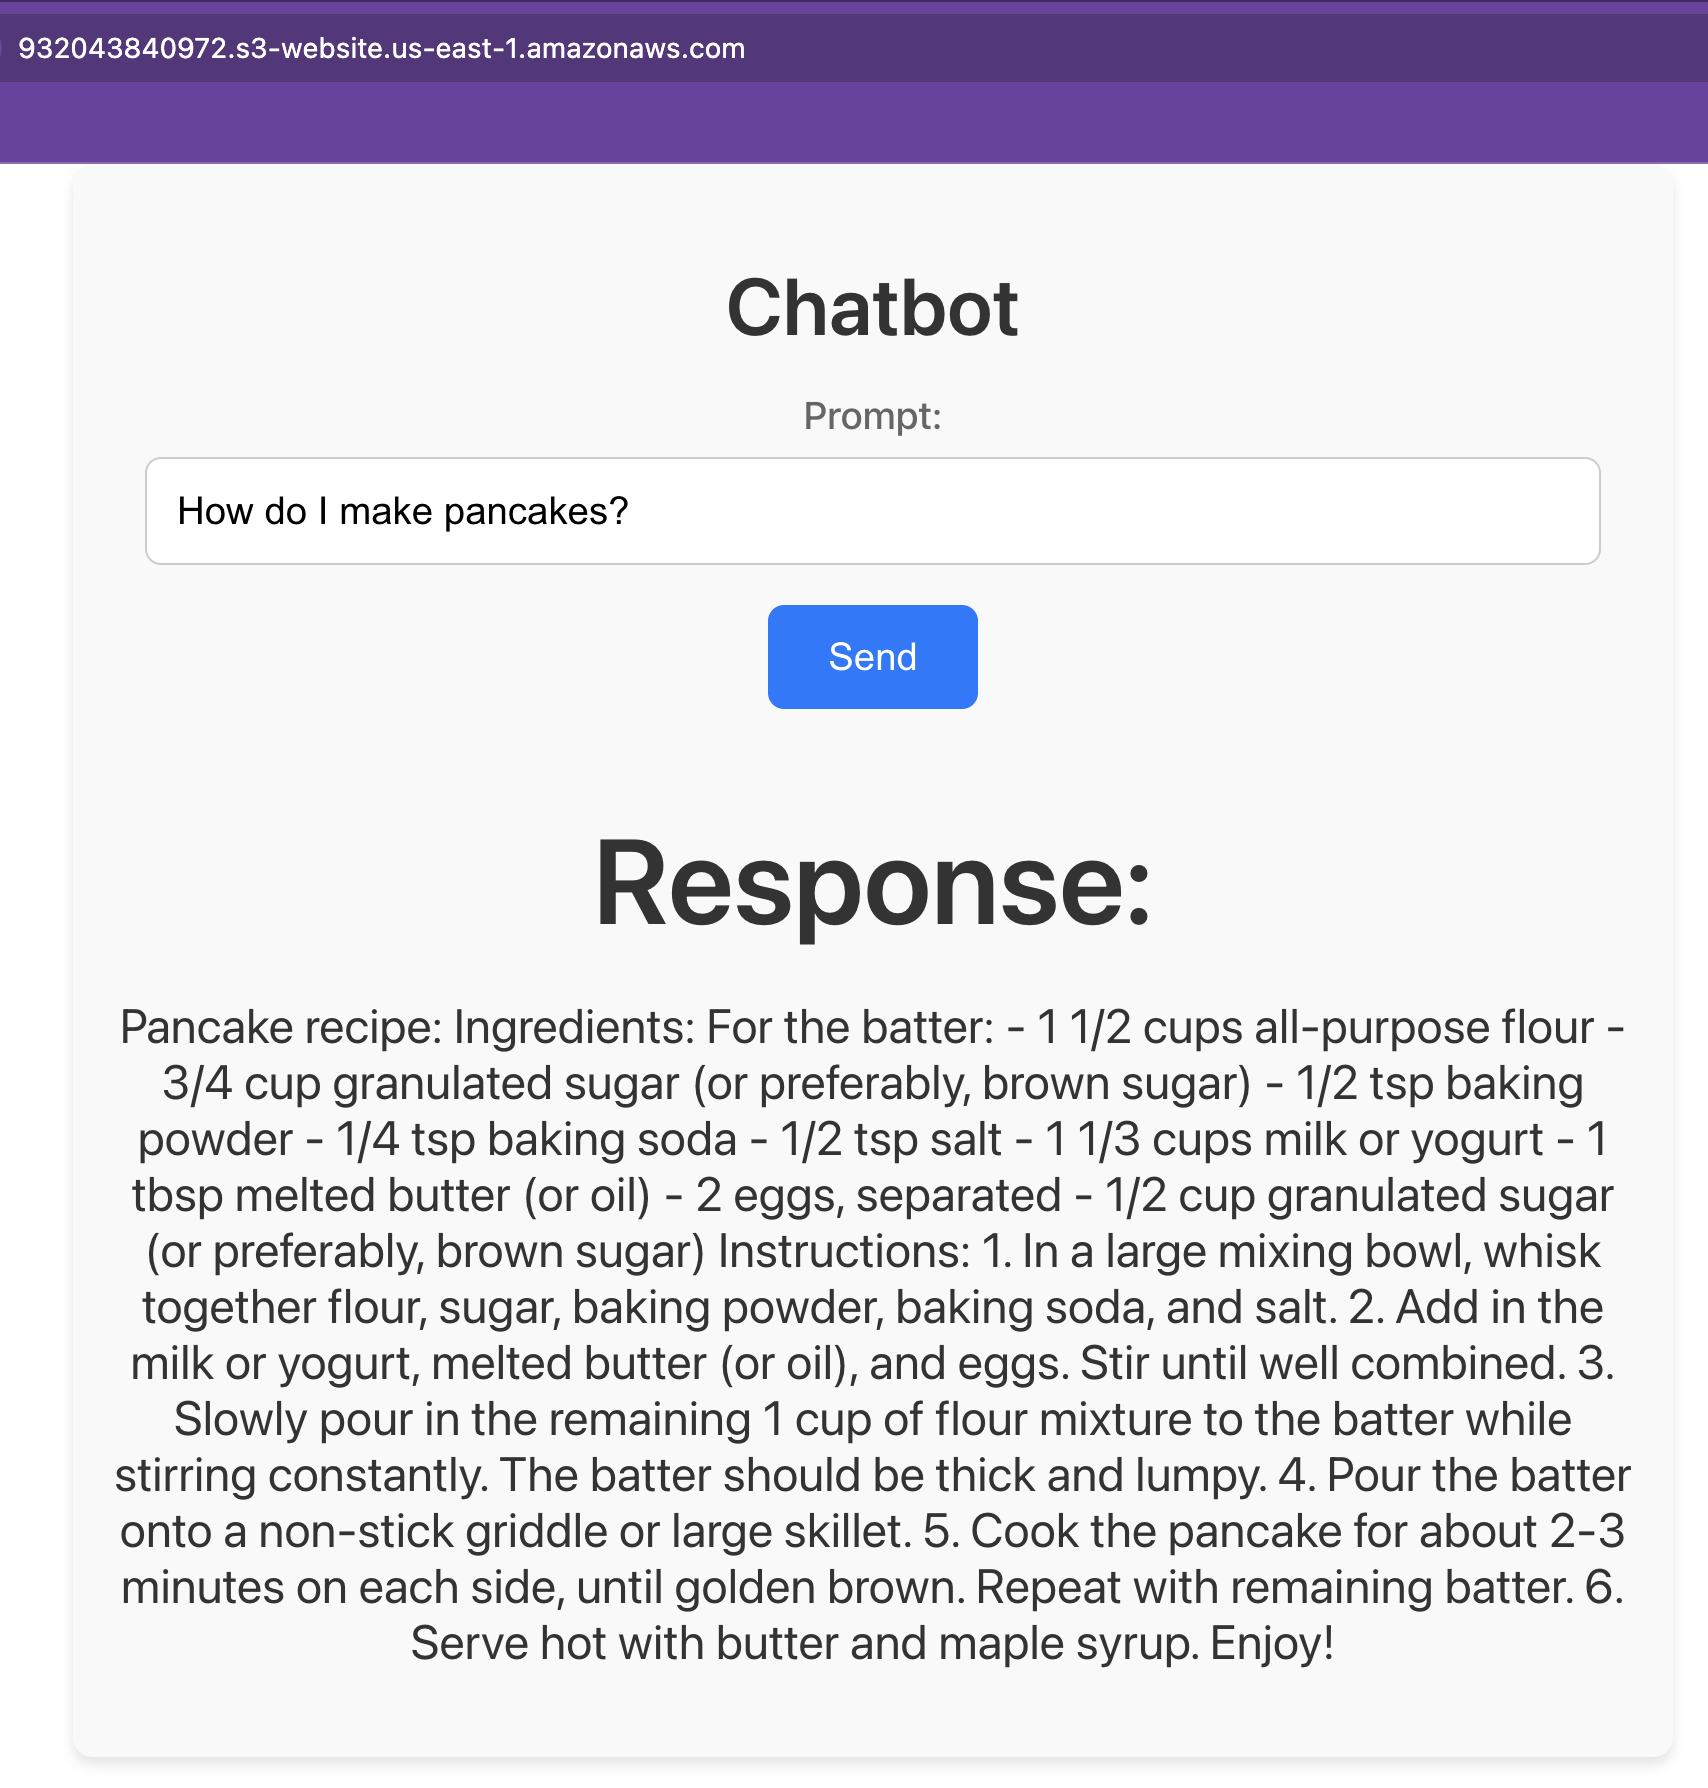
Conclusion
Developing and testing cloud AI-powered applications can be complex, particularly when ensuring they perform reliably in a production-like environment without incurring high costs. This is where integrating Ollama and LocalStack provides a robust solution. Ollama, which simplifies the process of downloading, installing, and interacting with various large language models (LLMs), paired with LocalStack’s ability to emulate AWS cloud services locally, allows developers to rigorously test AI functionalities in a controlled and cost-effective manner. By leveraging LocalStack, developers can validate integrations and behaviors of AI models managed with Ollama. The combination of Ollama’s straightforward LLM handling with LocalStack’s comprehensive AWS emulation offers a powerful toolkit for any developer looking to build reliable and scalable cloud AI applications.

Related Articles
Harsh Mishra and Brian Rinaldi •