Run Your First AWS App Locally in 4 Simple Steps with LocalStack
Learn how to build and run your first AWS-style application entirely on your local machine. This step-by-step guide walks through installing LocalStack, configuring authentication, and deploying a real serverless app without deploying to AWS.
LocalStack makes it possible to run AWS services locally so you can build and test cloud applications without constantly deploying to a real AWS account. Instead of waiting on remote resources or burning time and money just to see if something works, you can develop against a fully local AWS environment on your own machine.
In this guide, we’re going to build your first local AWS app in four steps. You’ll install LocalStack, set your auth token, deploy a real serverless sample, and confirm it’s working. Nothing fancy. Just a clean “it runs on my laptop” win.
Step 1: Install LocalStack
Let’s start by getting LocalStack running on your machine. This part is pretty straightforward, and once it’s done, everything else builds on top of it.
Prerequisites
Before installing LocalStack, make sure Docker is installed and running. LocalStack runs inside a Docker container, so if Docker isn’t up, nothing else will be either.
If you already use Docker for development, you’re good. If not, install Docker Desktop first and come back here once it’s running.
Install the LocalStack CLI
The easiest way to work with LocalStack is through the LocalStack CLI. It handles starting and stopping the local AWS environment and keeps you from dealing with raw Docker commands. The instructions below will get you started if you’re using MacOS, Linux, or running Python. If you’re running Windows or something else check out this link.
# macOS or Linux (Homebrew)brew install localstack/tap/localstack-cli
# Or via pippython3 -m pip install --upgrade localstack
Once installed, verify it worked:
localstack --versionIf you see a version number, you are good to go.
Start LocalStack
Start LocalStack:
localstack startThe first time you run this, Docker will pull the LocalStack image, which can take a minute. After that, LocalStack will spin up a local AWS environment and run quietly in the background.
At this point, you’ve got AWS running locally on your machine. Not bad for step one!
Step 2: Configure Your Auth Token
Now that LocalStack is running, there’s one more thing to take care of before we deploy anything: your auth token. If you’ve worked with API keys before, this will feel familiar. If not, don’t overthink it. This is mostly a one-time setup.
What Is an Auth Token (and Why do I Need One)?
Your auth token tells LocalStack who you are and what features you have access to. It’s how LocalStack knows whether you’re using the free tier, a paid plan, or running in CI.
There are two main types:
- Developer auth tokens for local development
- CI auth tokens for automated workflows
For this guide, you’ll be using a developer token. You can find the tokens page directly here. Once you have the token, you’re ready to set it locally. One important rule: treat your auth token like a password. Don’t check it into GitHub, and don’t paste it into screenshots.
Set Your Auth Token
You’ve got a couple of ways to set your token. Pick whichever feels more natural.
Option 1: Use the LocalStack CLI
localstack auth set-token YOUR_AUTH_TOKENlocalstack startOption 2: Use an Environment Variable
If you prefer being explicit or you’re setting this up for scripts, you can export the token as an environment variable.
On macOS or Linux:
export LOCALSTACK_AUTH_TOKEN="your-auth-token"On Windows PowerShell:
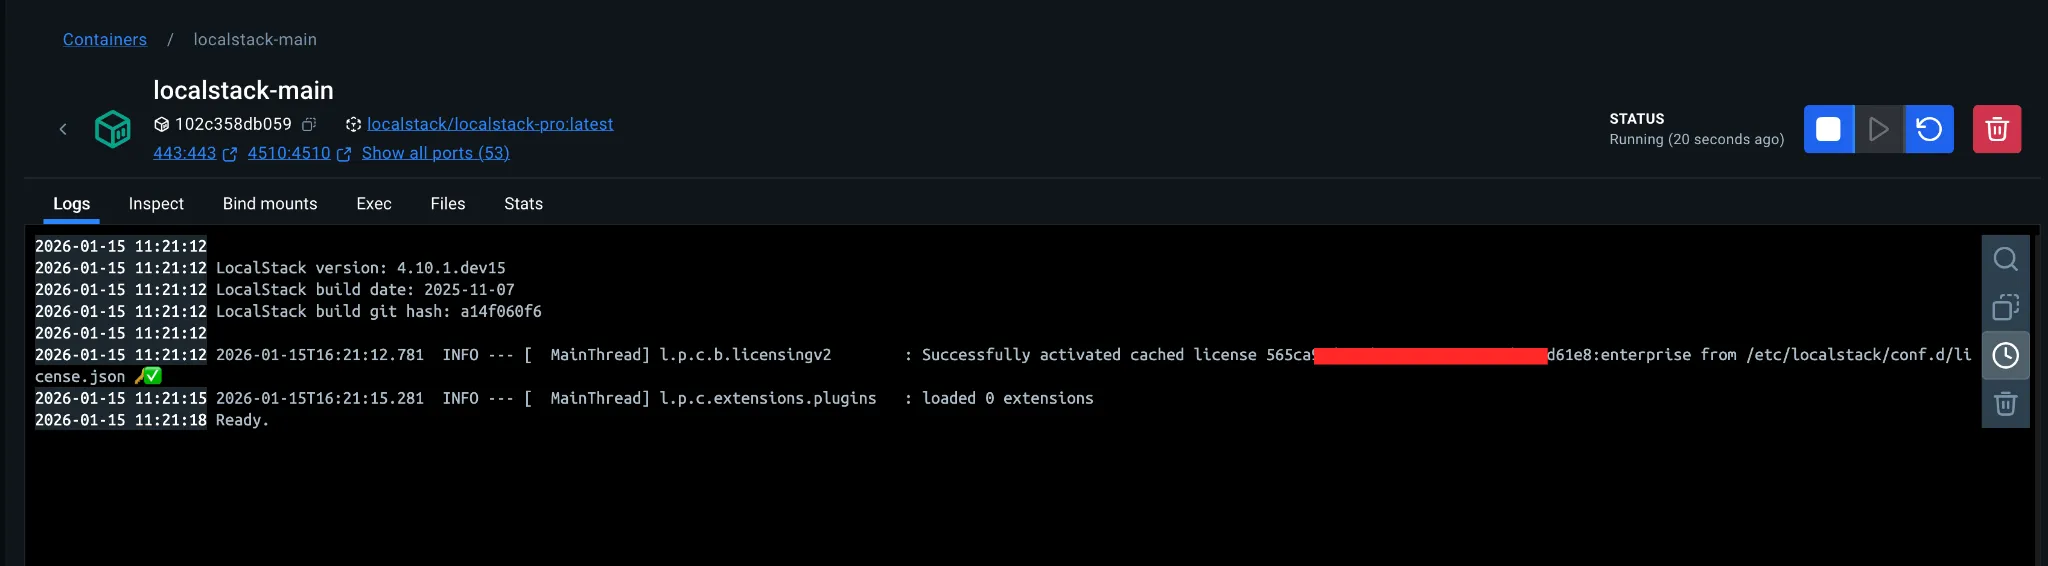
$env:LOCALSTACK_AUTH_TOKEN="your-auth-token"Once the variable is set, start LocalStack again if it isn’t already running. LocalStack will start authenticated and activate the appropriate features. Here’s what you’ll see in the logs:
Using Docker or Docker Compose
If you start LocalStack manually with Docker or Docker Compose, make sure the auth token gets passed into the container.
With Docker:
docker run -e LOCALSTACK_AUTH_TOKEN=${LOCALSTACK_AUTH_TOKEN} localstack/localstackWith Docker Compose:
environment: - LOCALSTACK_AUTH_TOKEN=${LOCALSTACK_AUTH_TOKEN}Step 3: Deploy Your First Local AWS App
Now that LocalStack is running and authenticated, let’s deploy a real application using Terraform, locally, against LocalStack. This isn’t a simple Hello World example, It’s a shipment management app with a backend, a frontend, and multiple AWS services working together.
What This App Does
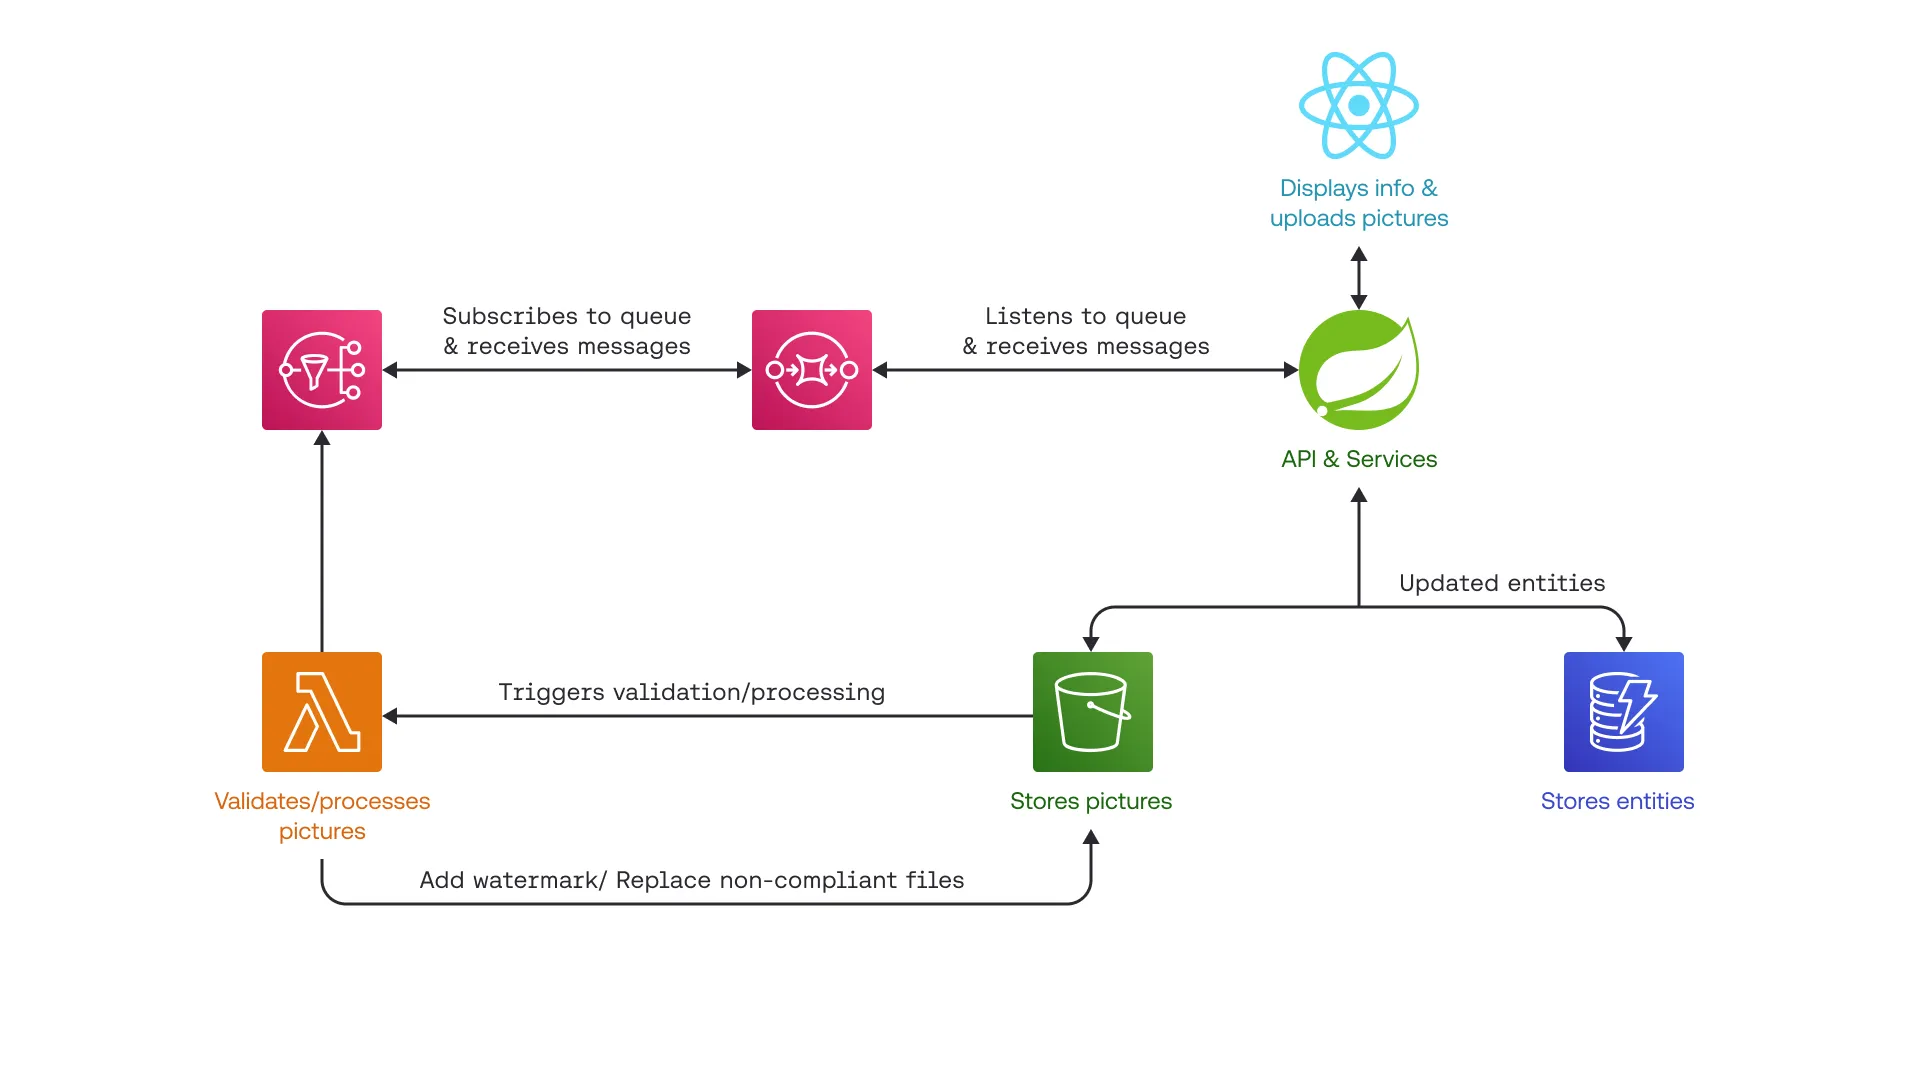
This sample is a shipment management application with:
- A Spring Boot backend
- A React frontend
- Terraform-managed AWS infrastructure
- Lambda-based image validation and processing
You can create and manage shipments, upload images, and see those images processed by a Lambda function. Valid images get watermarked, invalid ones get rejected, and updates are pushed in real time.
Clone the Sample Application
Start by cloning the repo:
git clone https://github.com/localstack-samples/sample-terraform-fullstack-serverless-shipment-app.gitcd sample-terraform-fullstack-serverless-shipment-appMake Sure LocalStack Is Running
Before deploying, make sure LocalStack is still running:
localstack startIf it’s already running, this won’t hurt anything. If it isn’t, this gets you back on track.
Install Project Dependencies
Next, install everything the project needs:
make installThis command handles a few things for you:
- Builds the Lambda validator JAR ((Java ARchive))
- Installs frontend dependencies with npm
- Prepares the project for deployment
- You only need to run this once.
Deploy the Infrastructure with Terraform
This project uses tflocal to run Terraform against LocalStack without any extra configuration. tflocal is a thin wrapper around the Terraform CLI that automatically redirects AWS provider endpoints to LocalStack instead of real AWS.
Now, let’s deploy the entire stack locally:
make deployIn the Makefile, the deploy target runs tflocal init, tflocal plan, and tflocal apply, which means the same Terraform files you’d use for AWS are applied locally with no code changes. The result is a local infrastructure deployment that behaves like AWS and provisions everything the app needs, including:
- S3 buckets for shipment images and Lambda code
- A DynamoDB table pre-populated with sample shipments
- A Lambda function for image validation and watermarking
- SNS topics and SQS queues for messaging
- All required IAM roles and permissions
Terraform will output logs as it works through the deployment. Let it finish.
When it’s done, you’ve got a full AWS-style backend running locally.
Start the Frontend
In a new terminal, start the React frontend:
cd shipment-list-frontendnpm startThe frontend will be available at http://localhost:3000
Start the Backend
In another terminal, start the Spring Boot backend:
mvn spring-boot:run -Dspring-boot.run.profiles=devThe backend will run at: http://localhost:8081
The dev profile is configured specifically for LocalStack, so no AWS endpoints or credentials need to change.
Step 4: Explore and Experiment
If you made it this far, you’ve already done something a lot of teams struggle with. You deployed real infrastructure, ran a full-stack app, and tested AWS-style workflows locally.
Now let’s slow down for a second and make sure everything feels solid.
If the app is working, you should be able to:
Open the frontend at http://localhost:3000
- See a list of shipments
- Upload an image to a shipment
- Watch that image get processed by a Lambda function
- See the UI update once processing completes
If that all happened, congrats. You’re officially running AWS locally.
Run Tests (Optional, but Recommended)
If you want to run full end-to-end tests against the local infrastructure:
make testThis validates that the application behaves the same way it would against real AWS.
Stop LocalStack when you are finished:
localstack stopWrapping Up
At this point, you’ve done more than just follow a tutorial. You stood up real AWS-style infrastructure, deployed a full-stack application with Terraform, and ran the entire workflow locally on your machine.
To recap, you just:
- Installed LocalStack
- Set up authentication
- Deployed a real serverless app
- Verified it works locally
That’s a solid foundation. From here, the next step is to take one of your own projects and swap AWS for LocalStack during development and testing. Welcome to local cloud development. Your laptop just got promoted 😉.