

Introduction
dbt on Snowflake can be orchestrated in many ways: CI pipelines, scheduled jobs, or workflow tools like Apache Airflow. When teams do use Airflow with Astronomer Cosmos (which turns dbt projects into Airflow task groups), validating the full DAG against Snowflake often means pointing at a shared cloud account or waiting on CI. That feedback loop is slow for iterative SQL work.
You can run Airflow locally against Snowflake Cloud, but testing the full path (including an MWAA-style environment, Cosmos task groups, and Snowflake transformations) without touching shared cloud resources is harder.
LocalStack’s Snowflake emulator and MWAA (Managed Workflows for Apache Airflow) emulator let you run that stack on a single machine. In this tutorial, we’ll set up a local Airflow environment with a dbt project that seeds hotel booking data into Snowflake, transforms it through dbt models, and queries the results.
How does our sample application work?
The sample app models a hotel booking system. Three CSV seed files (two booking tables and a customer table) get loaded into Snowflake, transformed through dbt models, and queried at the end to verify the output.
Orchestration Layer
Amazon MWAA (Managed Workflows for Apache Airflow) handles the orchestration, which LocalStack emulates locally. When you call mwaa create-environment, LocalStack spins up an Airflow container on your machine, wires it to a local S3 bucket, and installs the Python dependencies.
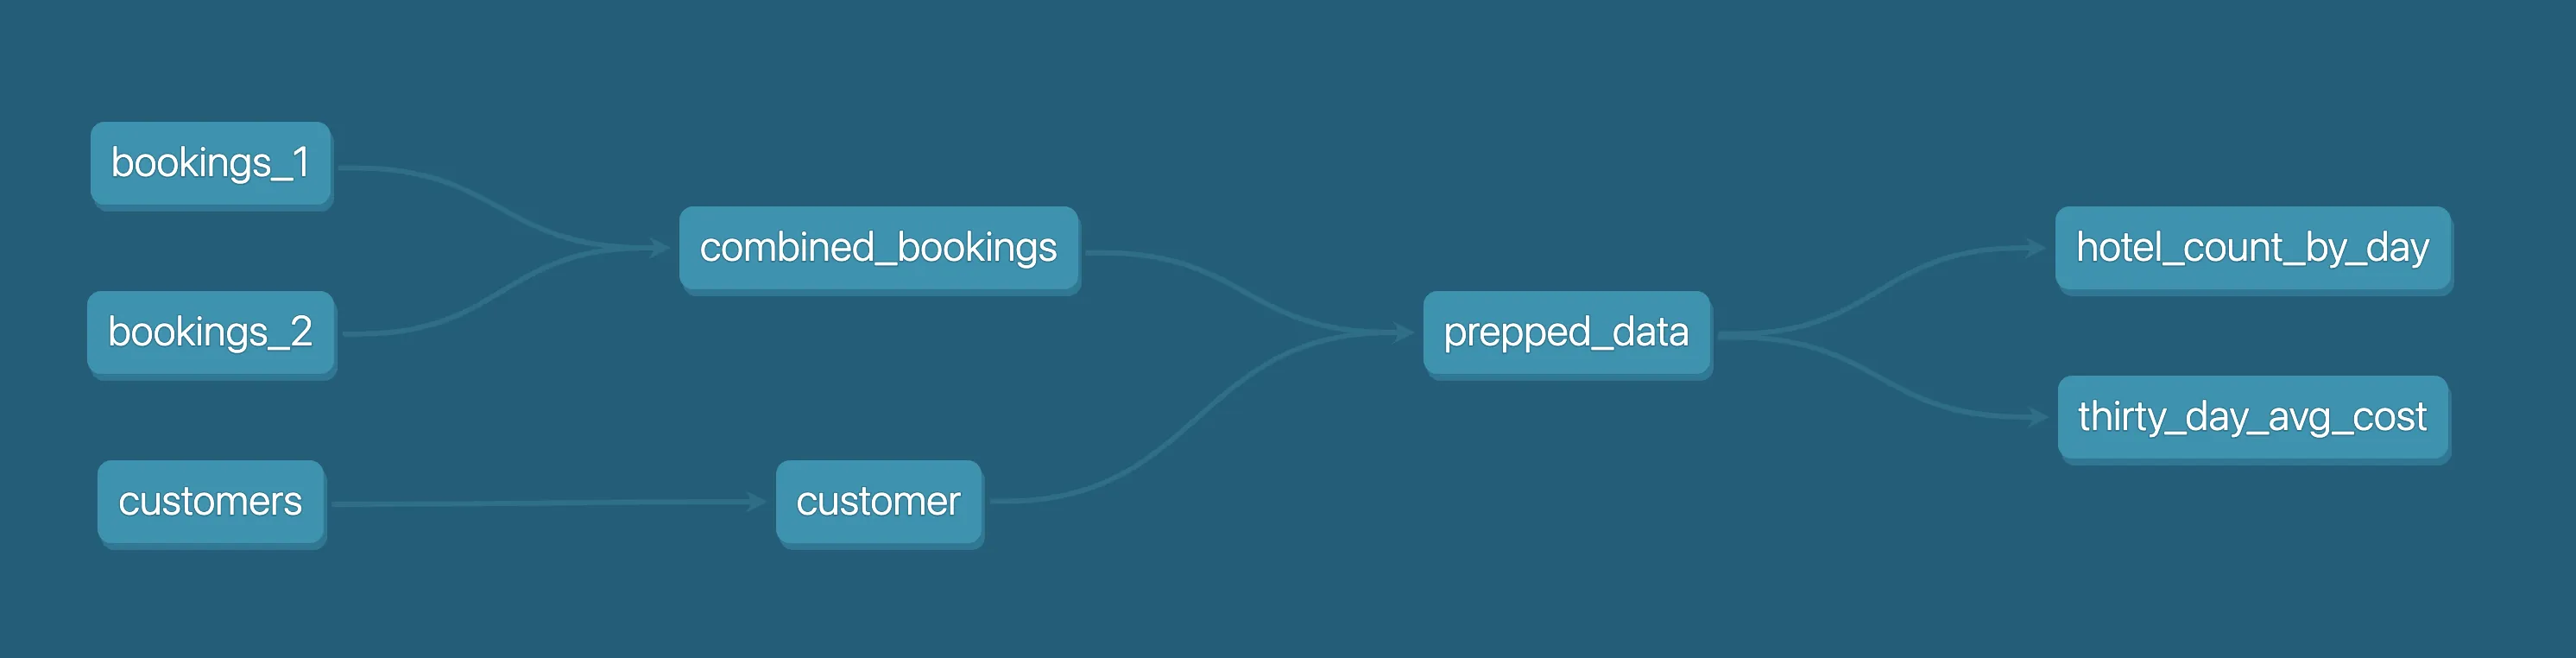
The dbt project builds five models on top of the seed data:
combined_bookingsunions the two booking CSVs usingdbt_utils.union_relationscustomerselects fields from the customers seedprepped_datajoins customers with their bookingshotel_count_by_daycounts bookings per hotel per daythirty_day_avg_costcalculates a 30-day rolling average cost using a window function
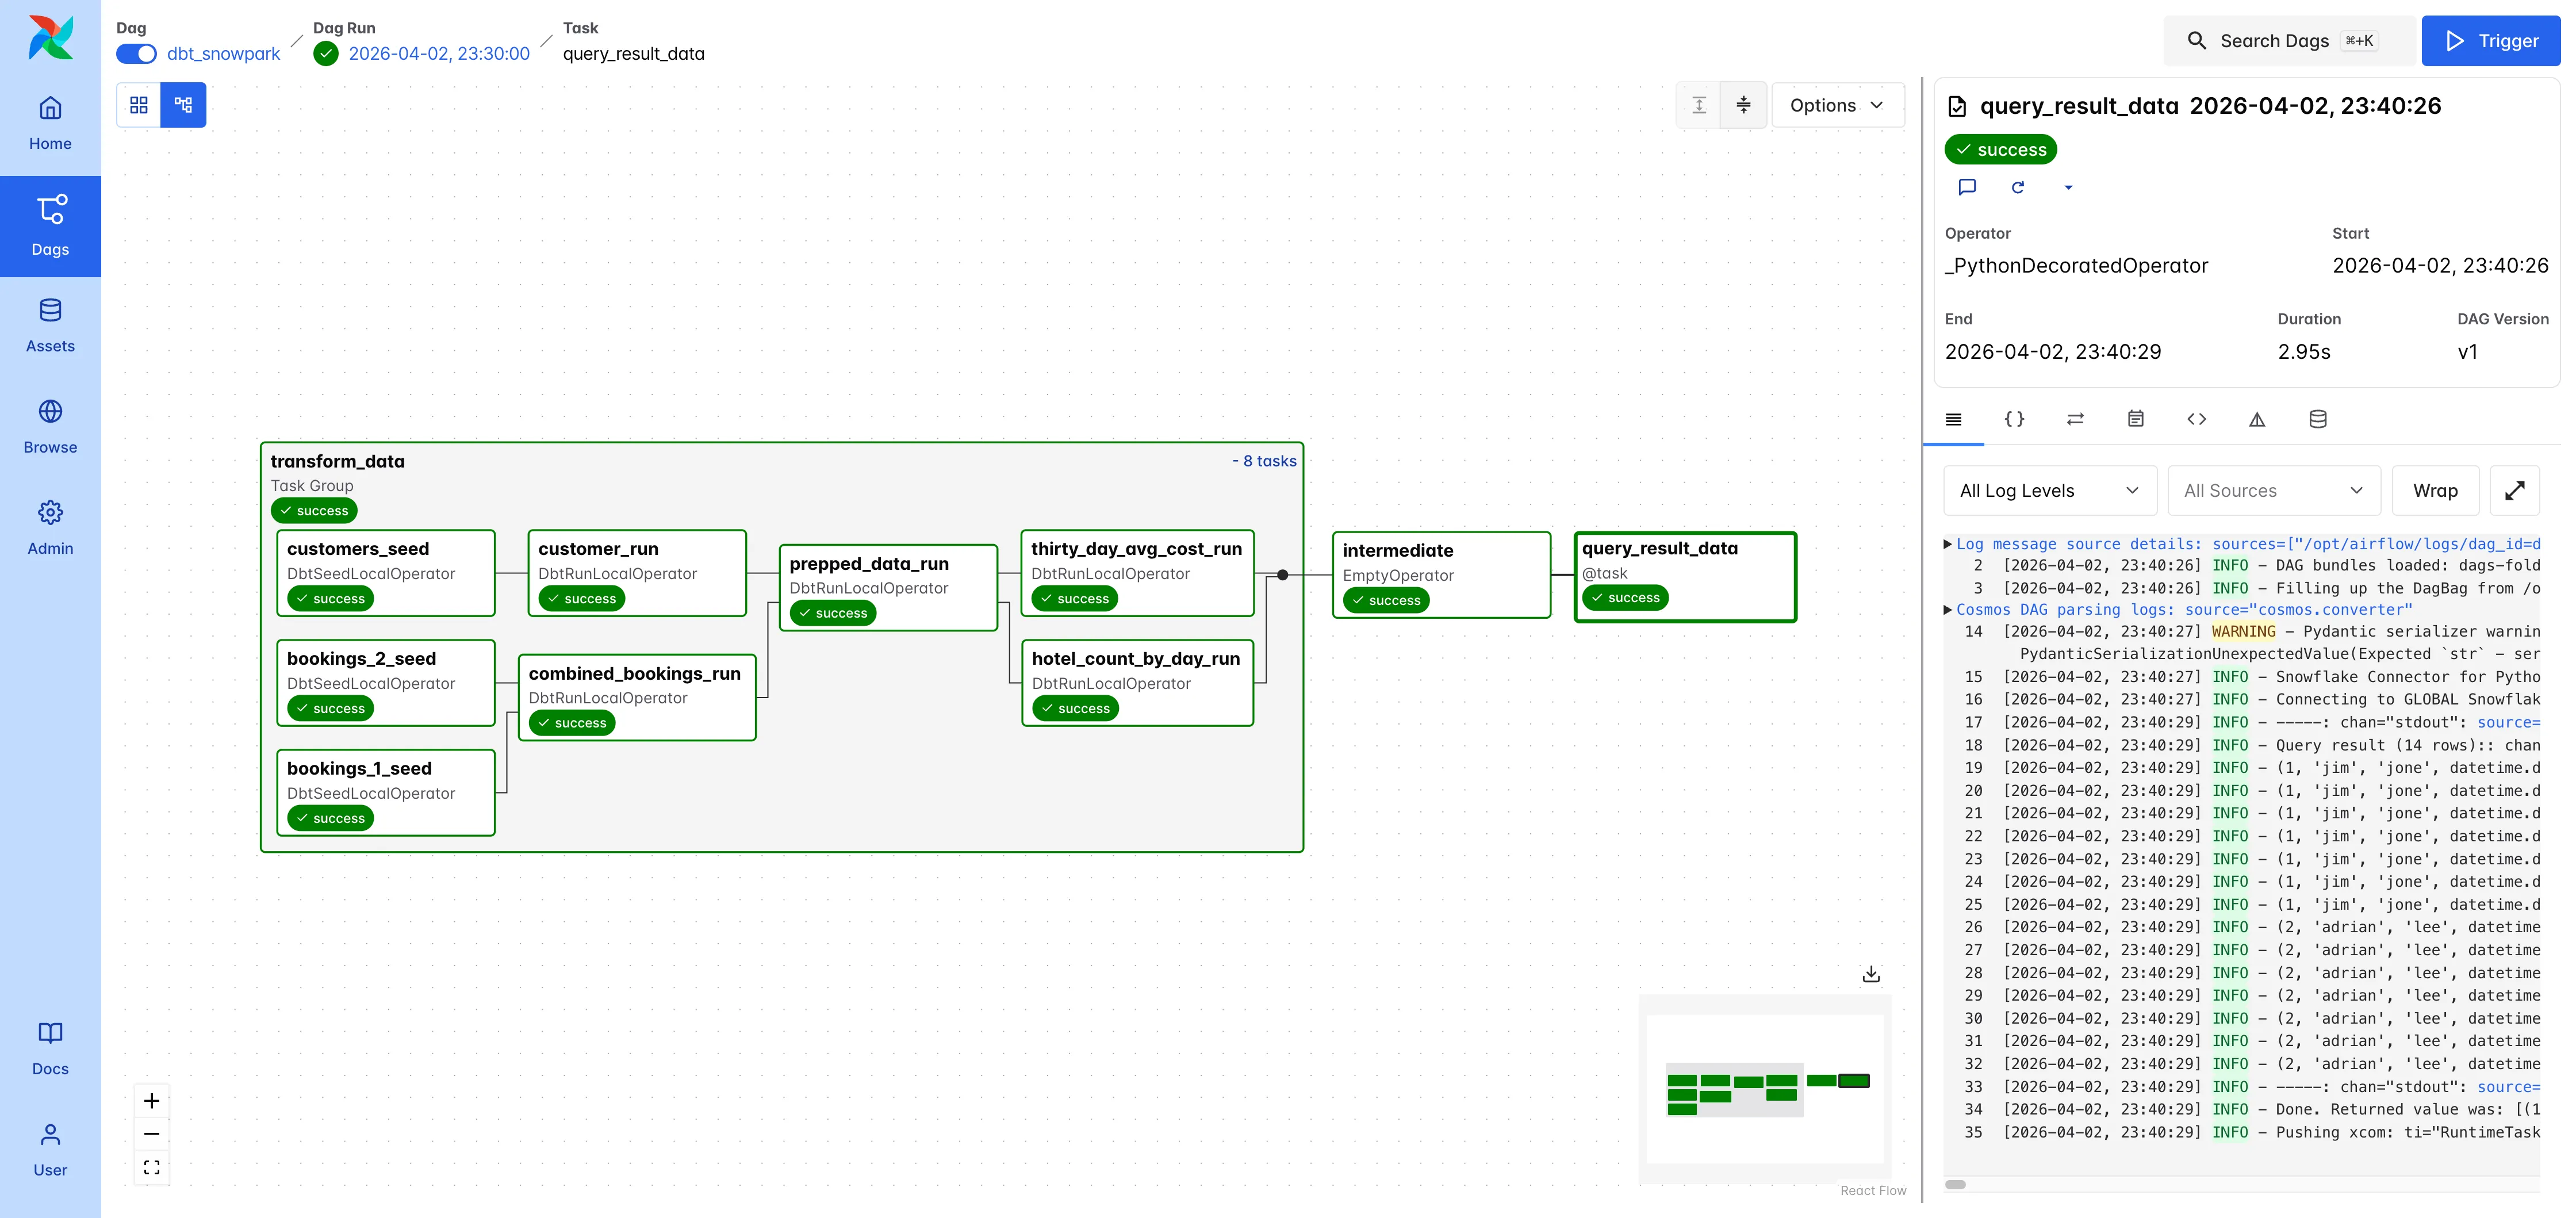
Astronomer Cosmos converts this dbt project into native Airflow tasks. Each seed becomes a seed task, each model becomes a run task, and dbt’s dependency graph maps to Airflow task dependencies.
The DAG defines a DbtTaskGroup pointing at the dbt project directory. The operator_args={"install_deps": True} flag tells Cosmos to run dbt deps before each task, installing the dbt_utils package from packages.yml.
Connection setup
The Snowflake connection is defined via an AIRFLOW_CONN_SNOWFLAKE_LOCAL environment variable in the DAG file. Airflow registers connections from environment variables following the AIRFLOW_CONN_<CONN_ID> naming convention, creating a connection called snowflake_local:
os.environ["AIRFLOW_CONN_SNOWFLAKE_LOCAL"] = json.dumps({ "conn_type": "snowflake", "login": "test", "password": "test", "extra": { "host": "snowflake.localhost.localstack.cloud", "port": 4566, "account": "test", "database": "test", "schema": "public", },})The default SnowflakeUserPasswordProfileMapping in Cosmos doesn’t map host and port from the connection’s extra field, so the DAG patches the mapping at module level:
SnowflakeUserPasswordProfileMapping.airflow_param_mapping["host"] = "extra.host"SnowflakeUserPasswordProfileMapping.airflow_param_mapping["port"] = "extra.port"This passes the emulator’s hostname and port through to dbt when Cosmos generates the profile.
Task graph
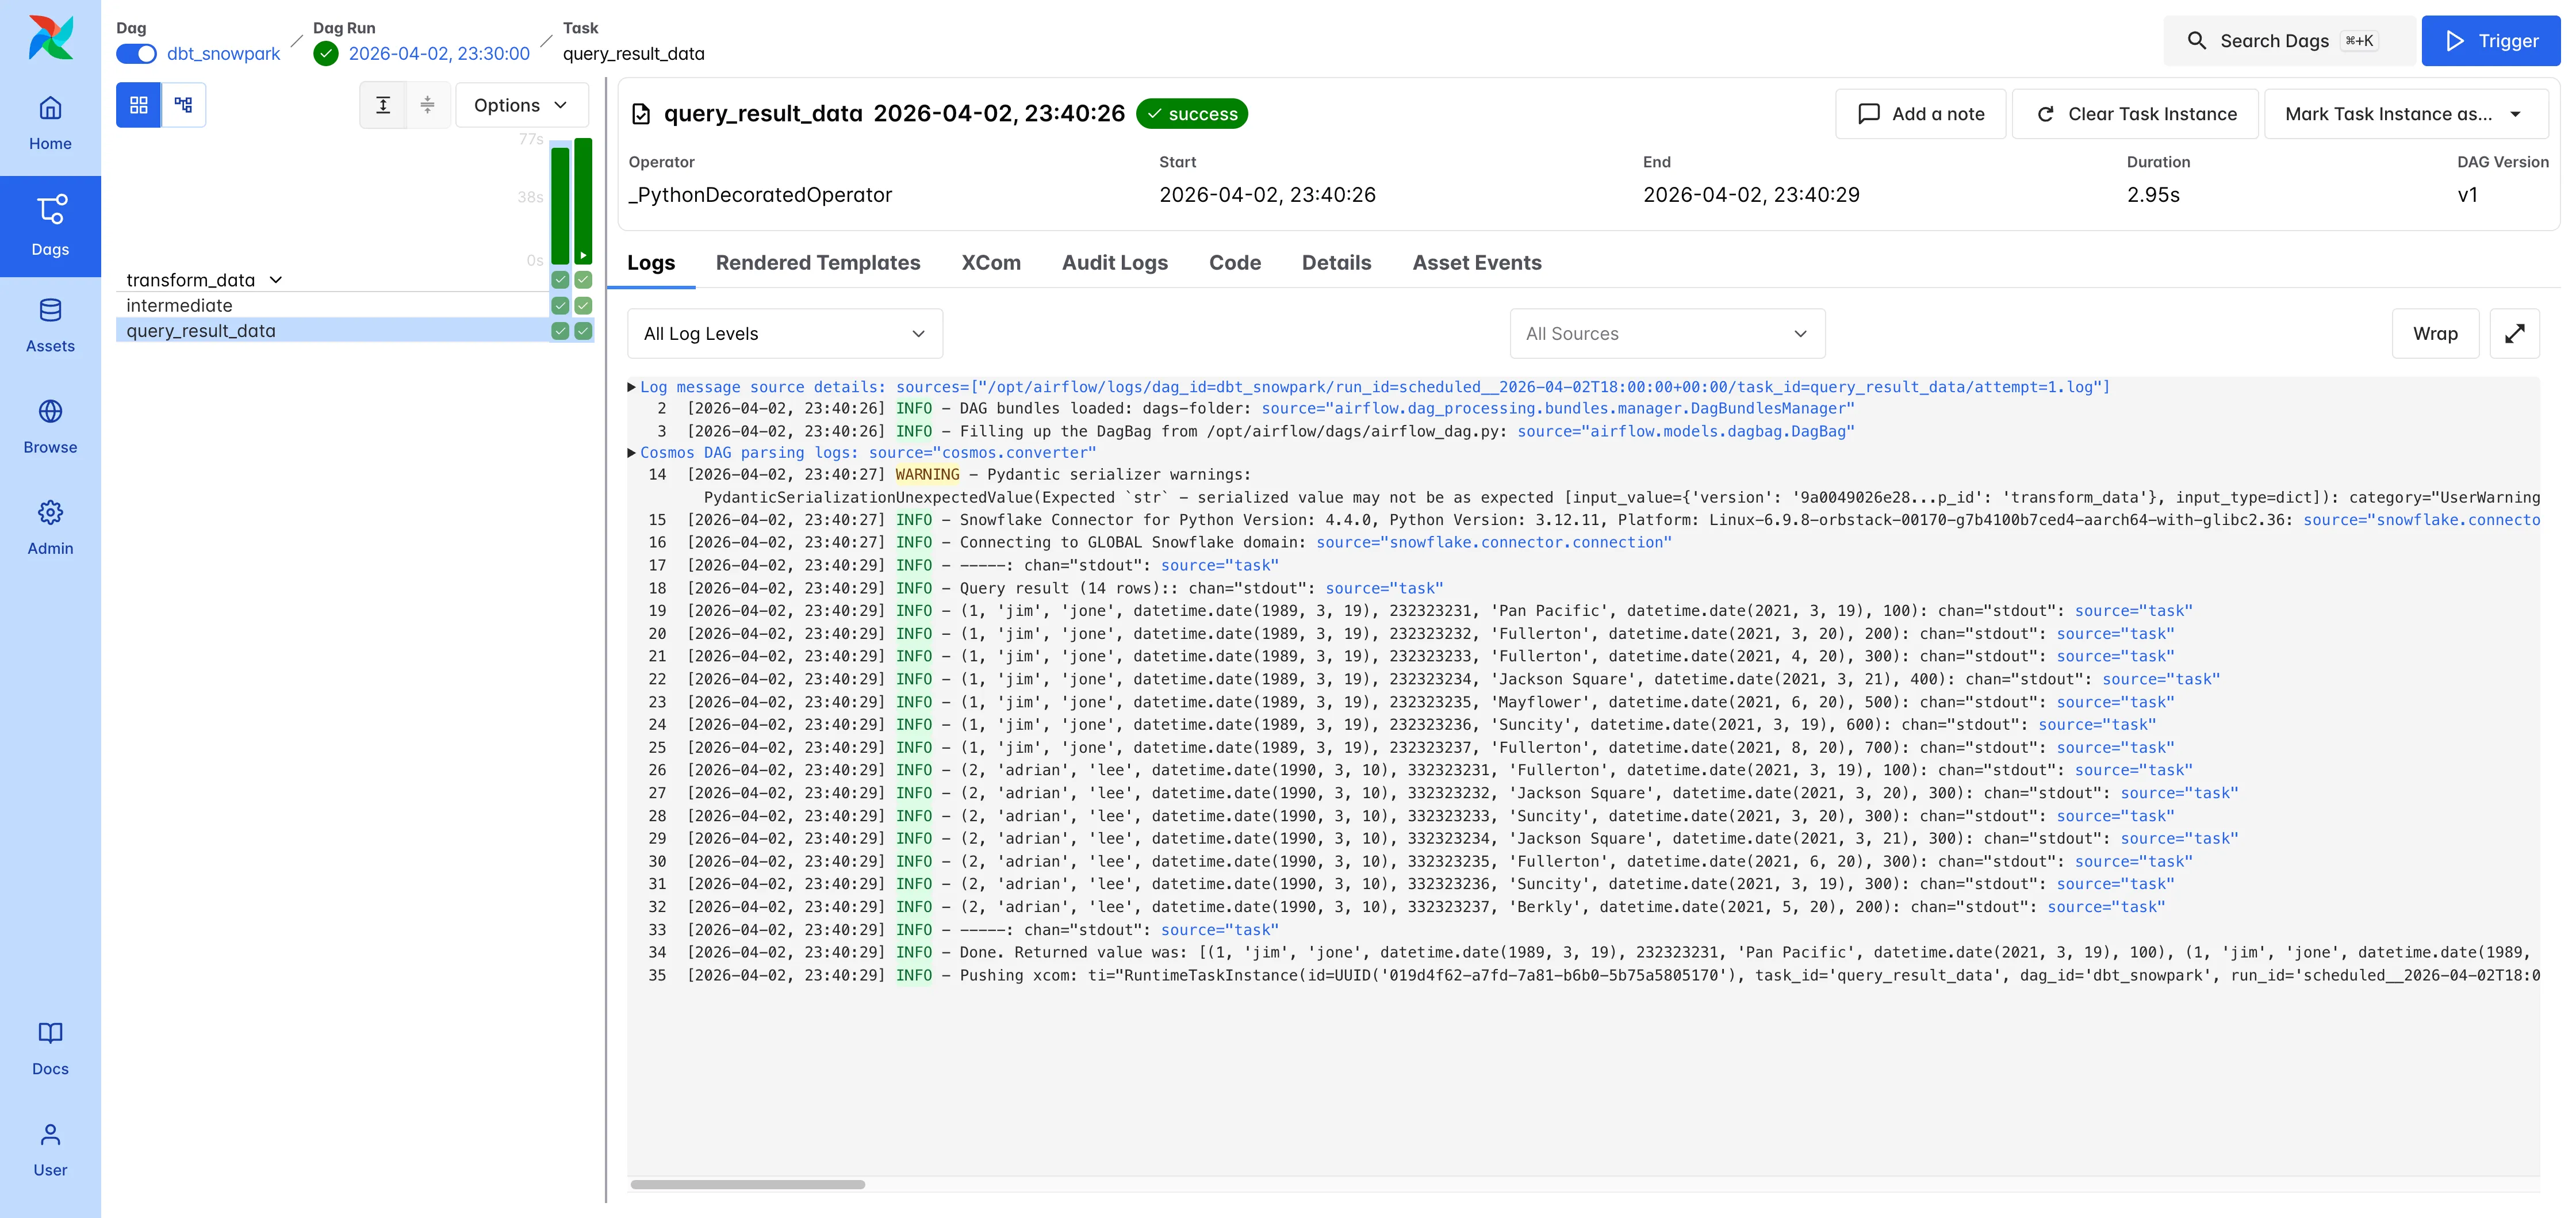
After the dbt task group finishes, an EmptyOperator acts as a sync point before the final query_result_data task. That task opens a Snowflake connection and runs SELECT * FROM transform.PREPPED_DATA, printing all 14 rows of joined booking data. The DAG uses max_active_tasks=1 to run tasks sequentially and avoid concurrent CREATE TABLE collisions in the Snowflake emulator.
With that explanation out of the way, let’s get started!
Prerequisites
- Docker
localstackCLI with a validLOCALSTACK_AUTH_TOKEN(available with a LocalStack license)awslocalCLI- Python 3 and
curl
Step 1: Start LocalStack for Snowflake emulator
The Snowflake emulator and the MWAA container need to communicate over a shared Docker network. Create the network and start LocalStack:
docker network create --attachable --subnet 172.20.0.0/24 localstackDOCKER_FLAGS='-e SF_LOG=trace --network localstack --name=localhost.localstack.cloud --network-alias=snowflake.localhost.localstack.cloud' \DEBUG=1 \localstack start -s snowflake -dWait for LocalStack to be ready:
localstack wait -t 120Verify the Snowflake emulator is running:
curl -d '{}' snowflake.localhost.localstack.cloud:4566/sessionThe expected output is:
{"success": true}Step 2: Clone the sample application
Clone the repository and navigate to the project directory:
git clone https://github.com/localstack-samples/localstack-snowflake-samples.gitcd localstack-snowflake-samples/airflow-dbt-transformationThe project layout:
airflow-dbt-transformation/├── airflow_dag.py # Airflow DAG definition with Cosmos + Snowflake├── dbt_project.yml # dbt project configuration├── packages.yml # dbt package dependencies (dbt_utils)├── requirements.txt # Python packages for the Airflow container├── Makefile # Automation targets for init/deploy├── macros/│ └── custom_demo_macros.sql # Schema name override for dbt├── models/│ ├── transform/ # Core transformation models│ │ ├── combined_bookings.sql│ │ ├── customer.sql│ │ └── prepped_data.sql│ └── analysis/ # Analytical models│ ├── hotel_count_by_day.sql│ └── thirty_day_avg_cost.sql└── seeds/ # Raw CSV data ├── bookings_1.csv ├── bookings_2.csv └── customers.csvStep 3: Create the MWAA environment
Create an S3 bucket and upload the requirements.txt:
awslocal s3 mb s3://snowflake-airflowawslocal s3 cp requirements.txt s3://snowflake-airflow/Create the MWAA environment:
awslocal mwaa create-environment \ --dag-s3-path /dags \ --execution-role-arn arn:aws:iam::000000000000:role/airflow-role \ --network-configuration {} \ --source-bucket-arn arn:aws:s3:::snowflake-airflow \ --requirements-s3-path /requirements.txt \ --airflow-configuration-options agent.code=007,agent.name=bond \ --name my-mwaa-env \ --endpoint-url http://localhost.localstack.cloud:4566The expected output is:
{ "Arn": "arn:aws:airflow:us-east-1:000000000000:environment/my-mwaa-env"}LocalStack spins up an Airflow container in the background and installs the Python dependencies from requirements.txt (including astronomer-cosmos, dbt-snowflake, and the Snowflake connector). Check that the environment is ready:
awslocal mwaa get-environment --name my-mwaa-env --query 'Environment.[Status,WebserverUrl]' --output textThe expected output is:
AVAILABLE http://localhost.localstack.cloud:4510Note down the Airflow webserver URL, as the port number can vary between runs.
Step 4: Deploy the DAG and dbt project
Upload the dbt project files and the DAG to the S3 bucket:
awslocal s3 cp packages.yml s3://snowflake-airflow/dags/awslocal s3 cp dbt_project.yml s3://snowflake-airflow/dags/awslocal s3 cp --recursive models s3://snowflake-airflow/dags/modelsawslocal s3 cp --recursive seeds s3://snowflake-airflow/dags/seedsawslocal s3 cp --recursive macros s3://snowflake-airflow/dags/macrosawslocal s3 cp airflow_dag.py s3://snowflake-airflow/dags/The MWAA emulator syncs files from S3 into the Airflow container at roughly 30-second intervals. Wait about 30-40 seconds, then verify the files:
docker exec localstack-mwaa-000000000000-us-east-1-my-mwaa-env ls /opt/airflow/dags/You should see airflow_dag.py, dbt_project.yml, packages.yml, and the macros/, models/, seeds/ directories. If any are missing, wait another 30 seconds and check again.
The Python dependencies (astronomer-cosmos, dbt-snowflake) get installed from the requirements.txt uploaded earlier. This can take 1-2 minutes on a first run. Verify the install:
docker exec localstack-mwaa-000000000000-us-east-1-my-mwaa-env bash -c "pip show astronomer-cosmos" 2>/dev/null | head -2The expected output is:
Name: astronomer-cosmosVersion: 1.13.1If nothing is returned, the install is still in progress. Give it another minute.
Step 5: Trigger a DAG run
Restart the Airflow services so the DAG processor picks up the new code:
docker exec localstack-mwaa-000000000000-us-east-1-my-mwaa-env bash -c "supervisorctl restart all"airflow_scheduler: stoppedairflow_dag_processor: stoppedairflow_triggerer: stoppedairflow_api_server: stoppedairflow_api_server: startedairflow_dag_processor: startedairflow_scheduler: startedairflow_triggerer: startedWait about 5-10 seconds for the DAG processor, then open the Airflow webserver URL (from Step 3) in your browser. Log in with localstack / localstack as the username and password.
The DAGs page should show the dbt_snowpark DAG. Click on it to open the DAG detail page. Toggle the pause switch to unpause it, then click Trigger DAG to start a manual run.
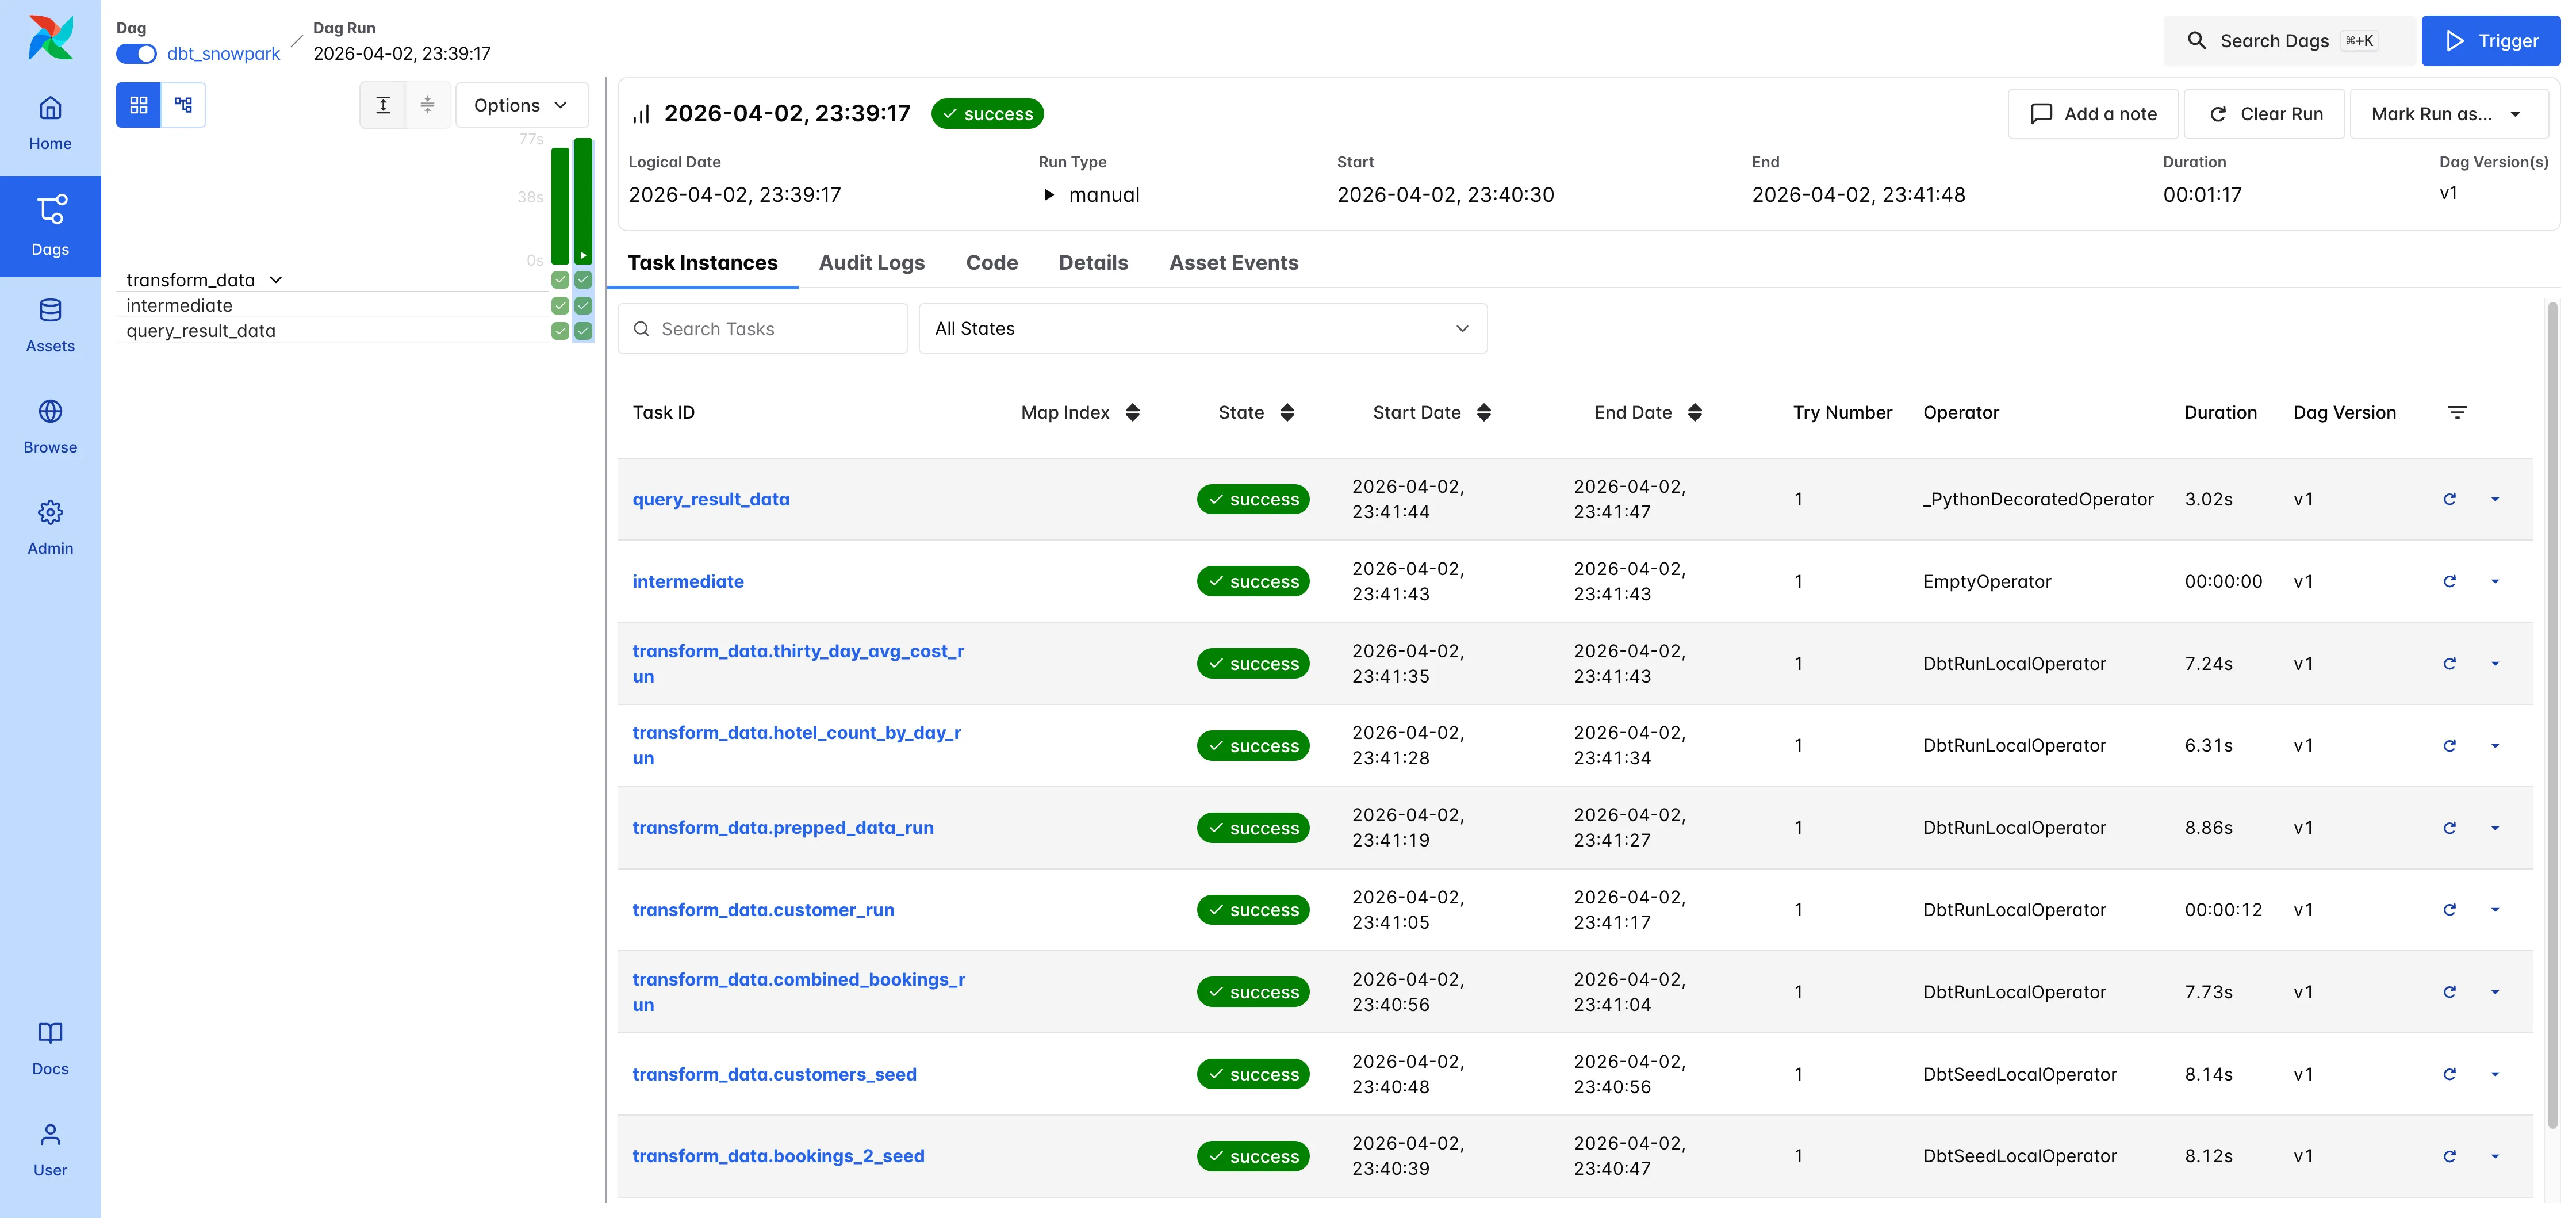
The pipeline takes about 60-90 seconds. The execution order is:
- Seed tasks:
bookings_1_seed,bookings_2_seed,customers_seedload CSVs into Snowflake - Transform models:
customer_runandcombined_bookings_run, thenprepped_data_runjoins their output - Analysis models:
hotel_count_by_day_runandthirty_day_avg_cost_runoperate on the prepped data - Intermediate: an
EmptyOperatorsync point - Query task:
query_result_dataqueriestransform.PREPPED_DATAand prints the results
When the run finishes, all 10 tasks should show green in the grid. Click on any task to inspect its logs. The query_result_data task log shows all 14 rows of joined booking data that the pipeline produced.
The graph view shows the full dependency chain from seeds through transforms to analysis and the final query. You can trigger additional runs to verify the pipeline is idempotent.
Summary
This setup gives you a fully local Airflow + dbt + Snowflake environment. The MWAA emulator handles Airflow, the Snowflake emulator handles the data warehouse, and Cosmos wires dbt into Airflow’s task system. You can iterate on SQL models, change DAG configuration, and re-deploy in under two minutes.
The sample application is available on GitHub. You can find more about LocalStack’s Snowflake emulator in the documentation and about MWAA support in the MWAA docs.