Accelerate infrastructure testing with LocalStack Cloud Pods & GitHub Actions
Cloud pods are persistent state snapshots of your LocalStack container. This blog guide you to use LocalStack Cloud Pods to save and load infrastructure state, enabling faster, consistent testing in CI workflows. It demonstrates the process with an AWS CDK application showing how to improve infrastructure testing on GitHub Actions to streamline cloud development.
Introduction
LocalStack is a cloud service emulator, that allows you to develop and test your cloud applications locally. LocalStack runs as a Docker container, and it’s ephemeral local resources like S3 buckets or Lambda functions are destroyed when you stop the container. However, you would like to persist & save certain resources for testing, debugging, or experimenting. That’s where LocalStack’s Cloud Pods come in.
Cloud Pods are snapshots of your LocalStack’s state that are stored on the LocalStack Web Application. This is incredibly useful for things like:
- Ensuring consistent developer environments and easing developer onboarding.
- Reducing environment setup times while using CDK, Terraform, or CloudFormation.
- Creating specific automated testing scenarios for your cloud application.
In this blog, we’re going to focus into this third use case: using Cloud Pods to enable pre-seeded testing scenarios in continuous integration (CI) workflows. We’ll explore creating a Cloud Pod from an existing stack, implementing integration tests against LocalStack, and running these tests as part of a GitHub Actions workflow.
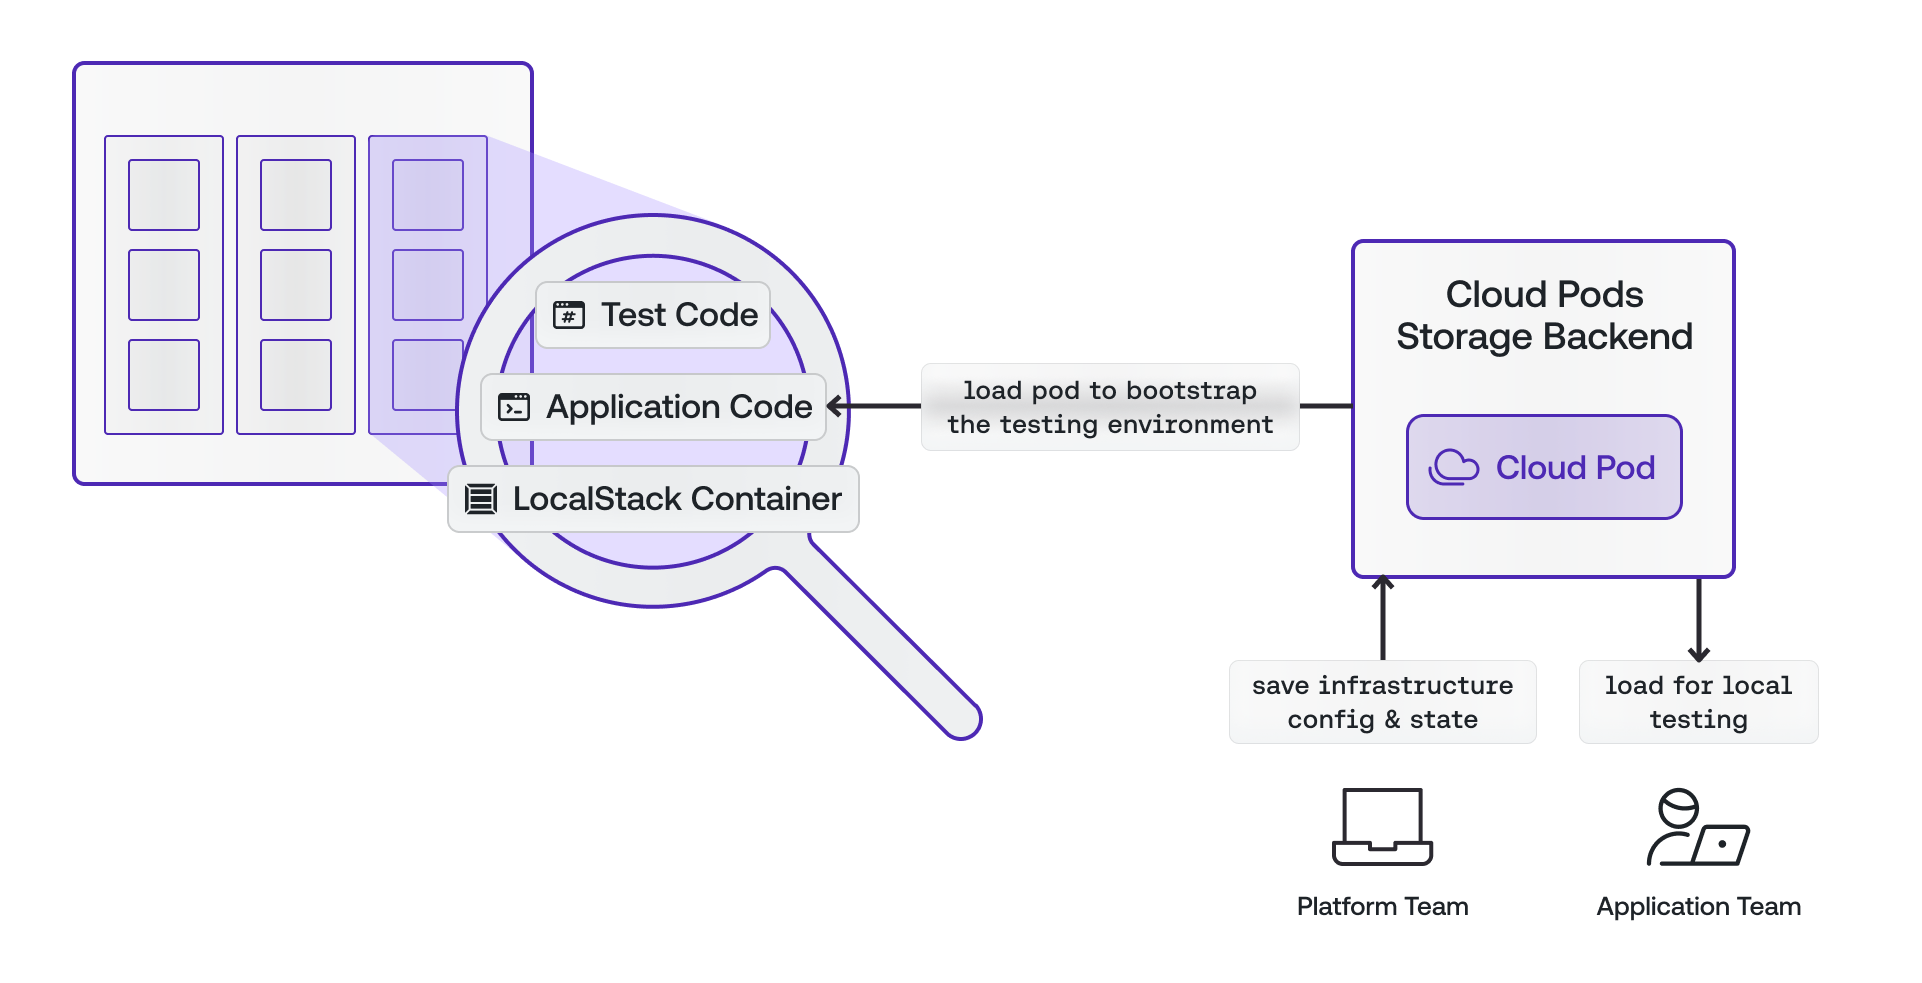
Table of Contents
Prerequisites
localstackCLI with theLOCALSTACK_AUTH_TOKEN- LocalStack Web Application account
- Node.js &
yarn - Python 3.10 &
pytest - Cloud Development Kit (CDK) &
cdklocal - GitHub Account &
git jqfor parsing JSON output
Tutorial: Loan Broker Application with Step Functions, DynamoDB, and Lambda
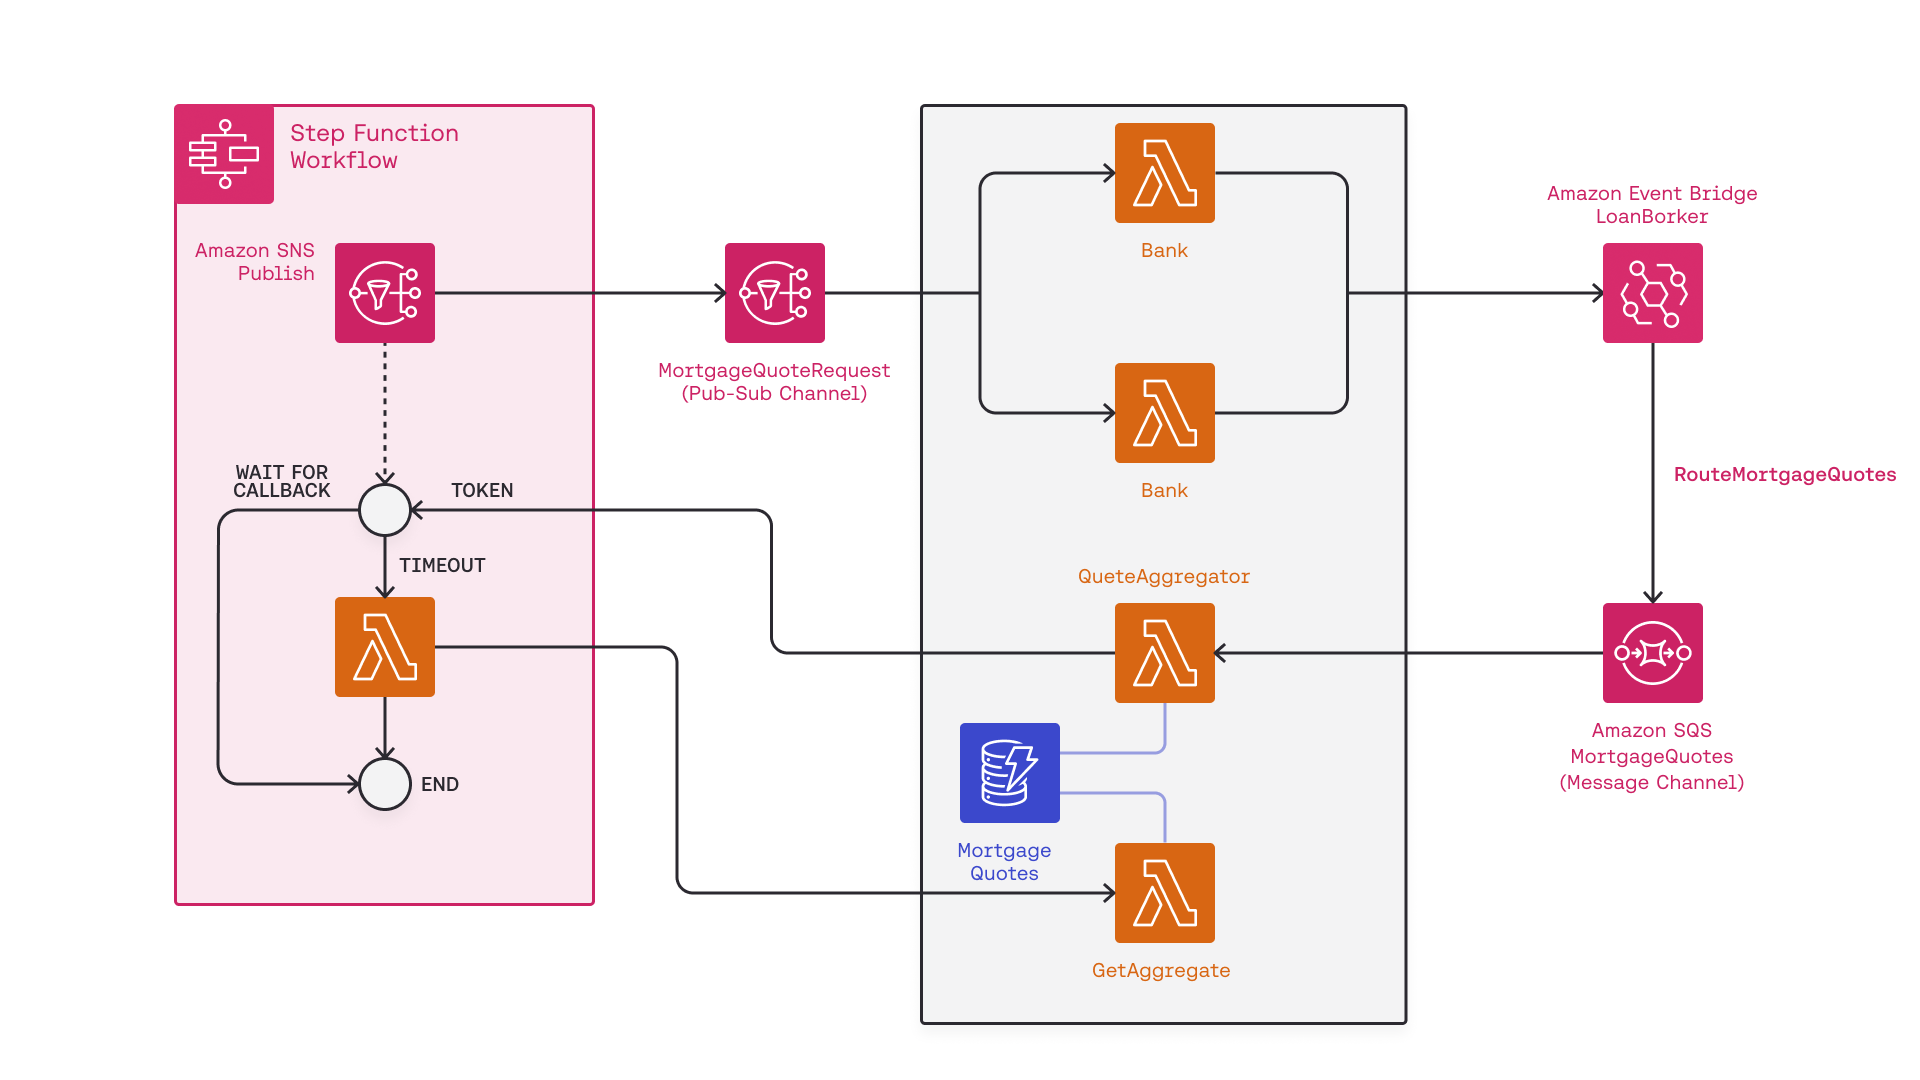
This demo utilizes a public sample to showcase a Loan Broker application inspired by Gregor Hohpe’s Loan Broker example. The sample application employs a Recipient List pattern and a Scatter Gather pattern to acquire a list of banks and dynamically route loan applications to multiple banks, respectively.
The sample deploys Step Functions, DynamoDB, Lambda, SQS, and SNS with the following functionality:
- User submits a loan application with personal data, desired terms, loan amount, and duration.
- Loan Broker retrieves information from the Credit Bureau and adds it to the previously submitted loan application.
- Loan Broker routes the application to multiple banks, and the banks respond if they are willing to offer.
- Loan Broker aggregates all the results and returns them to the user.
The Step Function controls the sequence of activities and transfer data between components for the Loan Broker, while Lambda functions implement the business logic for the Loan Broker, Banks, and Aggregator in the application.
An SNS topic publishes messages and broadcasts loan quote requests to any subscribing banks, while SQS fetches loan quotes from the banks to the Aggregator. DynamoDB is used to persist the state of the Aggregator.
All resources will be deployed using the Cloud Development Kit (CDK). Before configuring the GitHub Action workflow, you’ll need to save the infrastructure state using Cloud Pods on our local machine. After saving the Cloud Pod as a persistent state snapshot, you’ll be able toimplement a workflow that injects the Cloud Pod into our GitHub Action runner. Let’s walk through the steps.
Start your LocalStack container
Launch the LocalStack container on your local machine using the specified command:
localstack auth set-token <your-auth-token>localstack startReplace
<your-auth-tokenwith your LocalStack Auth Token to start the LocalStack Pro container.
Once initiated, you’ll receive a confirmation output indicating that the LocalStack container is up and running.
     __                     _______ __             __    / /   ____  _________ _/ / ___// /_____ ______/ /__   / /   / __ \/ ___/ __ `/ /\__ \/ __/ __ `/ ___/ //_/  / /___/ /_/ / /__/ /_/ / /___/ / /_/ /_/ / /__/ ,< /_____/\____/\___/\__,_/_//____/\__/\__,_/\___/_/|_|
 💻 LocalStack CLI 3.6.0 👤 Profile: default
[13:07:54] starting LocalStack in Docker localstack.py:503           mode 🐳...───── LocalStack Runtime Log (press CTRL-C to quit) ──────
LocalStack version: 3.6.1.dev20240805094804LocalStack build date: 2024-08-05LocalStack build git hash: 98cc4e6
To confirm the startup of your LocalStack container with the Pro services, utilize the cURL command to query the http://localhost:4566/_localstack/info endpoint.
curl -X GET http://localhost:4566/_localstack/info | jq
{  "version": "3.6.1.dev20240805094804:98cc4e6",  "edition": "pro",  "is_license_activated": true,  ...  "system": "linux",  "is_docker": true,  ...}
Set up the infrastructure locally
To begin, fork the LocalStack sample repository on GitHub and clone it on your local machine using this command:
git clone https://github.com/localstack-samples/sample-loan-broker-stepfunctions-lambda.gitTo locally deploy the CDK infrastructure, you can use cdklocal, a CLI wrapper for deploying CDK stacks against LocalStack’s emulated services. Before initiating the deployment, install the dependencies by executing the following command:
cd sample-loan-broker-stepfunctions-lambdayarnOnce the dependencies are installed, use cdklocal to deploy the application. First, ensure that each AWS environment intended for resource deployment is bootstrapped.
Execute the cdklocal bootstrap command, adjusting the AWS account ID (000000000000) and region (us-east-1) as needed:
cdklocal bootstrap aws://000000000000/us-east-1Proceed to deploy the CDK stack with cdklocal deploy. Since multiple stacks are being deployed, include the --all flag. Execute the following command:
cdklocal deploy --allUpon successful deployment, the output will include information for each stack, such as the ARN of the LoanBroker state machines and the CloudFormation stack ARN.
 ✅  LoanBroker-RecipientList-Stack
✨  Deployment time: 30.36s
Outputs:LoanBroker-RecipientList-Stack.LoanBrokerArn = arn:aws:states:us-east-1:000000000000:stateMachine:LoanBroker-RecipientList-Stack-LoanBroker641FC9A8-efa3f66aStack ARN:arn:aws:cloudformation:us-east-1:000000000000:stack/LoanBroker-RecipientList-Stack/b85c91a1
....
 ✅  LoanBroker-PubSub-Stack
✨  Deployment time: 35.38s
Outputs:LoanBroker-PubSub-Stack.LoanBrokerArn = arn:aws:states:us-east-1:000000000000:stateMachine:LoanBroker-PubSub-Stack-LoanBroker641FC9A8-cc3ba97eStack ARN:arn:aws:cloudformation:us-east-1:000000000000:stack/LoanBroker-PubSub-Stack/103b86ee
✨  Total time: 40.2s
You can now proceed to save the infrastructure state in a Cloud Pod, enabling resource spin-up without manual CDK deployment.
Create a Cloud Pod
To create a Cloud Pod, utilize the pod CLI, which is shipped alongside the LocalStack CLI. Ensure the LocalStack CLI experience is activated by specifying LOCALSTACK_AUTH_TOKEN in the environment.
The pod CLI offers various options for:
- Saving your existing state in a Cloud Pod
- Loading an available Cloud Pod in your container
- Inspecting the content of the Cloud Pod
- Listing and deleting Cloud Pods available in your workspace
localstack pod --helpUsage: localstack pod [OPTIONS] COMMAND [ARGS]...
  Manage the state of your instance via Cloud Pods.
Options:  -h, --help  Show this message and exit.
Commands:  delete    Delete a Cloud Pod  inspect   Inspect the contents of a Cloud Pod  list      List all available Cloud Pods  load      Load the state of a Cloud Pod into the application...  remote    Manage cloud pod remotes  save      Create a new Cloud Pod  versions  List all available versions for a Cloud Pod
To save the existing infrastructure state in a Cloud Pod, use the pod save command in combination with the localstack CLI. Execute the following command to save the Cloud Pod as loan-broker-infra:
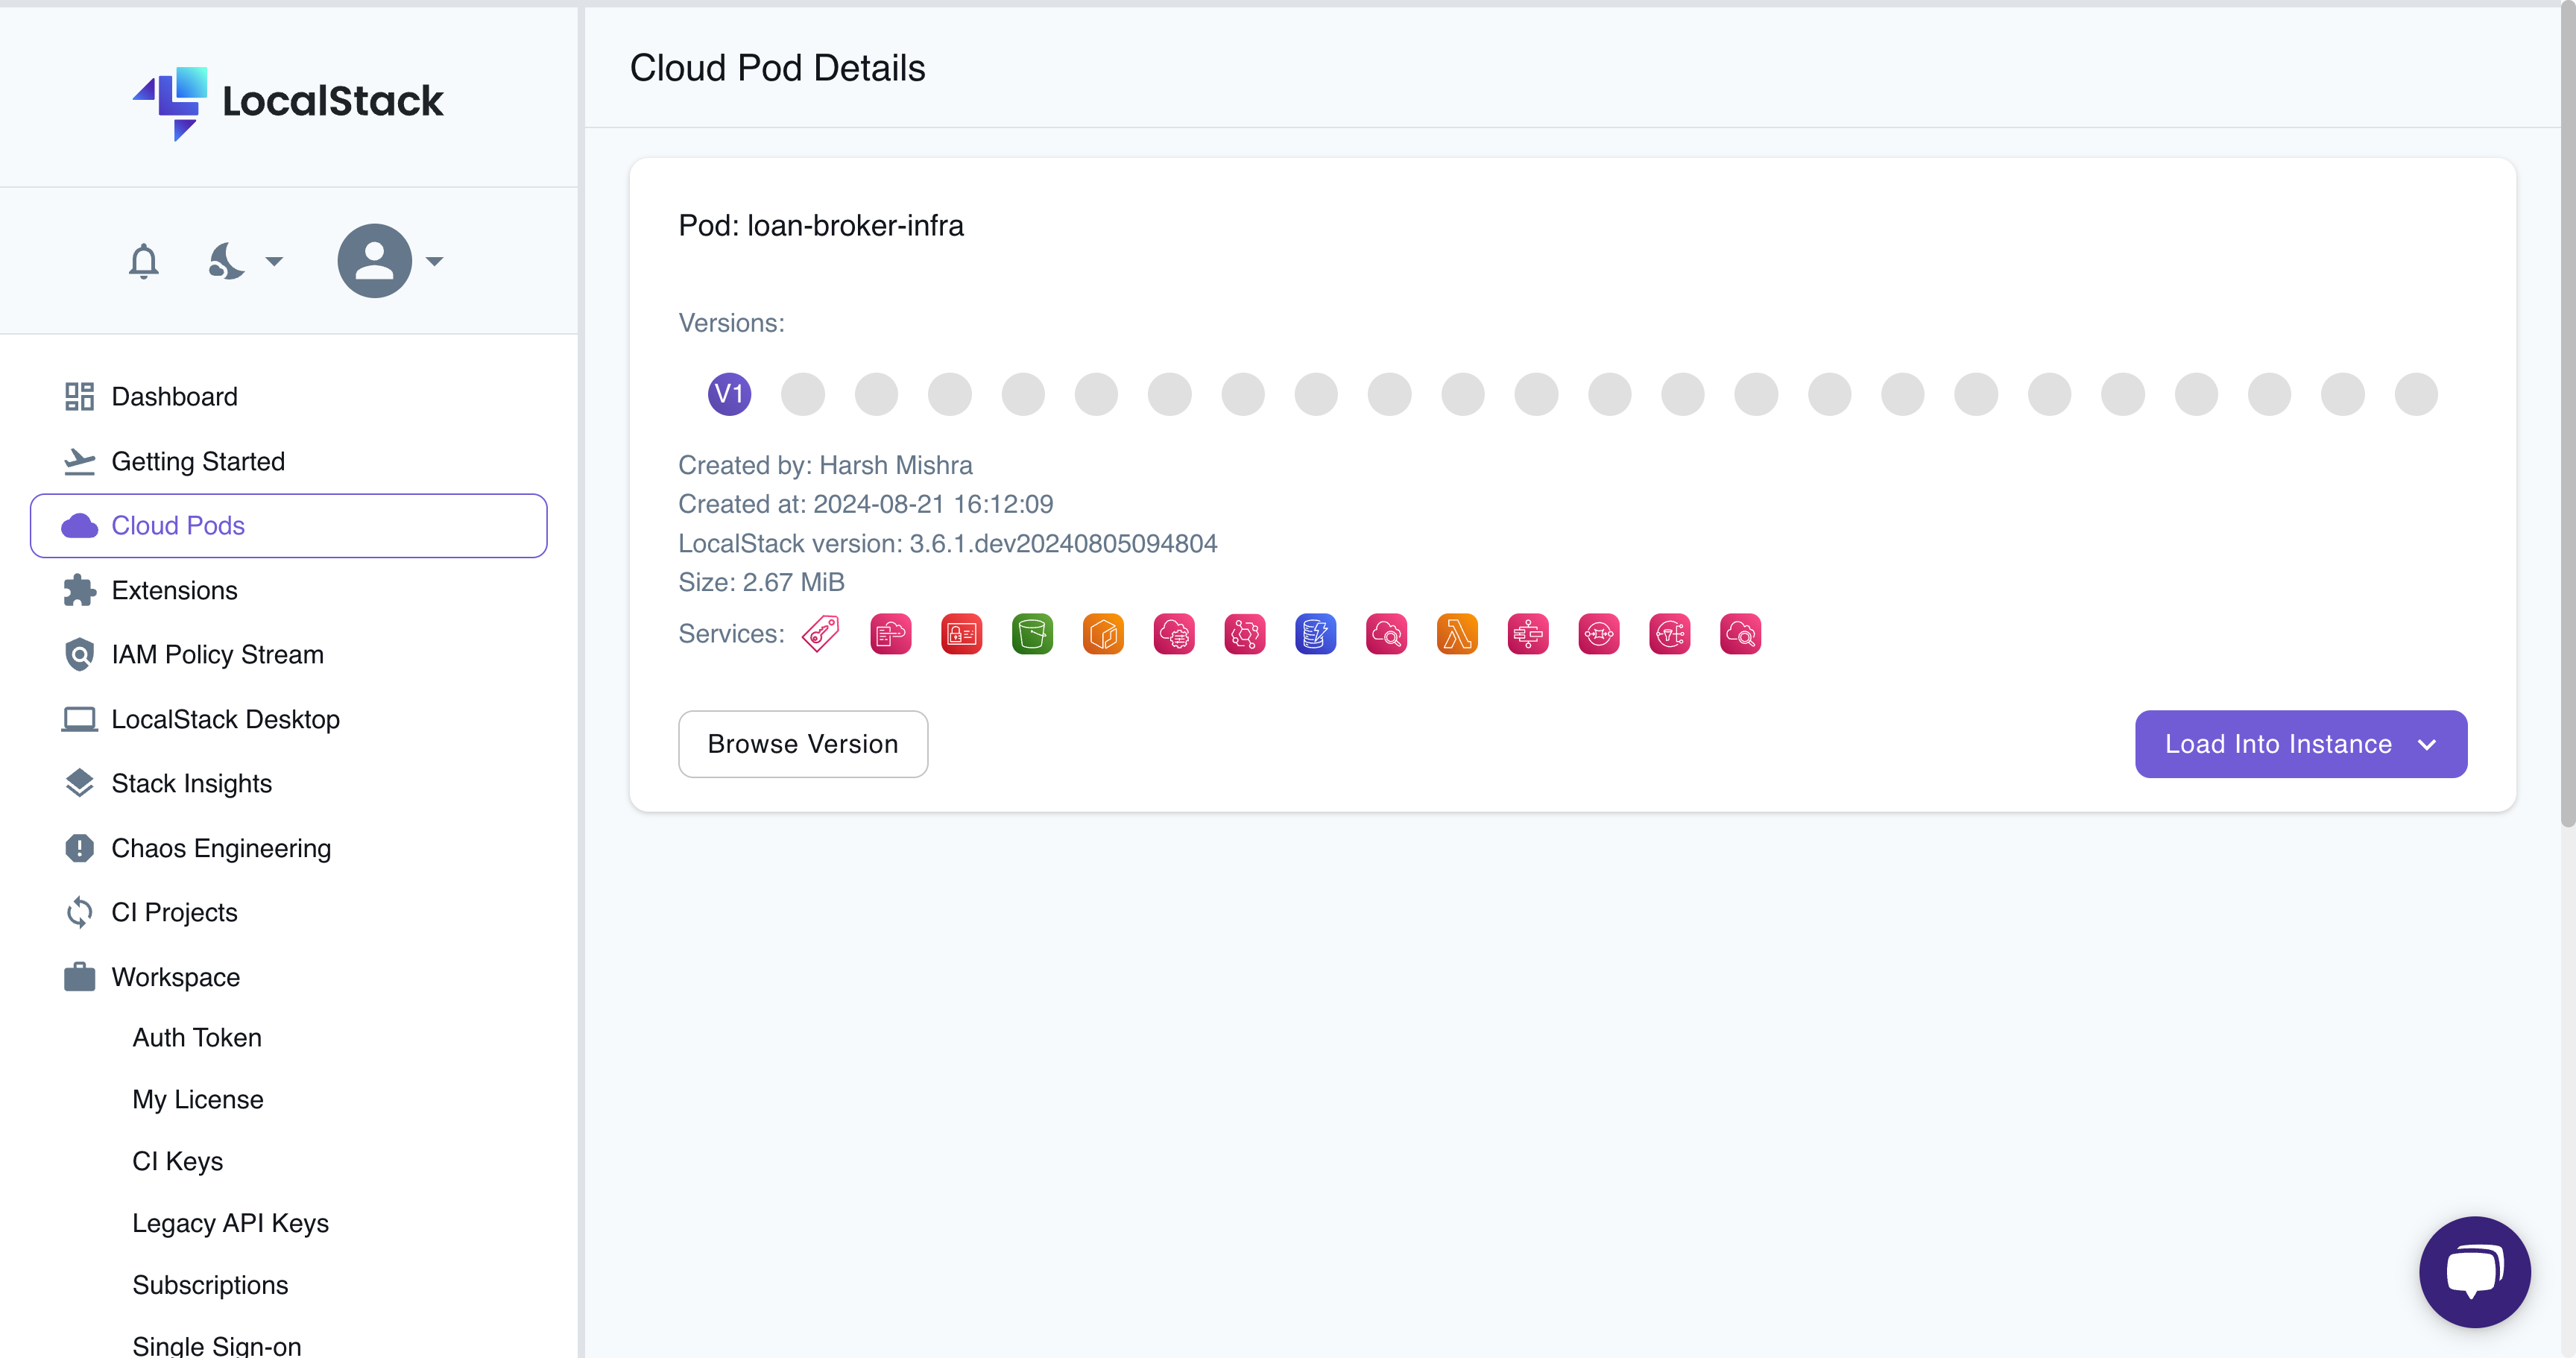
localstack pod save loan-broker-infraThe output should be:
Cloud Pod `loan-broker-infra` successfully created ✅Version: 1Remote: platformServices:sts,cloudformation,iam,s3,ecr,ssm,events,dynamodb,logs,lambda,stepfunctions,sqs,sns,cloudwatchThe version number specifies the latest version of the Cloud Pod saved. Verify the availability of your Cloud Pod by navigating to the Cloud Pods browser.
Implement integration tests against LocalStack
Now that the Cloud Pod is successfully created, you can proceed to write a simple integration test with the following steps:
- Validate that a Loan Broker (
LoanBroker-RecipientList-Stack) state machine is available. - Insert an item in the DynamoDB table (
LoanBrokerBanksTable) for theRecipientsListstack. - Start the state machine execution to get quotes from the banks after submitting a loan application.
- Validate the output of the state machine execution, listing the
Credit,Banks, andQuotes.
For integration testing, use the AWS SDK for Python (boto3) and the pytest framework. Create a new directory called tests and create a file named test_infra.py. Add the necessary imports and pytest fixtures:
import timeimport jsonimport pytestimport boto3
@pytest.fixturedef stepfunctions_client():    return boto3.client(        "stepfunctions", region_name="us-east-1", endpoint_url="http://localhost:4566"    )
@pytest.fixturedef dynamodb_client():    return boto3.client(        "dynamodb", region_name="us-east-1", endpoint_url="http://localhost:4566"    )
Now, include the following code to execute an integration test against the deployed infrastructure:
def test_loan_broker_workflow(stepfunctions_client, dynamodb_client):    response = stepfunctions_client.list_state_machines()    state_machines = response["stateMachines"]
    state_machine_arn = None    for state_machine in state_machines:        if state_machine["name"].startswith(            "LoanBroker-RecipientList-Stack-LoanBroker"        ):            state_machine_arn = state_machine["stateMachineArn"]            break
    assert (        state_machine_arn is not None    ), "State machine with specified prefix not found"
    dynamodb_client.put_item(        TableName="LoanBrokerBanksTable",        Item={            "Type": {"S": "Home"},            "BankAddress": {                "L": [                    {"S": "BankRecipientPremium"},                    {"S": "BankRecipientUniversal"},                    {"S": "BankRecipientPawnshop"},                ]            },        },    )
    start_response = stepfunctions_client.start_execution(        stateMachineArn=state_machine_arn,        name="cli-test-run",        input='{"SSN": "123-45-6789", "Amount": 500000, "Term": 30}',    )    execution_arn = start_response["executionArn"]
    time.sleep(10)
    describe_response = stepfunctions_client.describe_execution(        executionArn=execution_arn    )    output_json = json.loads(describe_response["output"])
    assert "SSN" in output_json    assert "Amount" in output_json    assert "Term" in output_json    assert "Credit" in output_json    assert "Banks" in output_json    assert "Quotes" in output_json
Before running the integration tests, restart the LocalStack container using the following command:
localstack restartNow, load the Cloud Pod (loan-broker-infra) created previously using the following command:
localstack pod load loan-broker-infraThe output should be:
Cloud Pod loan-broker-infra successfully loadedFinally, run the integration tests using the following command:
pytestThe output should be:
=========================================== test session starts ============================================platform darwin -- Python 3.10.4, pytest-7.2.0, pluggy-1.4.0rootdir: ...plugins: html-3.2.0, pylint-0.19.0, json-report-1.5.0, Faker-18.4.0, cov-4.0.0, metadata-2.0.4, anyio-3.6.2, datadir-1.4.1collected 1 item
tests/test_infra.py .                                                                                [100%]
============================================ 1 passed in 10.54s ============================================
Create the GitHub Action workflow
As the final step, you can create the GitHub Action workflow to test your infrastructure. The workflow should:
- Checkout the repository from GitHub.
- Install the
localstackCLI and start the container. - Load the Cloud Pod you created previously in the container.
- Run automated integration tests to verify the infrastructure functionality.
To set up the workflow:
- Create a new directory called
.githuband a sub-directory calledworkflows. - Create a new file called
pods.ymlin theworkflowssub-directory.
Add the following content to the pods.yml file:
name: Deploy using Cloud Pods
on:  push:    branches:      - main  pull_request:    branches:      - main
Create a new job named cloud-pods-test and specify the GitHub-hosted runner, while checking out the code:
jobs: cloud-pods-test: name: Setup infrastructure using Cloud Pods runs-on: ubuntu-latest steps: - name: Checkout the code uses: actions/checkout@v4Set up the step to install Python in the runner as part of the workflow step:
- name: Install Python uses: actions/setup-python@v4 with: python-version: '3.10'Next, set up LocalStack in your runner using the setup-localstack action:
- name: Start LocalStack uses: LocalStack/setup-localstack@main with: image-tag: 'latest' use-pro: 'true' env: LOCALSTACK_API_KEY: ${{ secrets.LOCALSTACK_API_KEY }}This action pulls the LocalStack Pro image (localstack/localstack-pro:latest) and installs the localstack CLI to start the LocalStack container. A repository secret LOCALSTACK_API_KEY is specified to activate your Pro license on the GitHub Actions runner.
Now, add the step to pull the Cloud Pod using the LocalStack/setup-localstack/cloud-pods action. It allows you to specify the name of the Cloud Pod and the corresponding action (load & save) to execute in the environment:
- name: Load the Cloud Pod uses: LocalStack/setup-localstack/cloud-pods@main with: name: loan-broker-infra action: load env: LOCALSTACK_API_KEY: ${{ secrets.LOCALSTACK_API_KEY }}Finally, add a step to run the integration tests in an automated way:
- name: Run integration tests run: | pip3 install boto3 pytest pytest env: AWS_DEFAULT_REGION: us-east-1 AWS_REGION: us-east-1 AWS_ACCESS_KEY_ID: test AWS_SECRET_ACCESS_KEY: testRun the GitHub Action workflow
Before triggering your workflow, set up a continuous integration (CI) key for LocalStack. LocalStack requires a CI Key for use in CI or similar automated environments.
Follow these steps to add your LocalStack CI key to your GitHub repository:
- Go to the LocalStack Web Application and access the CI Keys page.
- Switch to the Generate CI Key tab, provide a name, and click Generate CI Key.
- In your GitHub repository secrets, set the Name as
LOCALSTACK_API_KEYand the Secret as the CI Key.
Now, commit and push your workflow to your forked GitHub repository.
With the GitHub Action in place, you will notice that your Cloud Pod is automatically loaded, and your tests are executed against it.
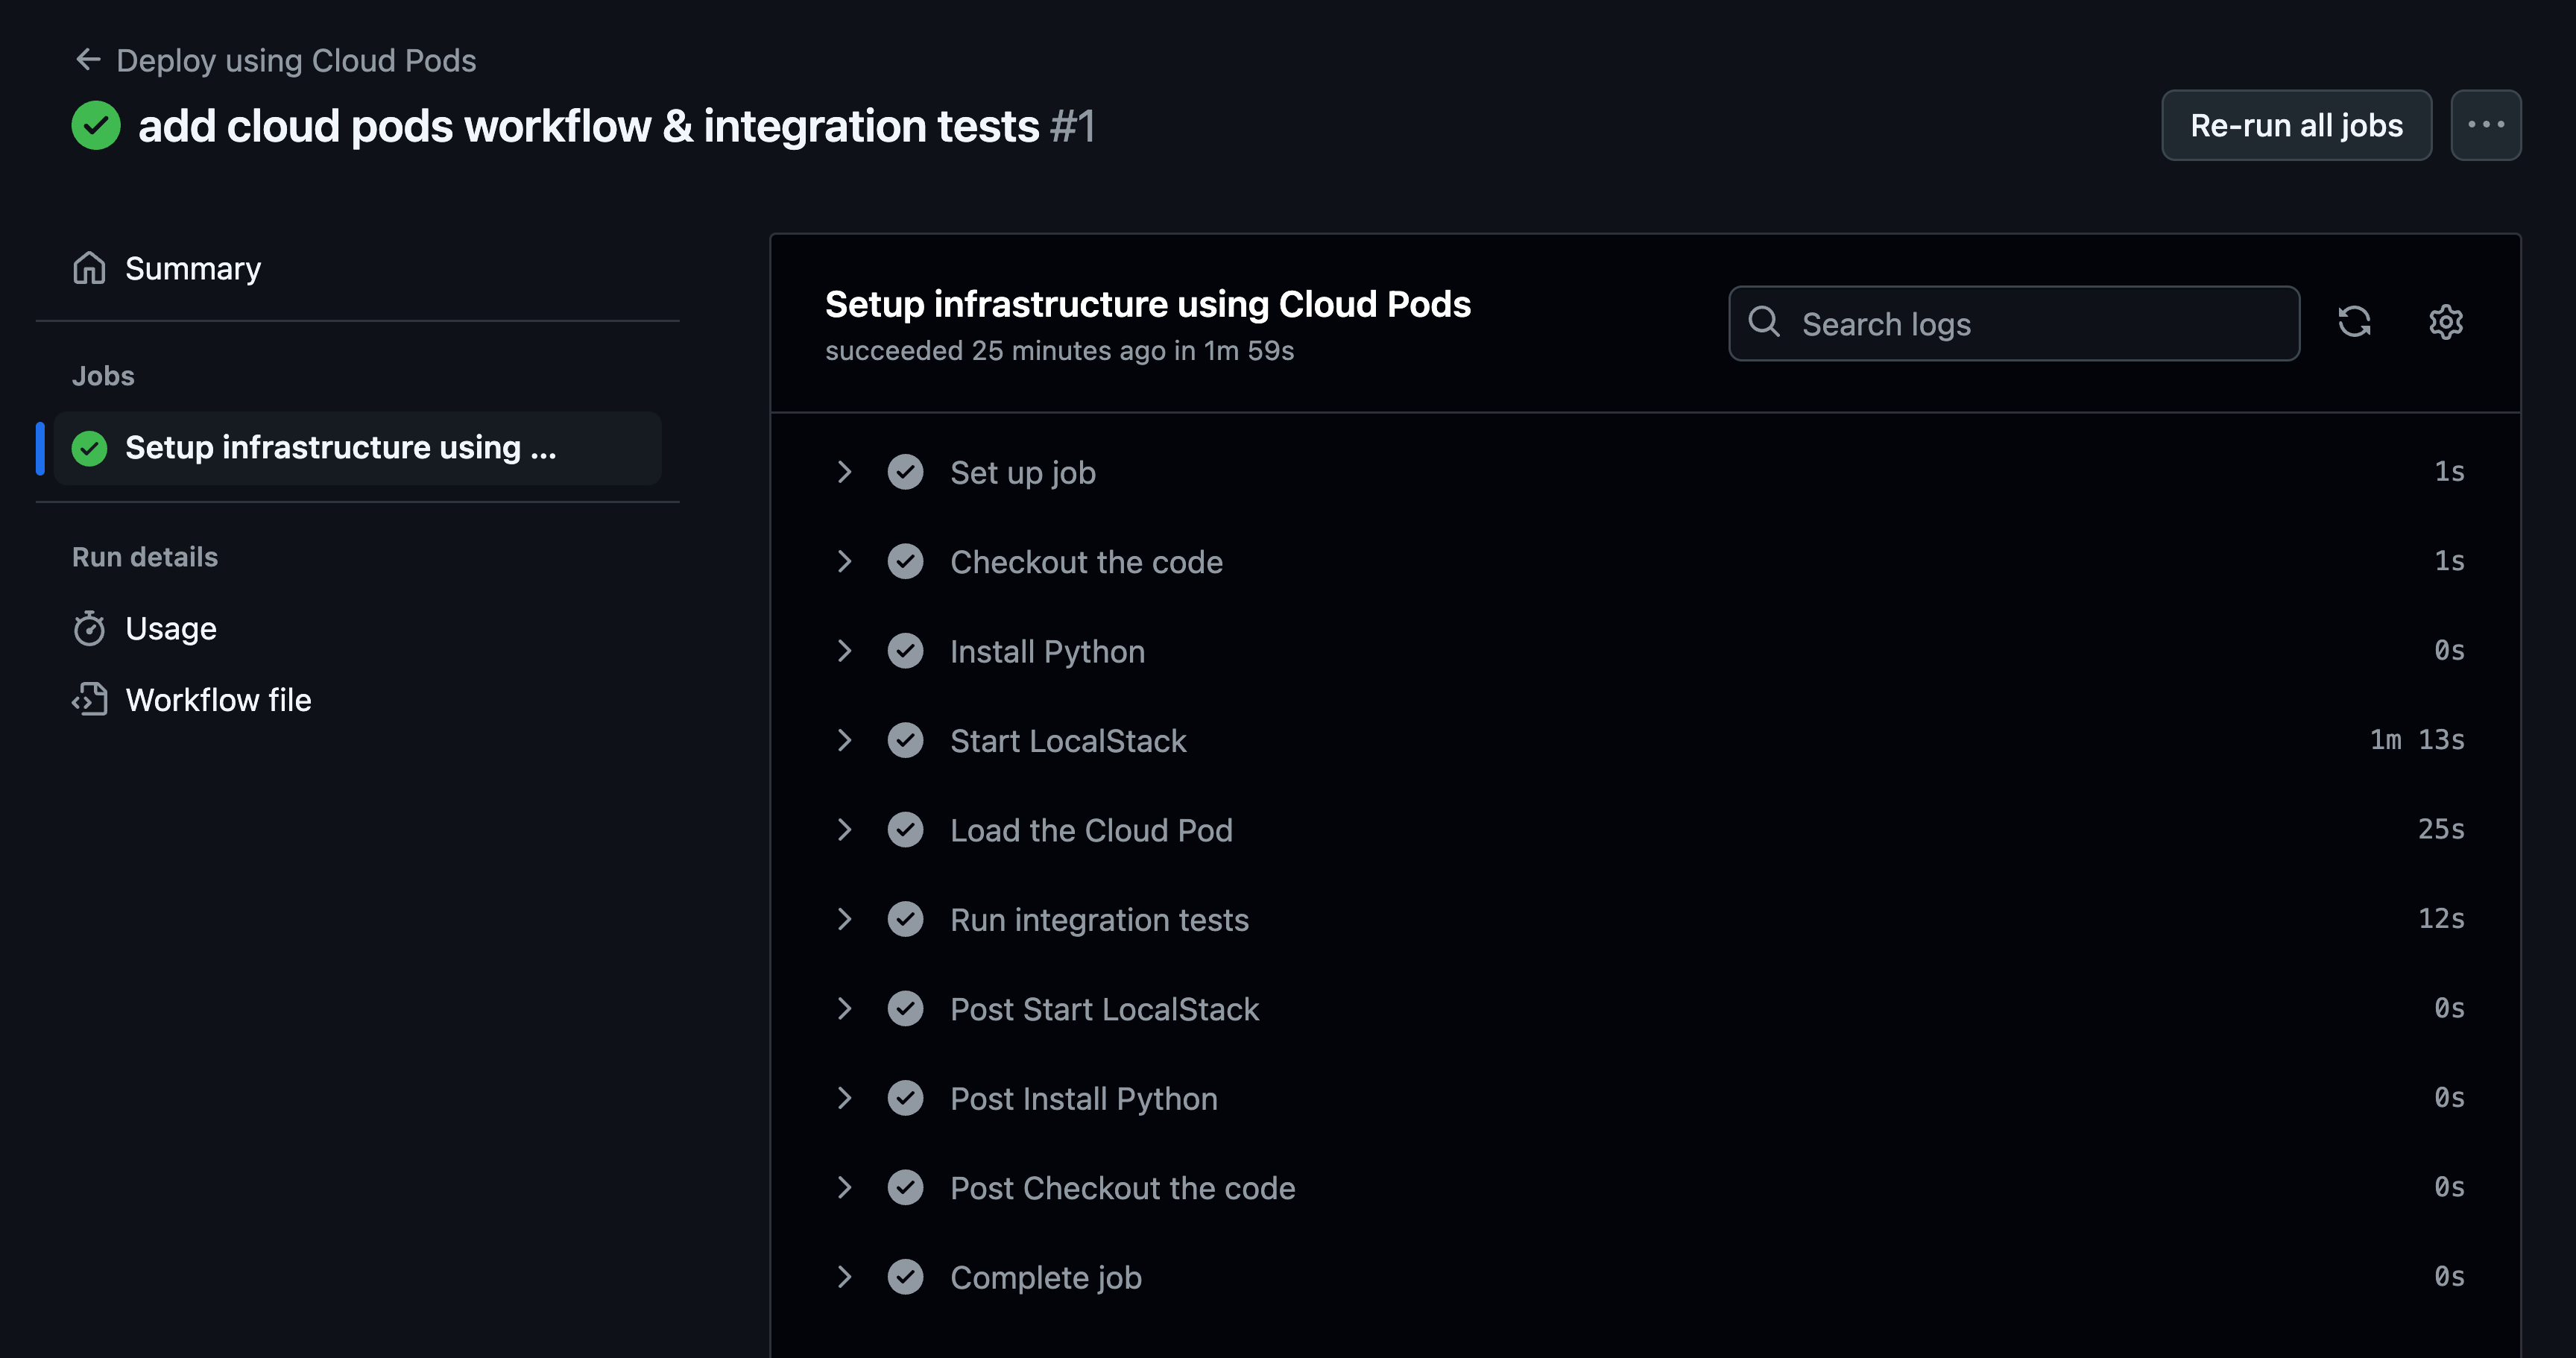
An interesting note is that it’s faster to save your pre-existing infrastructure into a Cloud Pod, which can be further used for testing, compared to spinning up your infrastructure from scratch using the CDK every time.
You can incorporate an additional step to preserve a new Cloud Pod in the event of test failures. Insert the following step in your GitHub Action workflow to save a new Cloud Pod when tests fail:
- name: Save the Cloud Pod if: failure() uses: LocalStack/setup-localstack/cloud-pods@main with: name: loan-broker-infra-ci action: save env: LOCALSTACK_API_KEY: ${{ secrets.LOCALSTACK_API_KEY }}Post CI execution, you can access the Cloud Pods browser to examine the Cloud Pod and load it locally for further examination and debugging.
Conclusion
Using Cloud Pods, you can boost efficiency by reducing the setup time from minutes to mere seconds. This rapid deployment not only accelerates the development cycle but also allows developers to focus more on actual work and less on waiting, aligning perfectly with the demands of agile methodologies and fast-paced project timelines.
In the upcoming blog posts, we’ll demonstrate how to use Cloud Pods in more unique scenarios — running end-to-end UI tests for your cloud apps, configuring distinct testing scenarios, facilitating developer onboarding and more! Stay tuned for more blogs on how LocalStack is enhancing your cloud development and testing experience.
You can find the GitHub Action workflow and integration test in this GitHub repository.