5 Cloud Pods Features You Might Have Missed
Discover 5 powerful Cloud Pods features in LocalStack that help you securely manage, merge, automate, and share your local cloud state seamlessly. This post explores recent Cloud Pods enhancements that help you streamline cloud development and collaborate more efficiently.
Introduction
By default, the state of all services in LocalStack is ephemeral. Each time you restart your LocalStack Docker container, it creates a completely fresh instance, wiping the previous state clean. This default behavior is excellent for rapid experimentation and gives a predictable and consistent starting point whenever you iterate on your application locally.
Cloud Pods allows you to capture persistent snapshots of your LocalStack environment. These snapshots can be stored, versioned, shared, and quickly restored. This gives you better control over the state of your instance. Unlike regular persistence, which pauses and resumes the entire instance state, Cloud Pods allow selective saving, loading, and merging of states.
In recent months, we’ve rolled out several enhancements to Cloud Pods. In this post, we’ll highlight five key features you might have overlooked. These enhancements offer better security, increased control over your cloud environment, enhanced observability, seamless automation, and greater flexibility in managing your storage options.
Let’s look at them to learn how you can effectively leverage Cloud Pods in your projects!
1. End-to-End Encryption
Security is always a priority, especially when dealing with cloud resources. Cloud Pods created with LocalStack are stored securely within a dedicated and isolated AWS S3 bucket allocated specifically to each user or organization. By default, every Cloud Pod is encrypted at rest using AWS S3’s built-in encryption, ensuring your data is protected. If you’ve created Cloud Pods before, you can access them in our Cloud Pods browser.
We’ve now taken this a step further by introducing end-to-end encryption, providing an additional layer of security by encrypting Cloud Pods before they even leave your environment. This ensures that your data remains encrypted not only while stored but also during transit and throughout the entire lifecycle of your Cloud Pods.
To enable end-to-end encryption, simply start LocalStack with the LOCALSTACK_POD_ENCRYPTION environment variable set to 1. You can do this easily using:
LOCALSTACK_POD_ENCRYPTION=1 localstack startBefore you create your encrypted Cloud Pod, you’ll first generate a secure passphrase using a utility like openssl. For example:
openssl rand --base64 32# Example output:3X03eU5pgoejObUR+Y8I4QjbjeGEKjDcmVFd0FU5pCg=This generated passphrase acts as your encryption key and should be treated as a sensitive secret. When you save a new Cloud Pod, you’ll provide this passphrase to encrypt your data:
localstack pod save my-secret-pod --secret 3X03eU5pgoejObUR+Y8I4QjbjeGEKjDcmVFd0FU5pCg=To load the encrypted Cloud Pod, you’ll again use the same secret:
localstack pod load my-secret-pod --secret 3X03eU5pgoejObUR+Y8I4QjbjeGEKjDcmVFd0FU5pCg=It’s important to note that once a Cloud Pod is created with encryption, this cannot be changed. You won’t be able to switch between encrypted and non-encrypted versions.
This provides an extra assurance that your sensitive data remains consistently protected, and you gain peace of mind, knowing your Cloud Pods remain secure on our storage platform.
2. State Merging & Dry Run
When managing application states with LocalStack Cloud Pods, you might often face scenarios where you need to combine a previously saved Cloud Pod state with the currently running LocalStack instance. Loading a Cloud Pod into a brand-new instance is straightforward, but what happens when your running LocalStack already contains existing resources? This is where state merging strategies come into play.
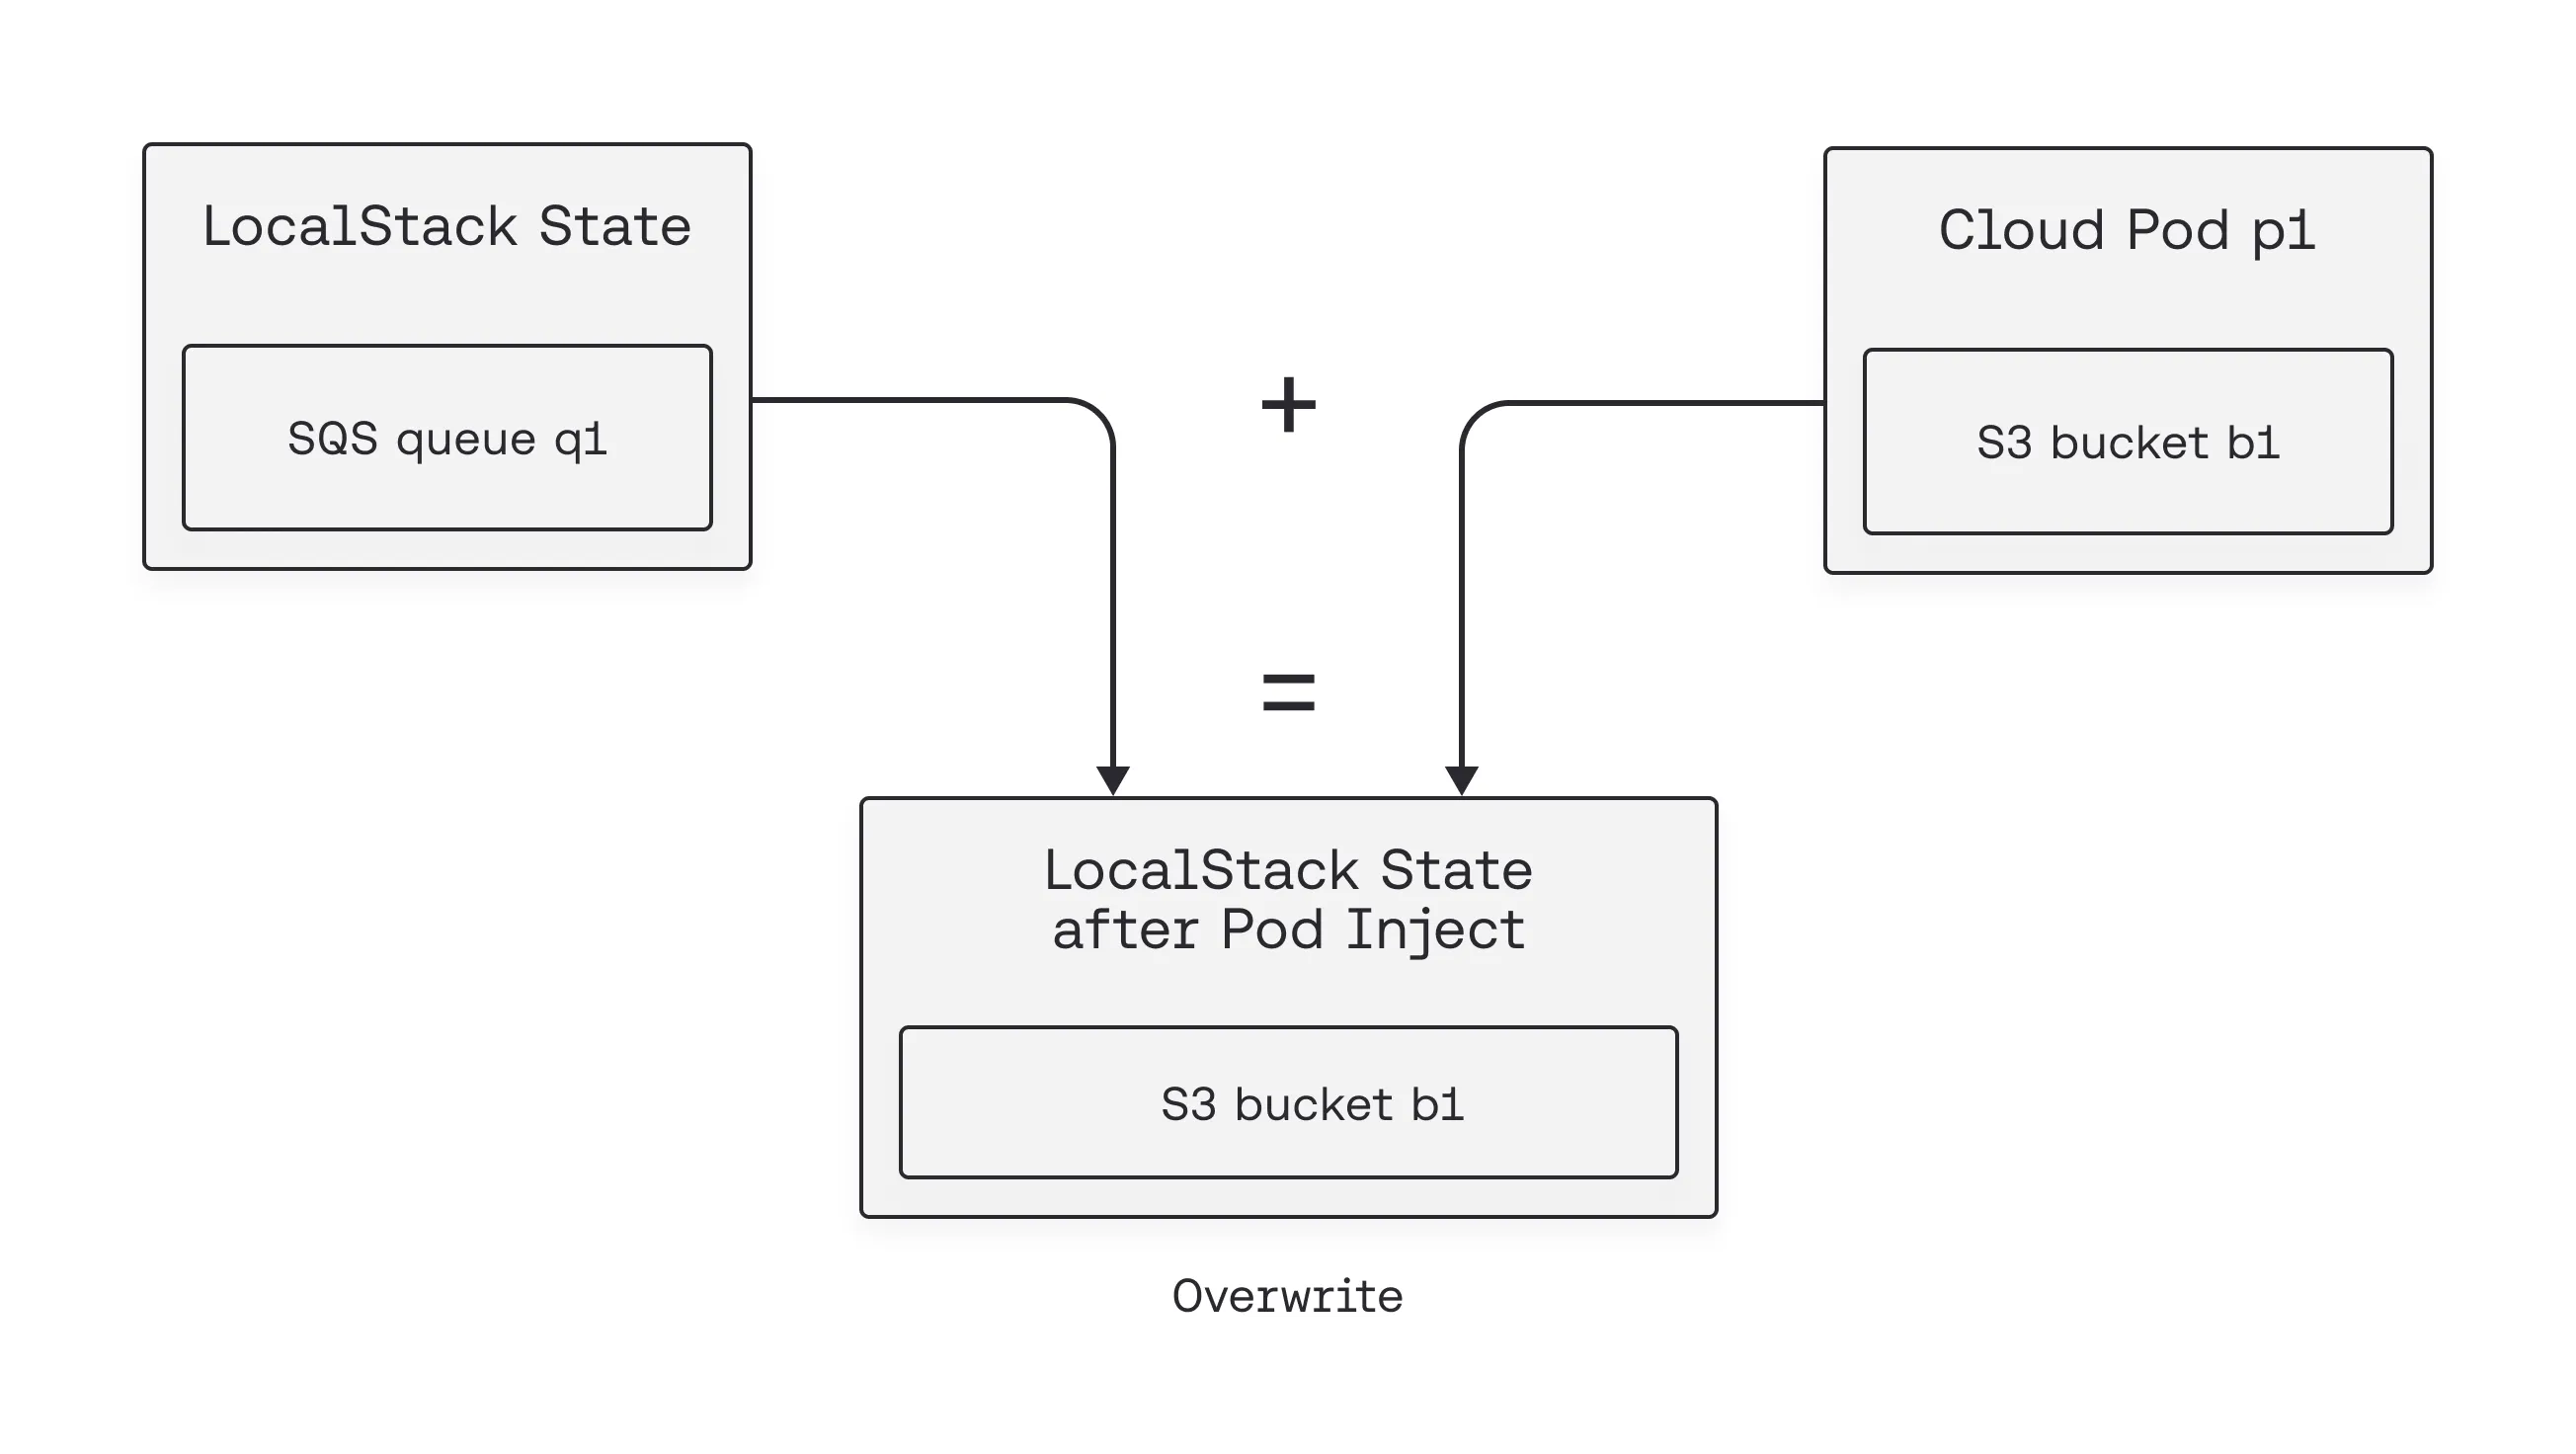
If you’re looking for a clean slate — say, you’re done experimenting and just want the exact state from your Cloud Pod — there’s the overwrite strategy that resets everything, completely replacing your current setup with your saved Cloud Pod state. This is equivalent to restarting LocalStack with a clean state and injecting a Cloud Pod.
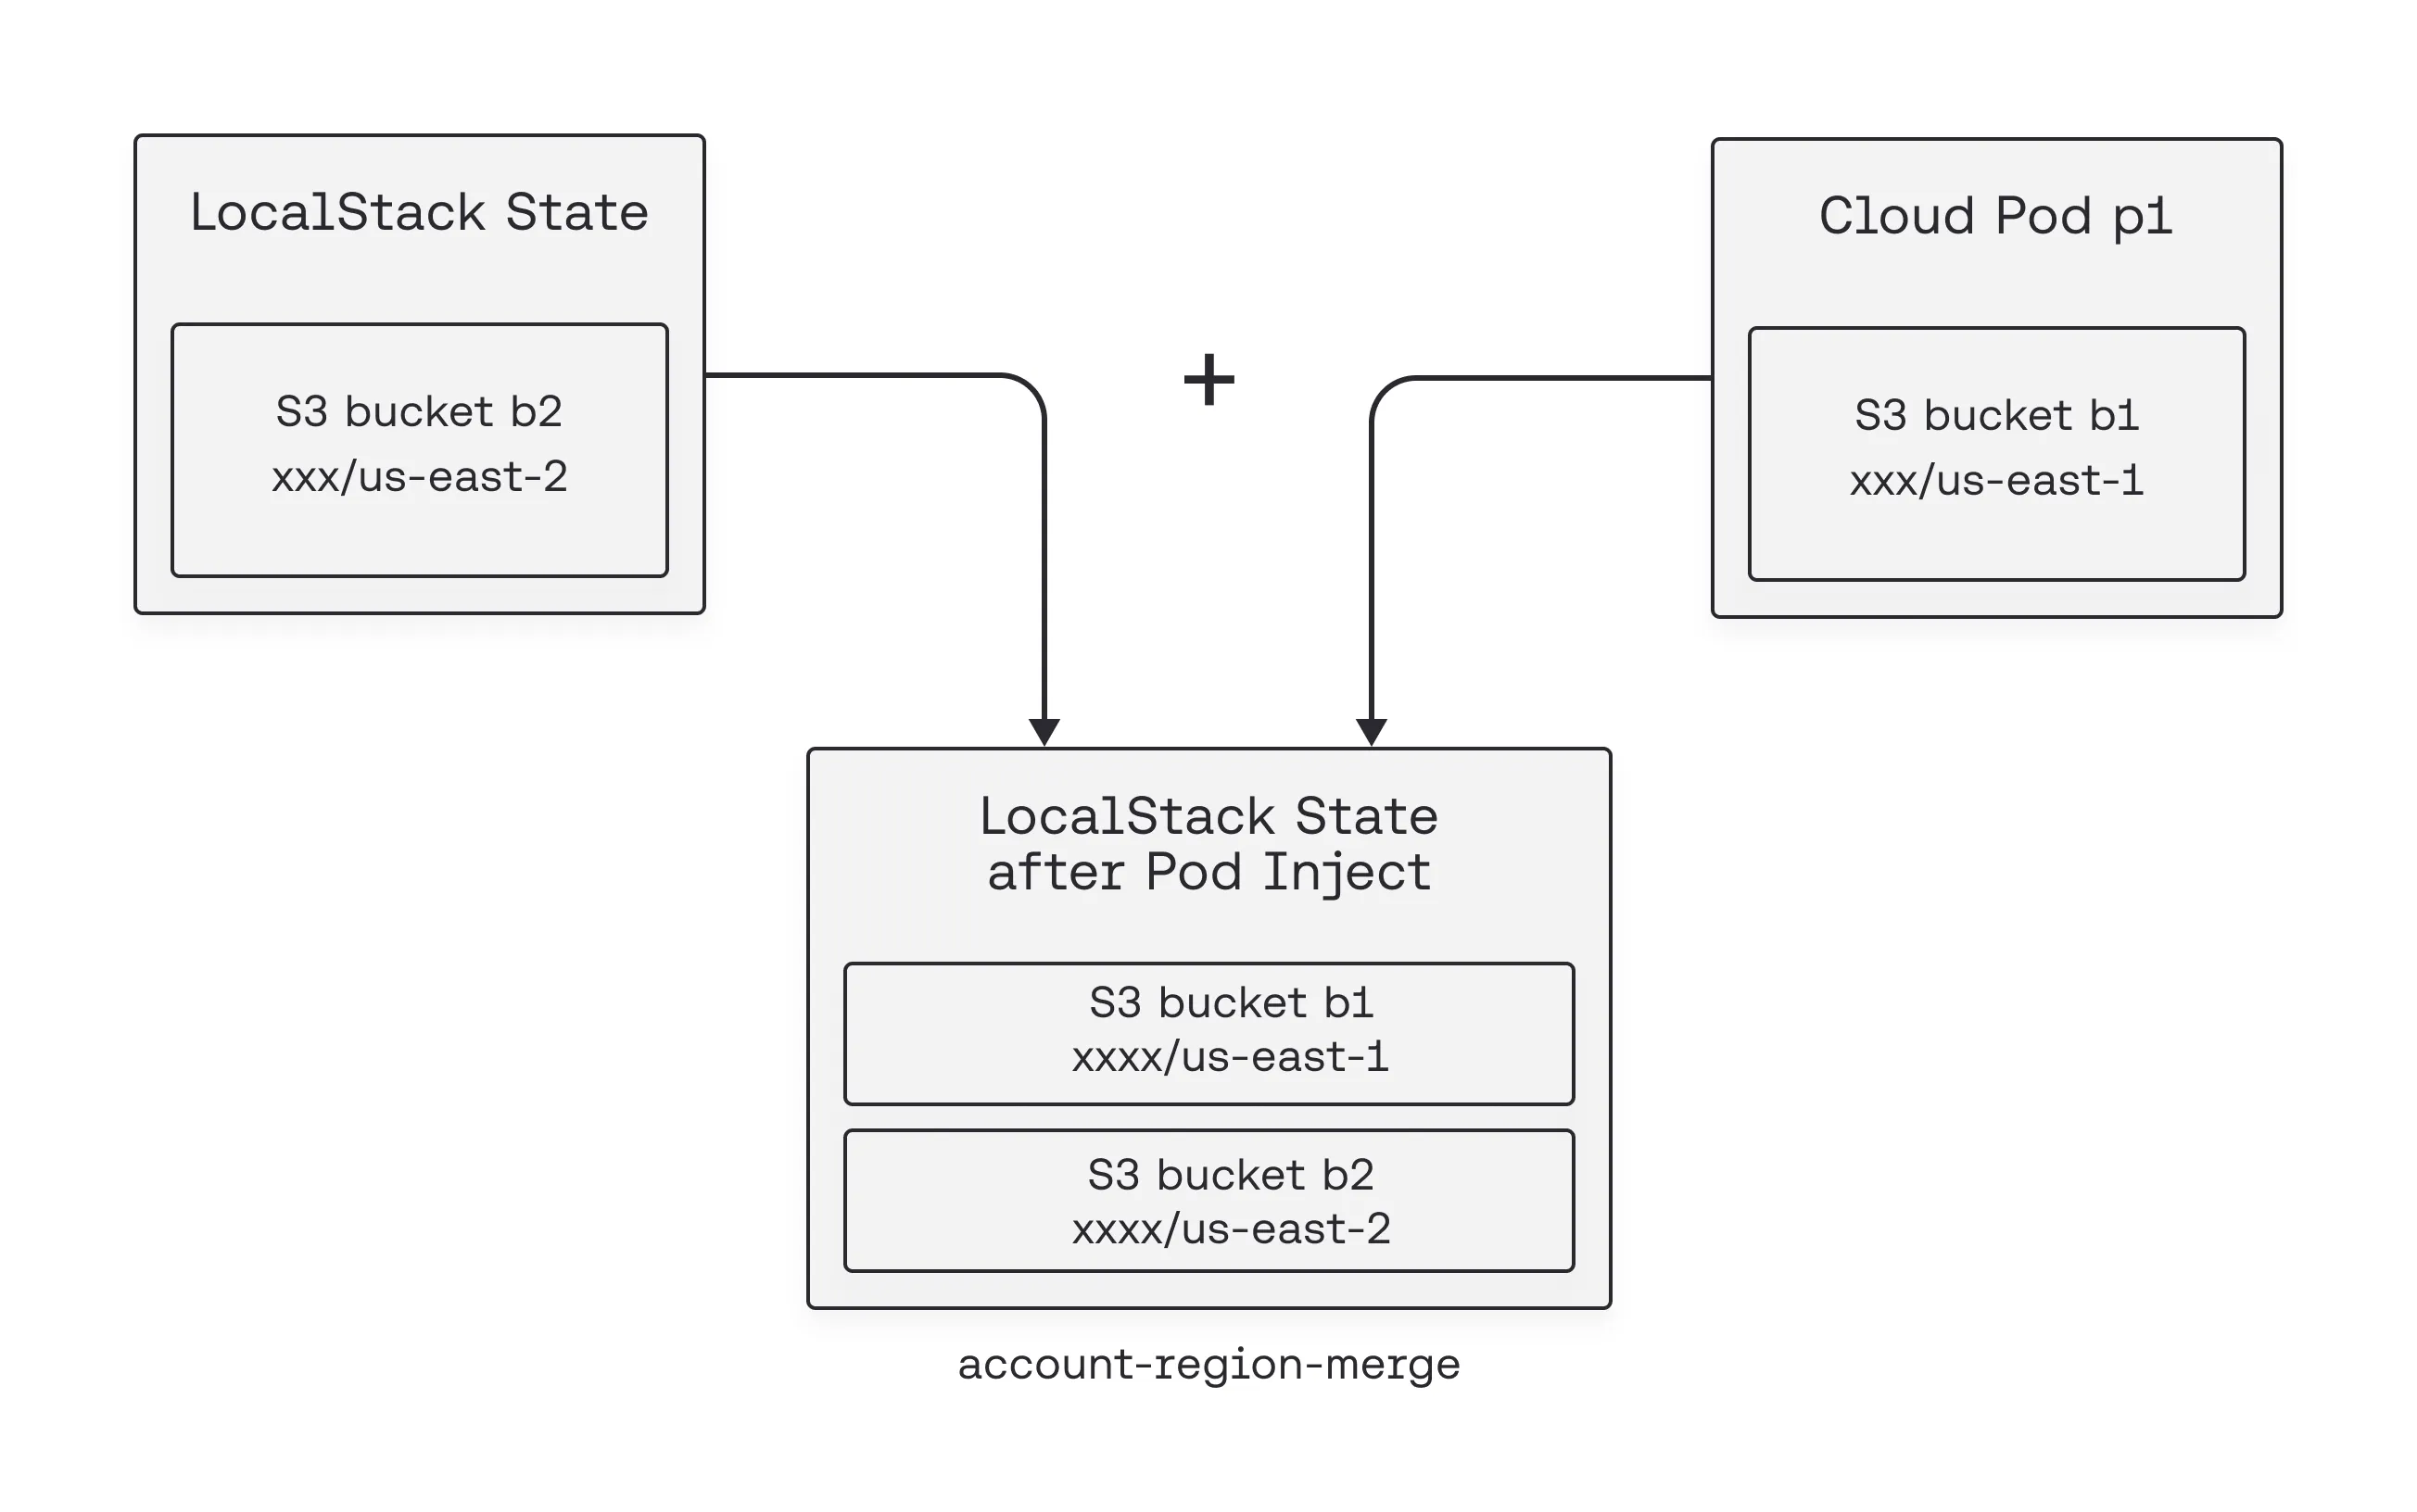
But in practice, things are rarely that straightforward. Often, you’ll already have resources set up, and you just want to blend them neatly with what’s in your Cloud Pod. With the account-region-merge strategy, LocalStack smartly merges based on accounts and regions, preserving the Cloud Pod’s resources whenever there’s a conflict.
Let’s take a look at an example — Imagine your Cloud Pod and your LocalStack instance each contain resources, but in different AWS account-region pairs. For instance, the Cloud Pod has resources in the 0123456789/us-east-1 region, while your active LocalStack instance has resources in 0123456789/us-east-2. Since these don’t overlap, after merging, both sets of resources happily coexist in your final environment without any trouble.
Now, consider a slightly trickier situation. Both your Cloud Pod and your running LocalStack instance have resources in the same account-region pair, like 0123456789/eu-central-1. This could potentially cause a conflict. With the default merge strategy (account-region-merge), LocalStack resolves conflicts at the account-region level. The entire state for the conflicting account-region pair (0123456789/eu-central-1) in your running instance is removed and replaced with the state from the Cloud Pod for that same account-region.
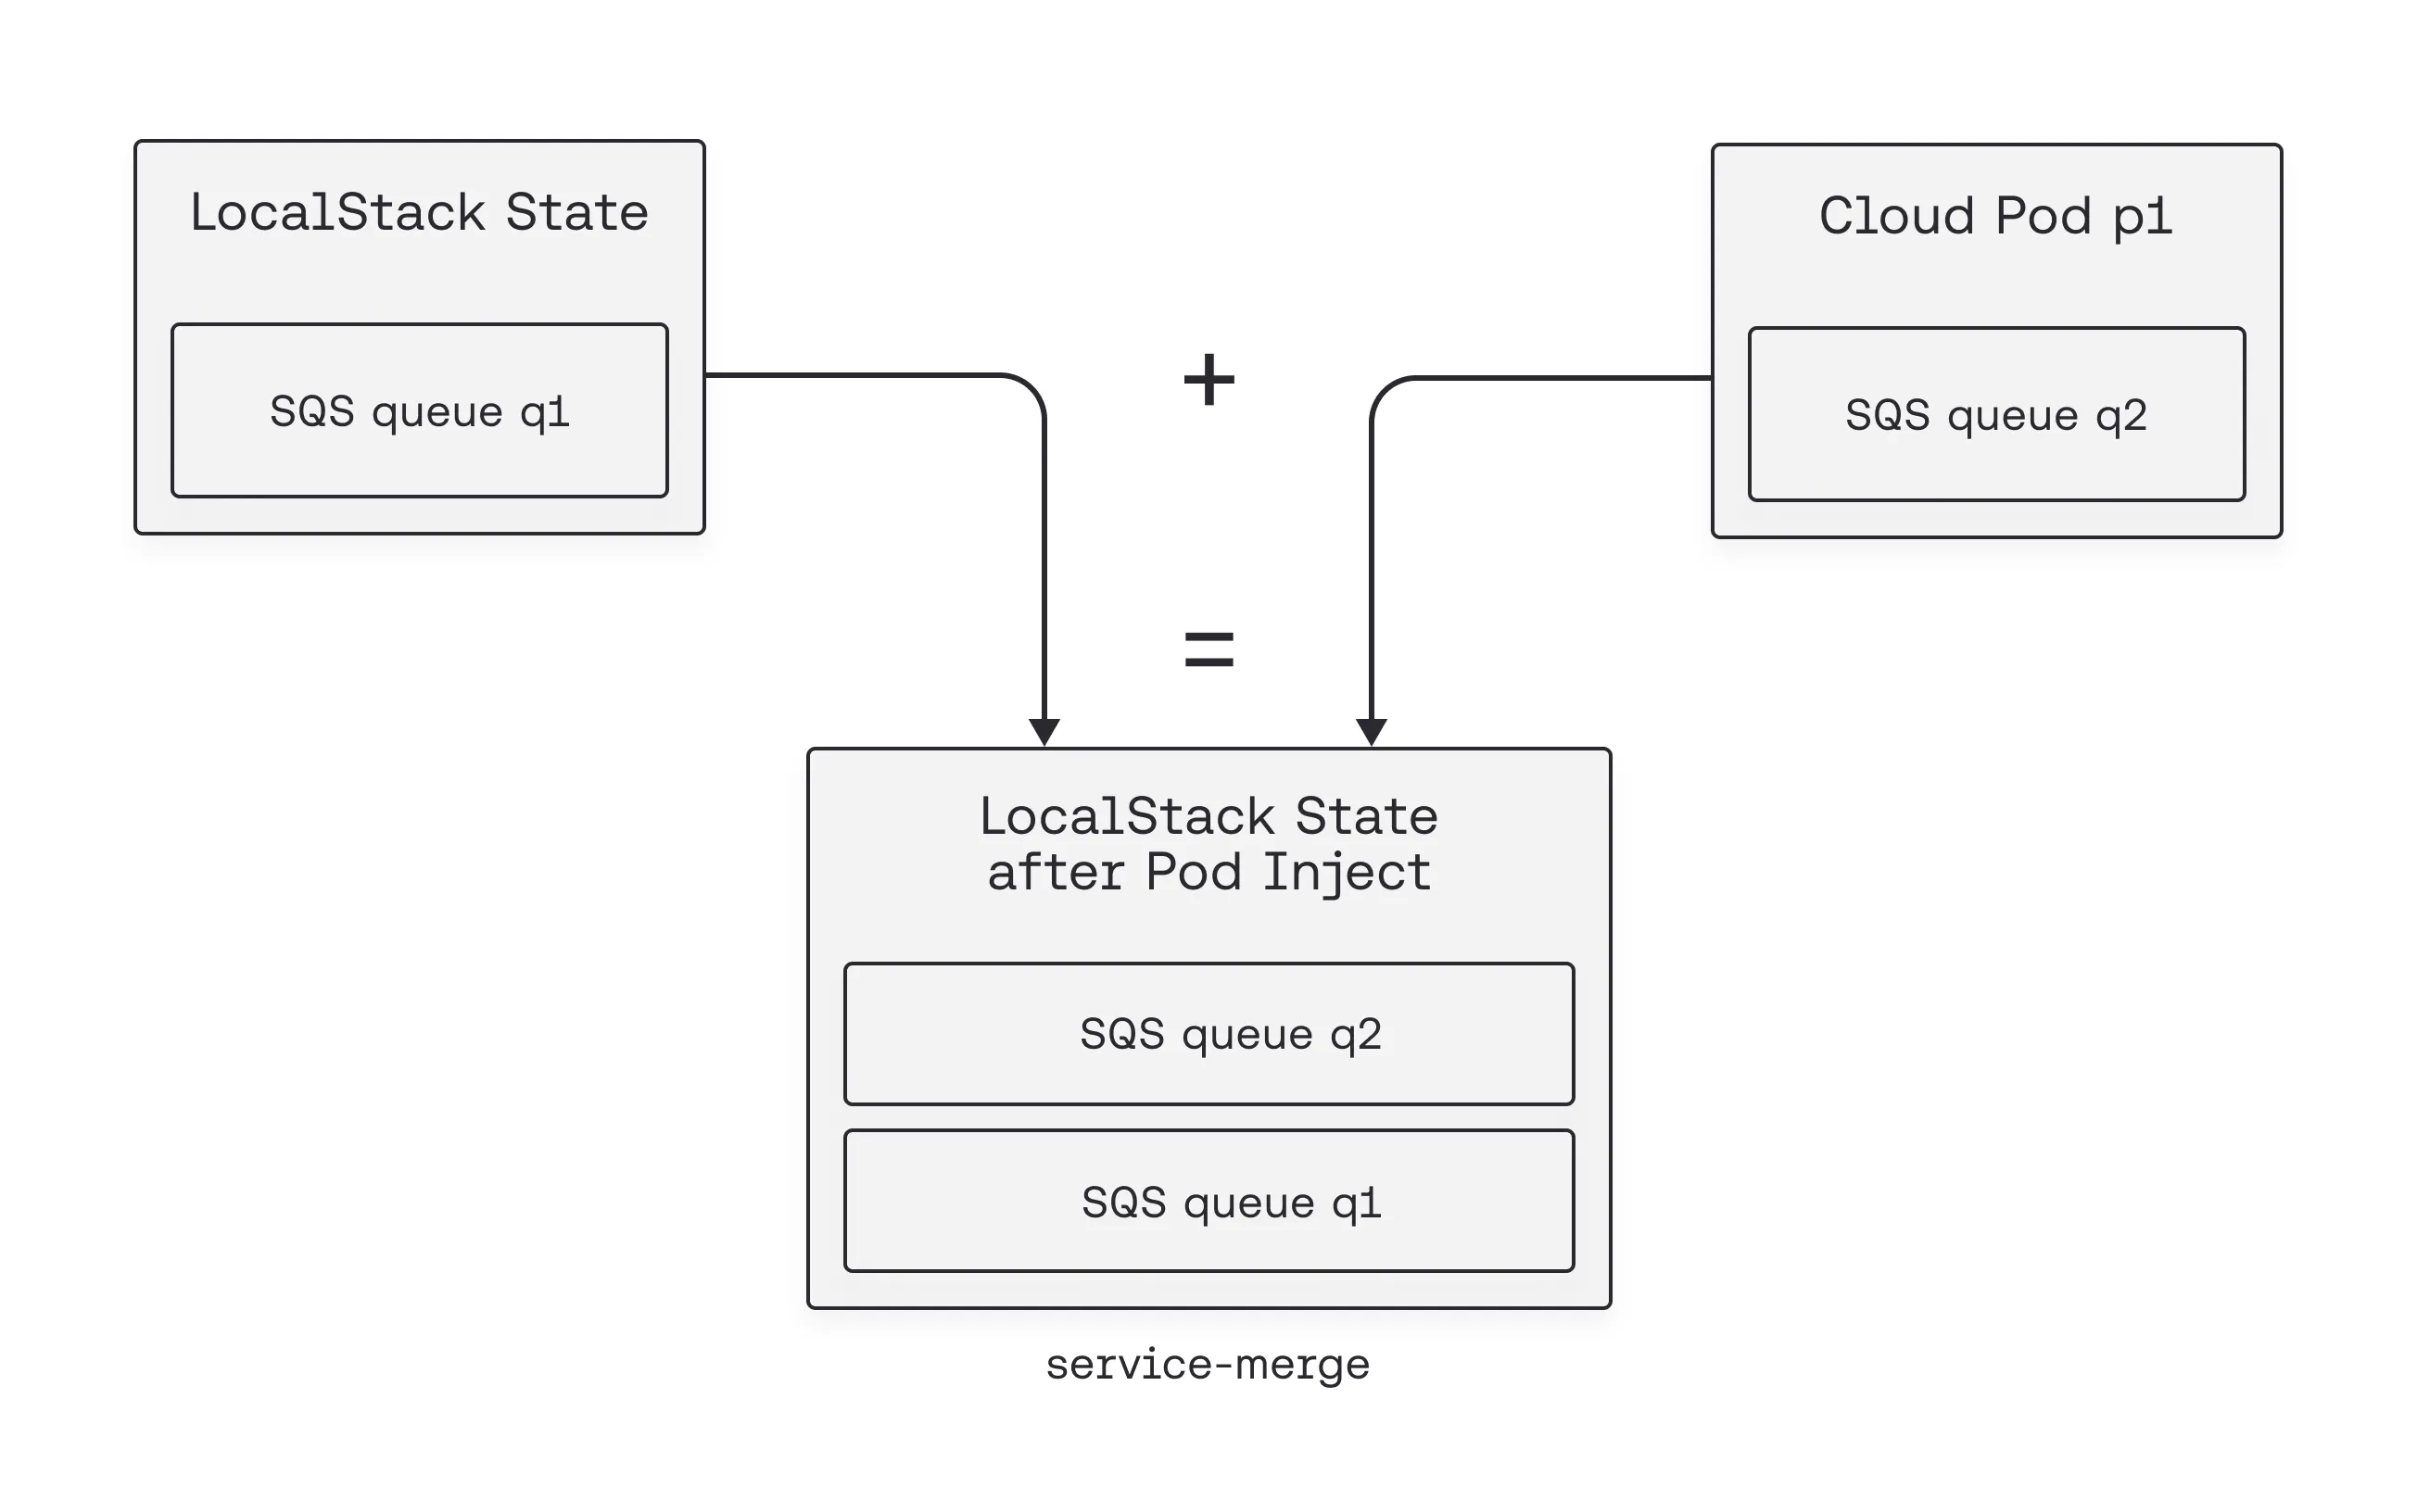
For finer control, the service-merge strategy merges states at the service level instead of replacing the entire region. Resources from both the Cloud Pod and the running instance can coexist in the same account-region, as long as they don’t directly conflict (e.g., two SQS queues with the same ARN). If a conflict occurs, the Cloud Pod resource takes priority, ensuring a predictable merge while keeping non-conflicting resources.
To specify a merging strategy, you can use the --strategy option when loading a Cloud Pod. For example, to load a Cloud Pod named test-pod-s3-sqs using the service-merge strategy, you’d use:
localstack pod load test-pod-s3-sqs --strategy service-mergeTo further help you preview what changes will happen when loading a Cloud Pod, LocalStack offers a helpful --dry-run option. This option gives you a clear summary of how your state will be affected without making any actual changes. Here’s how a dry-run result might look:
This load operation will modify the runtime state as follows:
──────────────────────────── sns ────────────────────────────+ 2 resources added.~ 1 resources modified.
──────────────────────── cognito-idp ────────────────────────+ 1 resources added.~ 0 resources modified.
──────────────────────────── sqs ────────────────────────────+ 1 resources added.~ 1 resources modified.
This way, you can confidently decide which merging strategy best fits your needs and avoid unintended state changes.
3. Resource Visibility
When managing cloud environments, having clear and immediate visibility into your resources is important. Without it, you’re often left guessing — what exactly is stored in a given snapshot? Who created it, when, and what’s inside? This is exactly where Cloud Pods’ resource visibility becomes invaluable.
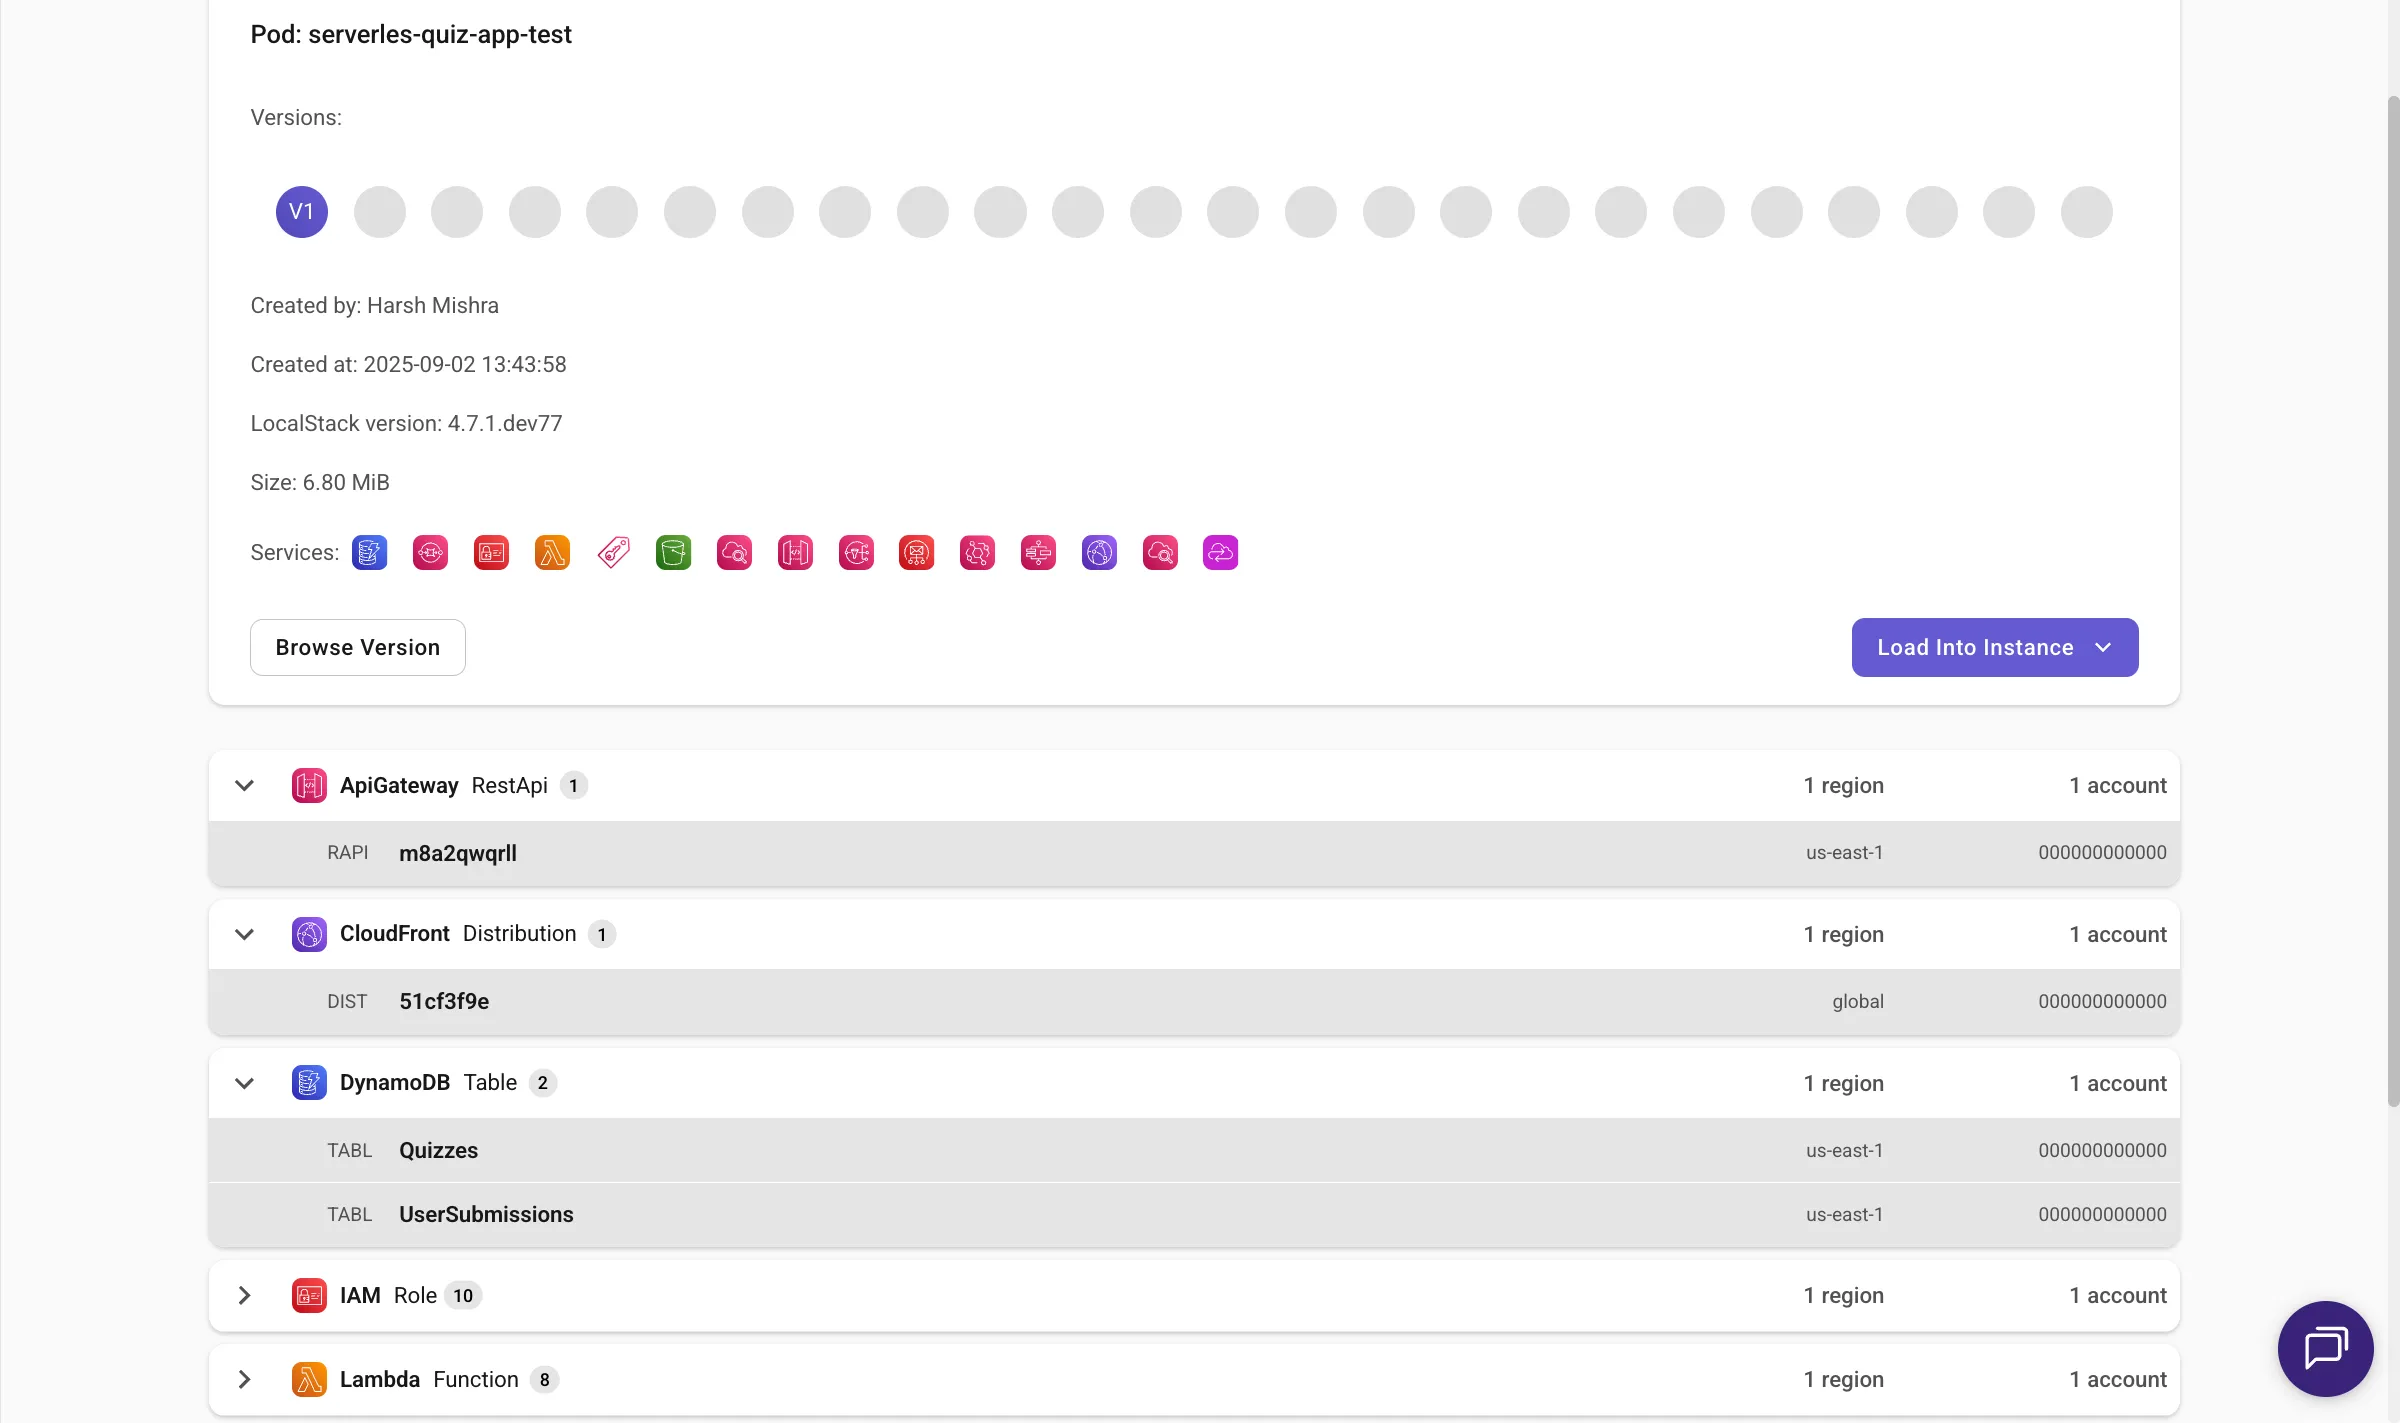
With LocalStack’s Cloud Pods Browser, you’re able to quickly view essential metadata about your Cloud Pods. Previously, this included information such as who created a particular Cloud Pod, exactly when it was created, the LocalStack version it was generated with, its overall size, and which AWS services it includes.
Now, you can get detailed insights into the specific resources included. Without needing to load anything into your LocalStack runtime, you can directly browse the categorized resources — like Lambda functions, DynamoDB tables, IAM roles, and API Gateways — complete with their configurations, resource identifiers, and endpoints.
To take advantage of this detailed resource visibility, make sure to enable it explicitly. When starting your LocalStack container, set the ENABLE_POD_RESOURCES environment variable to 1:
LOCALSTACK_ENABLE_POD_RESOURCES=1 localstack startOnce enabled, any Cloud Pod you save will include rich metadata with granular details. Cloud Pods created without this configuration will still store state, but won’t provide the same detailed breakdown of resources.
4. Auto Loading Cloud Pods
Automation is a core part of effective development workflows, helping you focus more on building features rather than repeatedly setting up environments. You can directly automate the loading of your Cloud Pods whenever your LocalStack container starts, to ensure your development environment is always ready with the exact resources you need with no manual setup required.
You can achieve this auto-loading in a couple of convenient ways. The easiest is using the LOCALSTACK_AUTO_LOAD_POD environment variable. By setting this variable when you start LocalStack, you instruct it to automatically load one or more Cloud Pods right away. You can even specify multiple Cloud Pods to load in sequence:
LOCALSTACK_AUTO_LOAD_POD=foo-pod,bar-pod localstack startIn this example, LocalStack loads foo-pod first, then bar-pod. Keep in mind, if both pods contain resources within the same service, account, and region, the resources from the last pod (bar-pod) will override those from the first (foo-pod).
Auto-loading Cloud Pods lets you turn repetitive manual setups into easy automation, letting you spend more time creating great applications instead of setting up development environments.
5. Remote Storage
When working in environments with strict security requirements or tight data regulations, having control over where and how your cloud snapshots are stored becomes crucial. Although Cloud Pods store your snapshots securely by default on the LocalStack platform, there are scenarios where organizations need full control over data storage — such as regulatory compliance, data sovereignty, or internal security guidelines.
LocalStack provides two convenient alternatives for storing Cloud Pods remotely:
- AWS S3 Bucket storage: Store your Cloud Pods directly in your own AWS account.
- ORAS (OCI Registry as Storage): Leverage OCI-compliant registries (like Docker Hub) for snapshot storage.
You can easily manage these remote storage options through the Cloud Pods command-line interface (CLI):
localstack pod remote --helpHere’s how simple it is to set up an AWS S3 bucket as your remote storage option:
First, you’ll need to ensure your AWS credentials are available to your terminal session. You can do this using environment variables:
export AWS_ACCESS_KEY_ID=...export AWS_SECRET_ACCESS_KEY=...Once you’ve set your credentials, the next step is creating a remote configuration. Suppose you have an AWS S3 bucket named ls-pods-bucket-test. You can configure it as your remote storage by running:
localstack pod remote add s3-storage-aws 's3://ls-pods-bucket-test/?access_key_id={access_key_id}&secret_access_key={secret_access_key}'Now you’re ready to save your Cloud Pod directly to this remote storage. Simply use:
localstack pod save my-pod s3-storage-awsTo confirm your Cloud Pod was saved correctly, you can easily check your AWS S3 bucket:
aws s3 ls s3://ls-pods-bucket-test# Output example:2025-04-02 13:50:10 83650 localstack-pod-my-pod-state-1.zip2023-04-02 13:50:11 85103 localstack-pod-my-pod-version-1.zipWhen you need to load your Cloud Pod again, simply run:
localstack pod load my-pod s3-storage-awsTo view all your Cloud Pods stored in this remote, just use:
localstack pod list s3-storage-awsYou can add a similar configuration setup for ORAS, by adding ORAS_USERNAME and ORAS_PASSWORD, which is necessary for authenticating with Docker Hub.
Using remote storage options such as AWS S3 and ORAS ensures you always have secure, accessible, and fully controlled storage solutions for your cloud snapshots. This optionality is crucial for organizations that need full transparency and complete ownership of their infrastructure snapshots, giving you the peace of mind to innovate confidently.
Conclusion
Cloud Pods continue to evolve, empowering you with security, automation, visibility, and flexible storage options. These five features — E2E encryption, state merging strategies with dry-run, resource visibility, automatic loading, and remote storage — ensure that you can confidently manage your LocalStack environments efficiently and securely.
We encourage you to explore these features in your own LocalStack environments and incorporate Cloud Pods into your development process. Whether you’re collaborating within a team, complying with strict security standards, or simply aiming to streamline your cloud operations, Cloud Pods offer the control and flexibility needed to build and test effectively.