Introduction
Amazon Elastic Container Service (ECS) allows developers to deploy and scale containerized applications on AWS. However, testing and debugging ECS tasks often involves rebuilding Docker images, redeploying to the cloud, and waiting for updates – a slow, inefficient cycle that stifles rapid iteration.
LocalStack solves this by emulating ECS locally. It enables hot-reloading to instantly apply code changes without rebuilds, and local debugging to set breakpoints and inspect tasks in real time. This enables you to eliminate the cloud development tax, allowing you to validate logic, fix errors, and refine behavior faster – all within a local development loop.
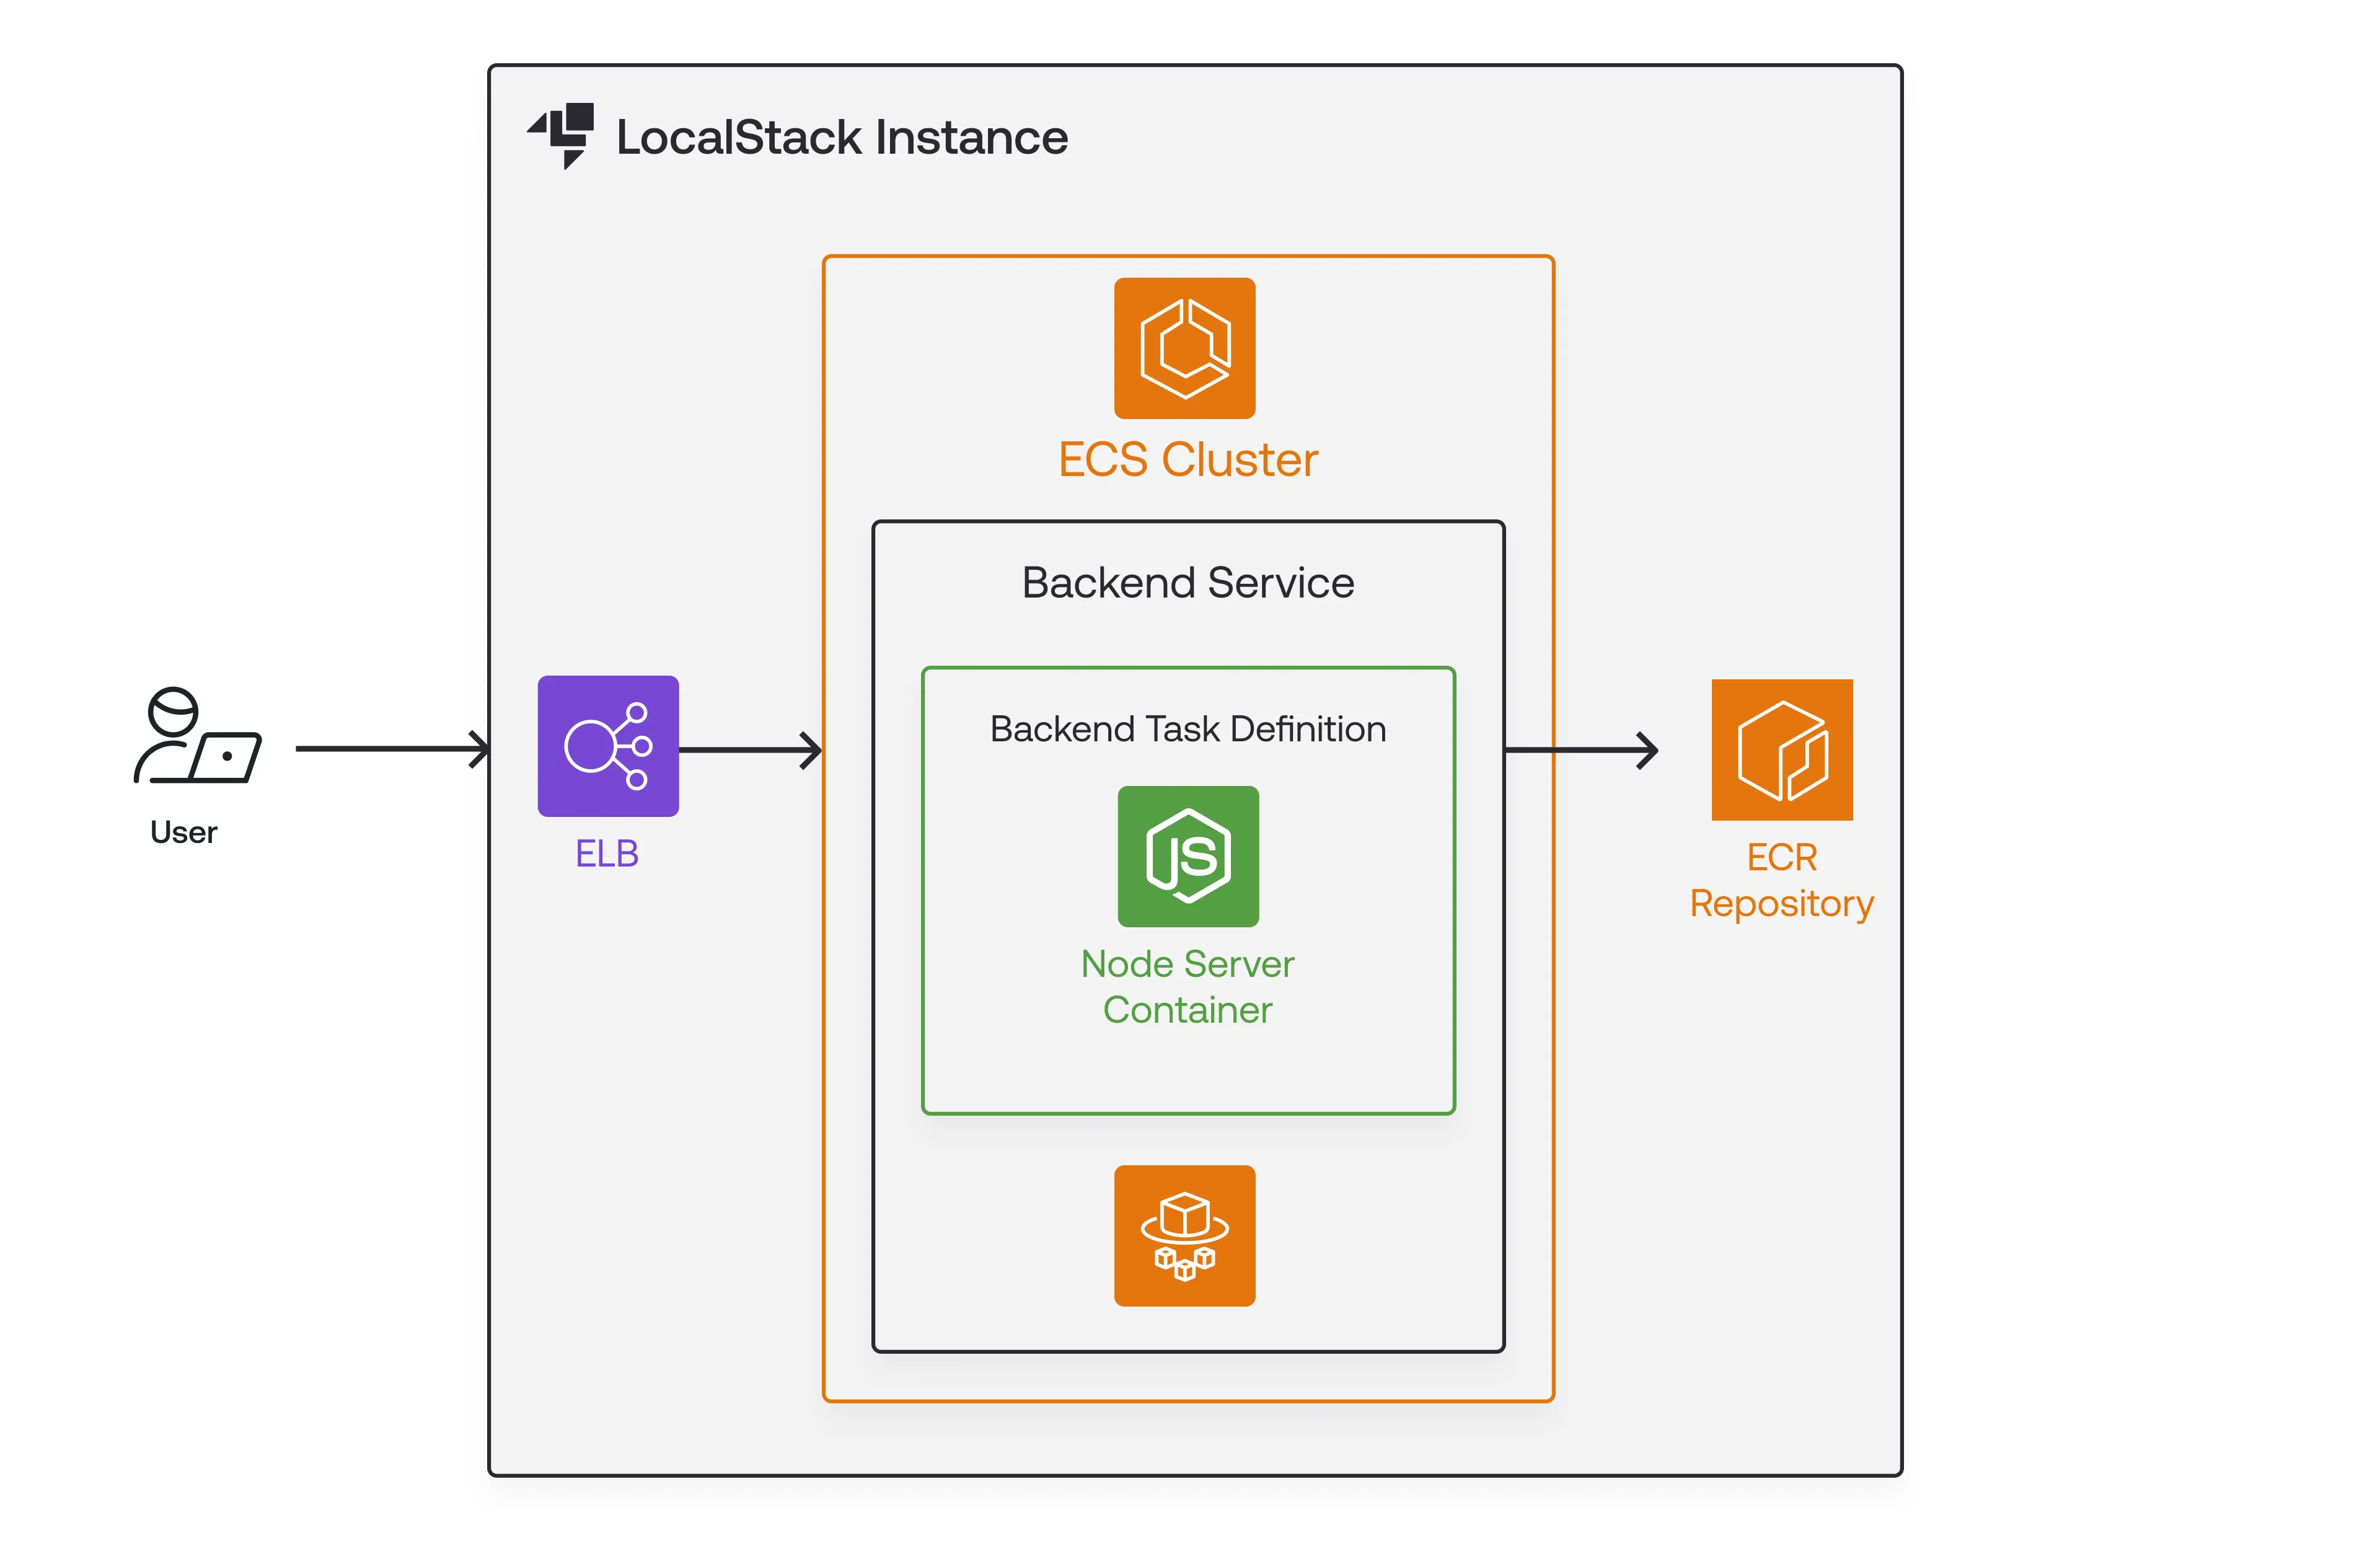
In this tutorial, we’ll walk through a streamlined ECS development workflow with LocalStack by setting up a sample Node.js application using AWS CDK. The CDK stack will deploy a Node.js containerized app locally by:
- Creating a local VPC and an ECS Cluster
- Building and pushing the application image to a local ECR repository
- Adding Task and Container Definitions for the local ECS tasks, including volume mounts
- Running the container on Fargate, distributing traffic using an Elastic Load Balancer (ELB)
After deploying the CDK stack locally, we’ll configure code mounting, test hot-reloading, and set up VS Code to attach a debugger to the running ECS task.
Key Concepts
Without local testing tools, development cycles become inefficient. Small code changes require lengthy rebuilds, and debugging relies on cumbersome tools like ECS Exec or the ECS container agent rather than using IDE-integrated debuggers.
LocalStack solves these problems by enabling local ECS development and debugging through two key methods: Docker bind mounts for code synchronization and environment variables for exposing debugger ports
ECS Code Mounting with Bind Mounts
ECS code mounting in LocalStack uses Docker bind mounts to synchronize your local development environment with locally running ECS tasks in real-time. Bind mounts allow you to directly mount a directory or file from your local system into a container. LocalStack emulates AWS ECS locally, enabling you to define tasks with bind mounts just like in AWS but with faster iteration.
To set this up, you can configure a volume in the ECS task definition and specify the container mount point to map the host directory to the container’s filesystem. As we’ll see in the tutorial when LocalStack deploys the ECS task, it translates this configuration and uses Docker bind mounts to link the specified host directory (e.g., ./src/app) to the container’s path (e.g., /app).
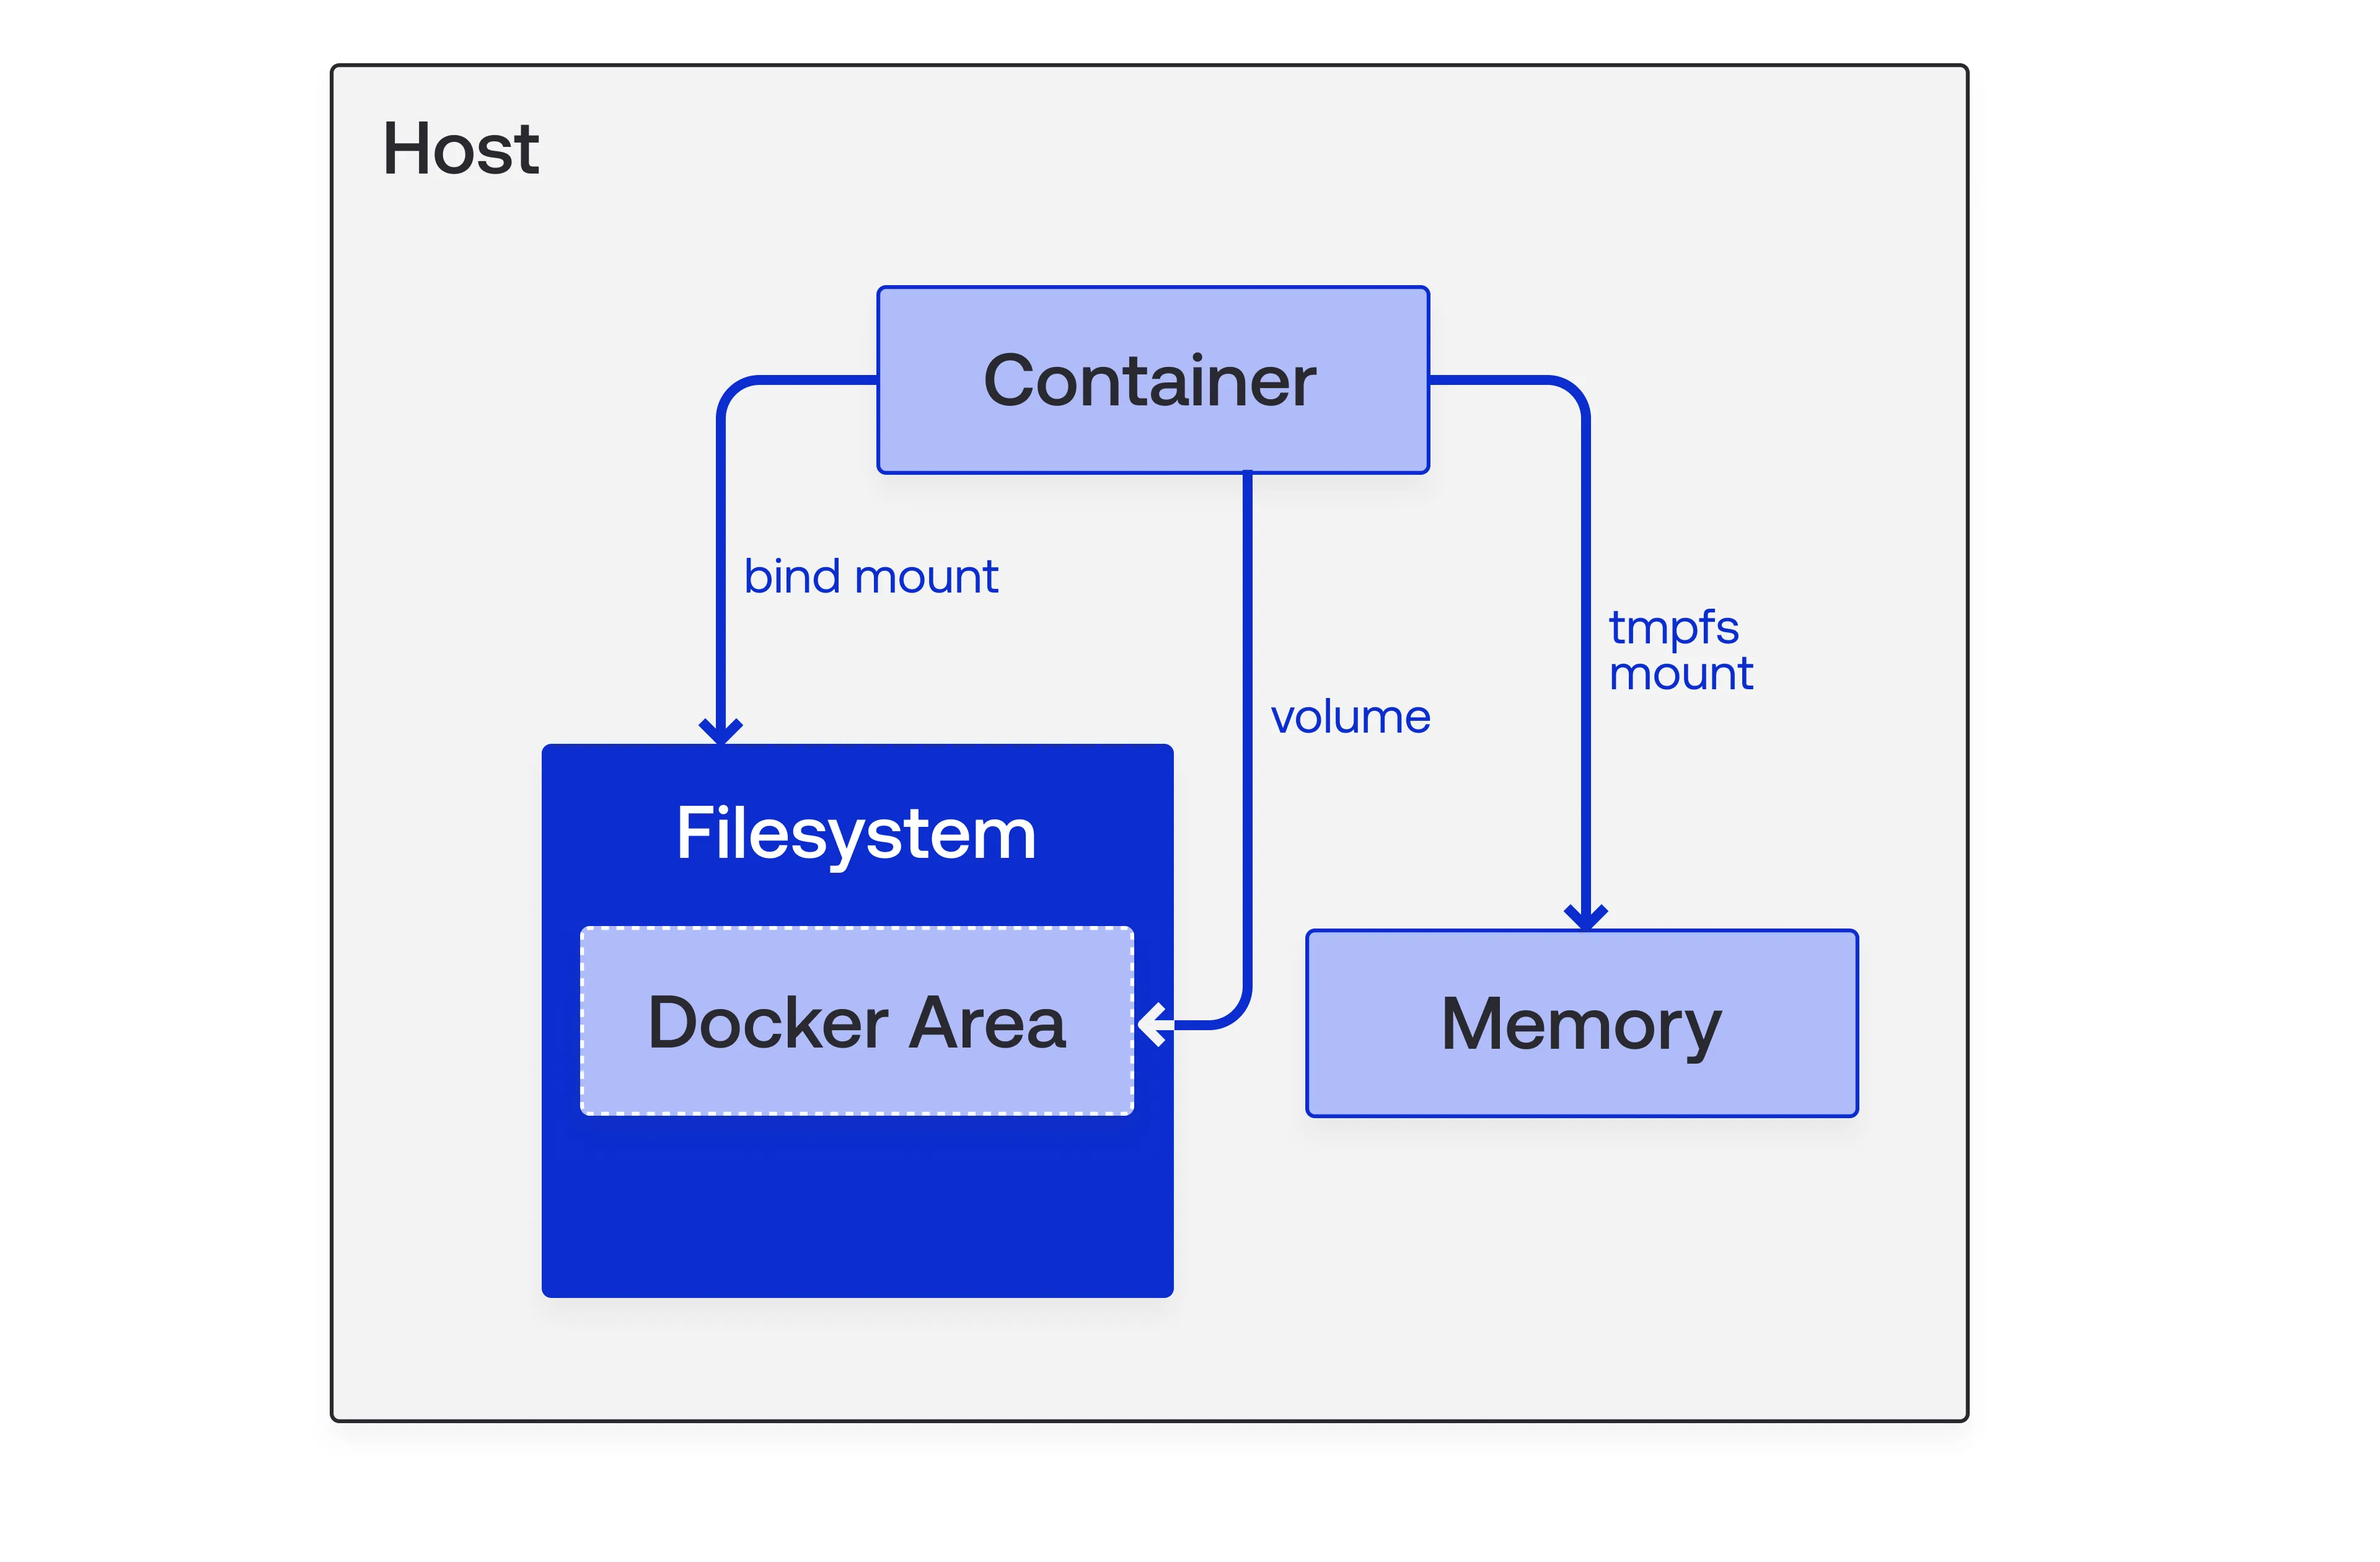
To reflect changes instantly, enable auto-reloading on your application server (like --watch for Node.js) so that updates on the host system are applied within the running container without rebuilding the Docker image.
Remote Debugging Port Configuration
Similarly, you can enable a remote debugging port for your ECS tasks by setting the environment variable ECS_DOCKER_FLAGS. This variable allows you to pass additional flags directly to the docker run command that LocalStack uses to start your container.
For example, to expose the Node.js debugger on port 9229 and map it to the same port on the host, you can set: ECS_DOCKER_FLAGS="-p 9229:9229". You might also need to configure your application runtime to listen for debug connections, often via environment variables passed within the flags (more on this in the tutorial).
By using LocalStack’s ECS emulation with bind mounts and remote debugging, LocalStack enables real-time development and debugging for faster iterations. Now, let’s put this into practice by setting up our application and walking through the process.
Prerequisites
localstackCLI withLOCALSTACK_AUTH_TOKENconfigured- Docker
- Visual Studio Code
- AWS CDK with
cdklocal - Node.js &
npm - AWS CLI with the
awslocalwrapper (optional) curl
Step 1: Install the dependencies
To begin, clone the sample repository from GitHub:
git clone https://github.com/localstack-samples/sample-cdk-ecs-elb.gitcd sample-cdk-ecs-elbAfter cloning, navigate to the CDK infrastructure directory (iac/awscdk) and install the Node dependencies:
cd iac/awscdknpm installStep 2: Deploy the infrastructure
We’ll use cdklocal, a wrapper for using AWS CDK with LocalStack.
2.1: Start LocalStack
Before deploying, make sure LocalStack is up and running:
# Ensure your Auth Token to use Pro features (like ECS)localstack auth set-token <YOUR_LOCALSTACK_AUTH_TOKEN>localstack start -d2.2: Bootstrap LocalStack
Next, ensure your LocalStack environment is bootstrapped:
# Run this command in the iac/awscdk directorycdklocal bootstrap2.3: Deploy the stack
Next, deploy the CDK stack:
# Still in the iac/awscdk directorycdklocal deployWait for the deployment to complete. You should see an output similar to this (including the URL for the load balancer):
Do you wish to deploy these changes (y/n)? yRepoStack: deploying... [1/1]RepoStack: creating CloudFormation changeset...
 ✅  RepoStack
✨  Deployment time: 15.14s
Outputs:RepoStack.MyFargateServiceLoadBalancerDNS704F6391 = lb-2e7934b9.elb.localhost.localstack.cloudRepoStack.MyFargateServiceServiceURL4CF8398A = http://lb-2e7934b9.elb.localhost.localstack.cloudRepoStack.localstackserviceslb = lb-2e7934b9.elb.localhost.localstack.cloud:4566RepoStack.serviceslb = lb-2e7934b9.elb.localhost.localstack.cloudStack ARN:arn:aws:cloudformation:us-east-1:000000000000:stack/RepoStack/880f3cce
✨  Total time: 17.04s
2.4: Verify the deployment
Test the deployed service using the output URL (adjust since yours will be different):
curl lb-2e7934b9.elb.localhost.localstack.cloud:4566This command will invoke its simple GET endpoint.
The output should be:
{"message":"Hi Localstack!"}Step 3: Configure & Test ECS Code Mounting
The project structure is organized as follows:
src/app: Contains the Node.js application code (server.js) and Dockerfile.iac/awscdk: Contains the CDK code defining the infrastructure, including the volume mount configuration.
3.1: Inspect the volume mount configuration
Open iac/awscdk/lib/repo-stack.ts, around Line 30 to find the volume definition:
// Defines a volume named 'local-src' that points to the host machine's source code directorytaskDefinition.addVolume({ name: 'local-src', host: { sourcePath: path.join(__dirname, '../../../src/app') // Host machine path relative to CDK code }});This is the directory we want to mount into the ECS task container.
Around Line 49, you’ll find the container mount point definition:
// Mounts the 'local-src' volume to the '/app' directory inside the containercontainer.addMountPoints({ containerPath: '/app', // Path inside the container sourceVolume: 'local-src', // Reference to the volume defined above readOnly: false // Allow write access from within the container if needed});When deployed via cdklocal, LocalStack interprets this and uses a Docker bind mount to link sample-cdk-ecs-elb/src/app on your host machine to /app inside the running container. Changes made to files in src/app on the host are immediately visible in the container’s /app directory.
3.2: Test the code mounting
Let’s test it out. Navigate to src/app/server.js in your editor, find Line 5, and change the message:
res.end(JSON.stringify({message: "Hi, from an ECS Task running in LocalStack"}))Save the file. Now, run the curl command again. You should immediately see the updated response, demonstrating hot-reloading via the bind mount:
{"message":"Hi, from an ECS Task running in LocalStack"}Note: The sample application is using Node.js watch mode (
--watch) which monitors the mounted/appdirectory for file changes and automatically restarts the Node.js server.
This set up is now using LocalStack with Docker bind mounts for fast local development.
Step 4: Set Up VS Code for remote debugging
Let’s set up VS Code configurations to establish a quick feedback loop for debugging.
4.1: Re-create the LocalStack environment
First, stop your running LocalStack container with the localstack stop command. Then, restart LocalStack, setting the ECS_DOCKER_FLAGS environment variable to configure port mapping and Node.js debug options:
ECS_DOCKER_FLAGS="-e NODE_OPTIONS=--inspect-brk=0.0.0.0:9229 -p 9229:9229" localstack start -d• -p 9229:9229: Maps container port 9229 to host port 9229 for the debugger
• -e NODE_OPTIONS=--inspect-brk=0.0.0.0:9229: Enables Node.js debugging on all interfaces
After restarting LocalStack with the flags, re-deploy the stack to ensure the new container settings are applied:
# In the iac/awscdk directorycdklocal bootstrapcdklocal deployNote the new load balancer URL, as it will likely have changed.
4.2: Create VS Code configurations
We can now add VS Code configurations for debugging. If the .vscode directory doesn’t exist, create one in the root of your sample-cdk-ecs-elb project.
Add the following configuration to .vscode/tasks.json:
{ "version": "2.0.0", "tasks": [ { "label": "Wait Remote Debugger Server", "type": "shell", "command": "while [[ -z $(docker ps | grep :9229) ]]; do sleep 1; done; sleep 1;" } ]}Create .vscode/launch.json to define how VS Code should connect to the remote Node.js app:
{ "version": "0.2.0", "configurations": [ { "address": "127.0.0.1", "localRoot": "${workspaceFolder}", "name": "Attach to Remote Node.js", "port": 9229, "remoteRoot": "/app", "request": "attach", "type": "node", "preLaunchTask": "Wait Remote Debugger Server" } ]}Step 5: Test ECS Remote Debugging
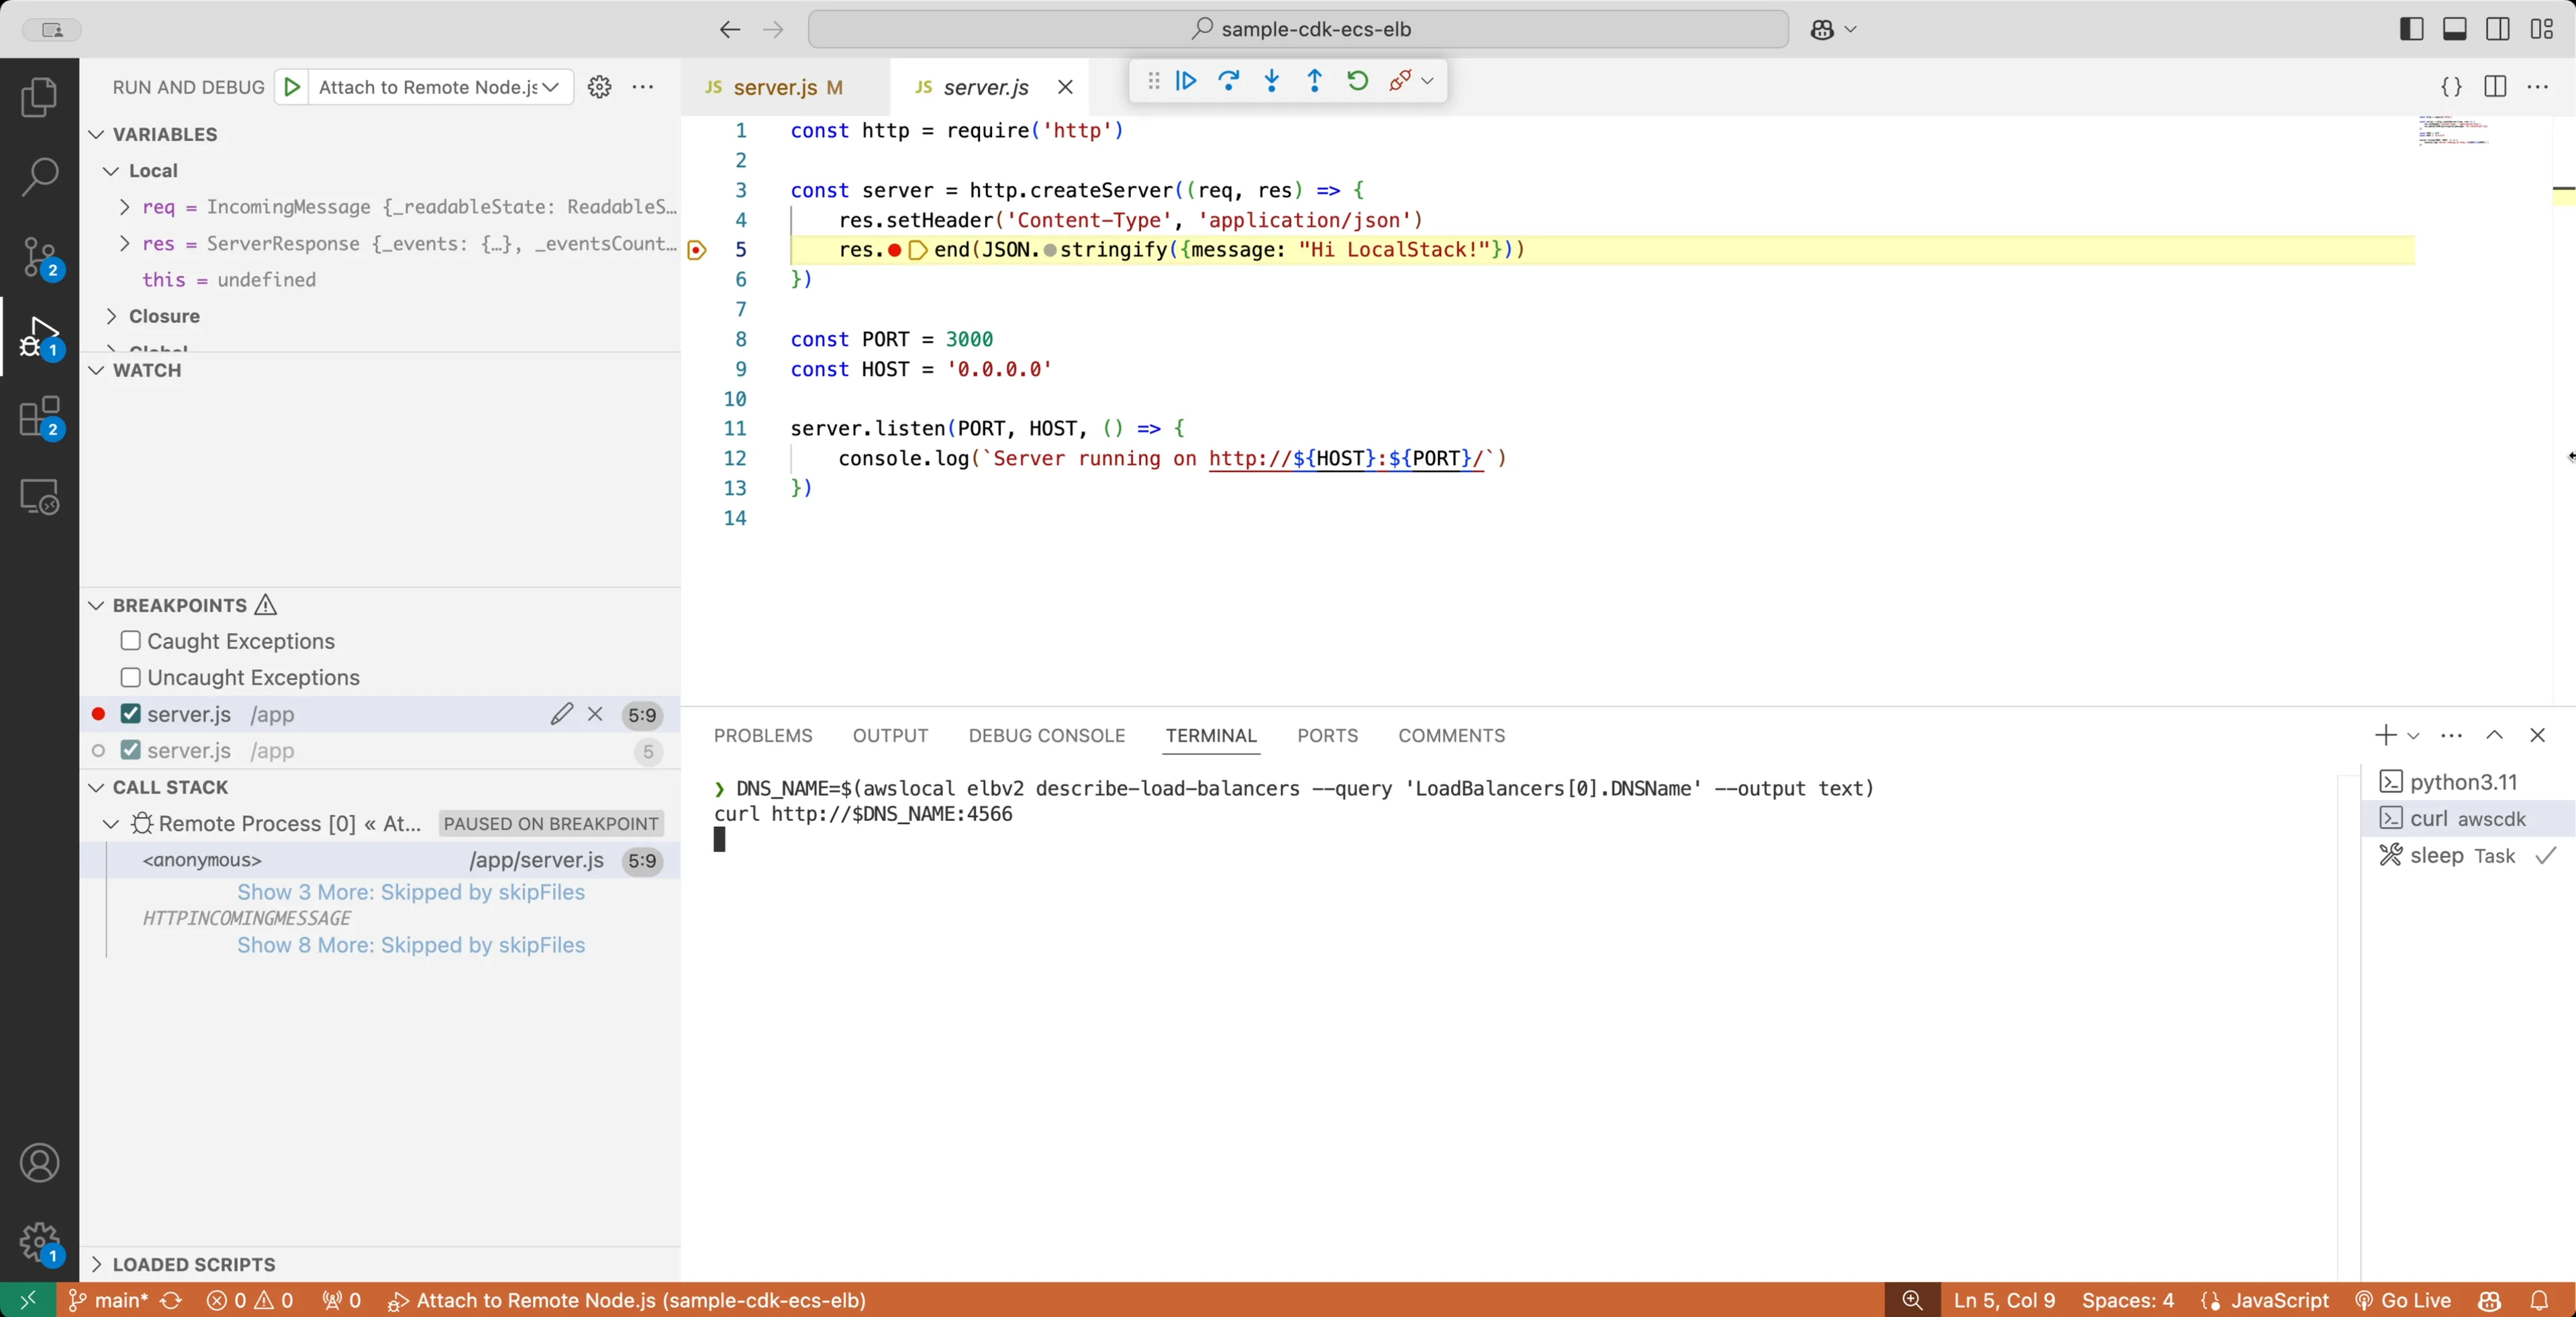
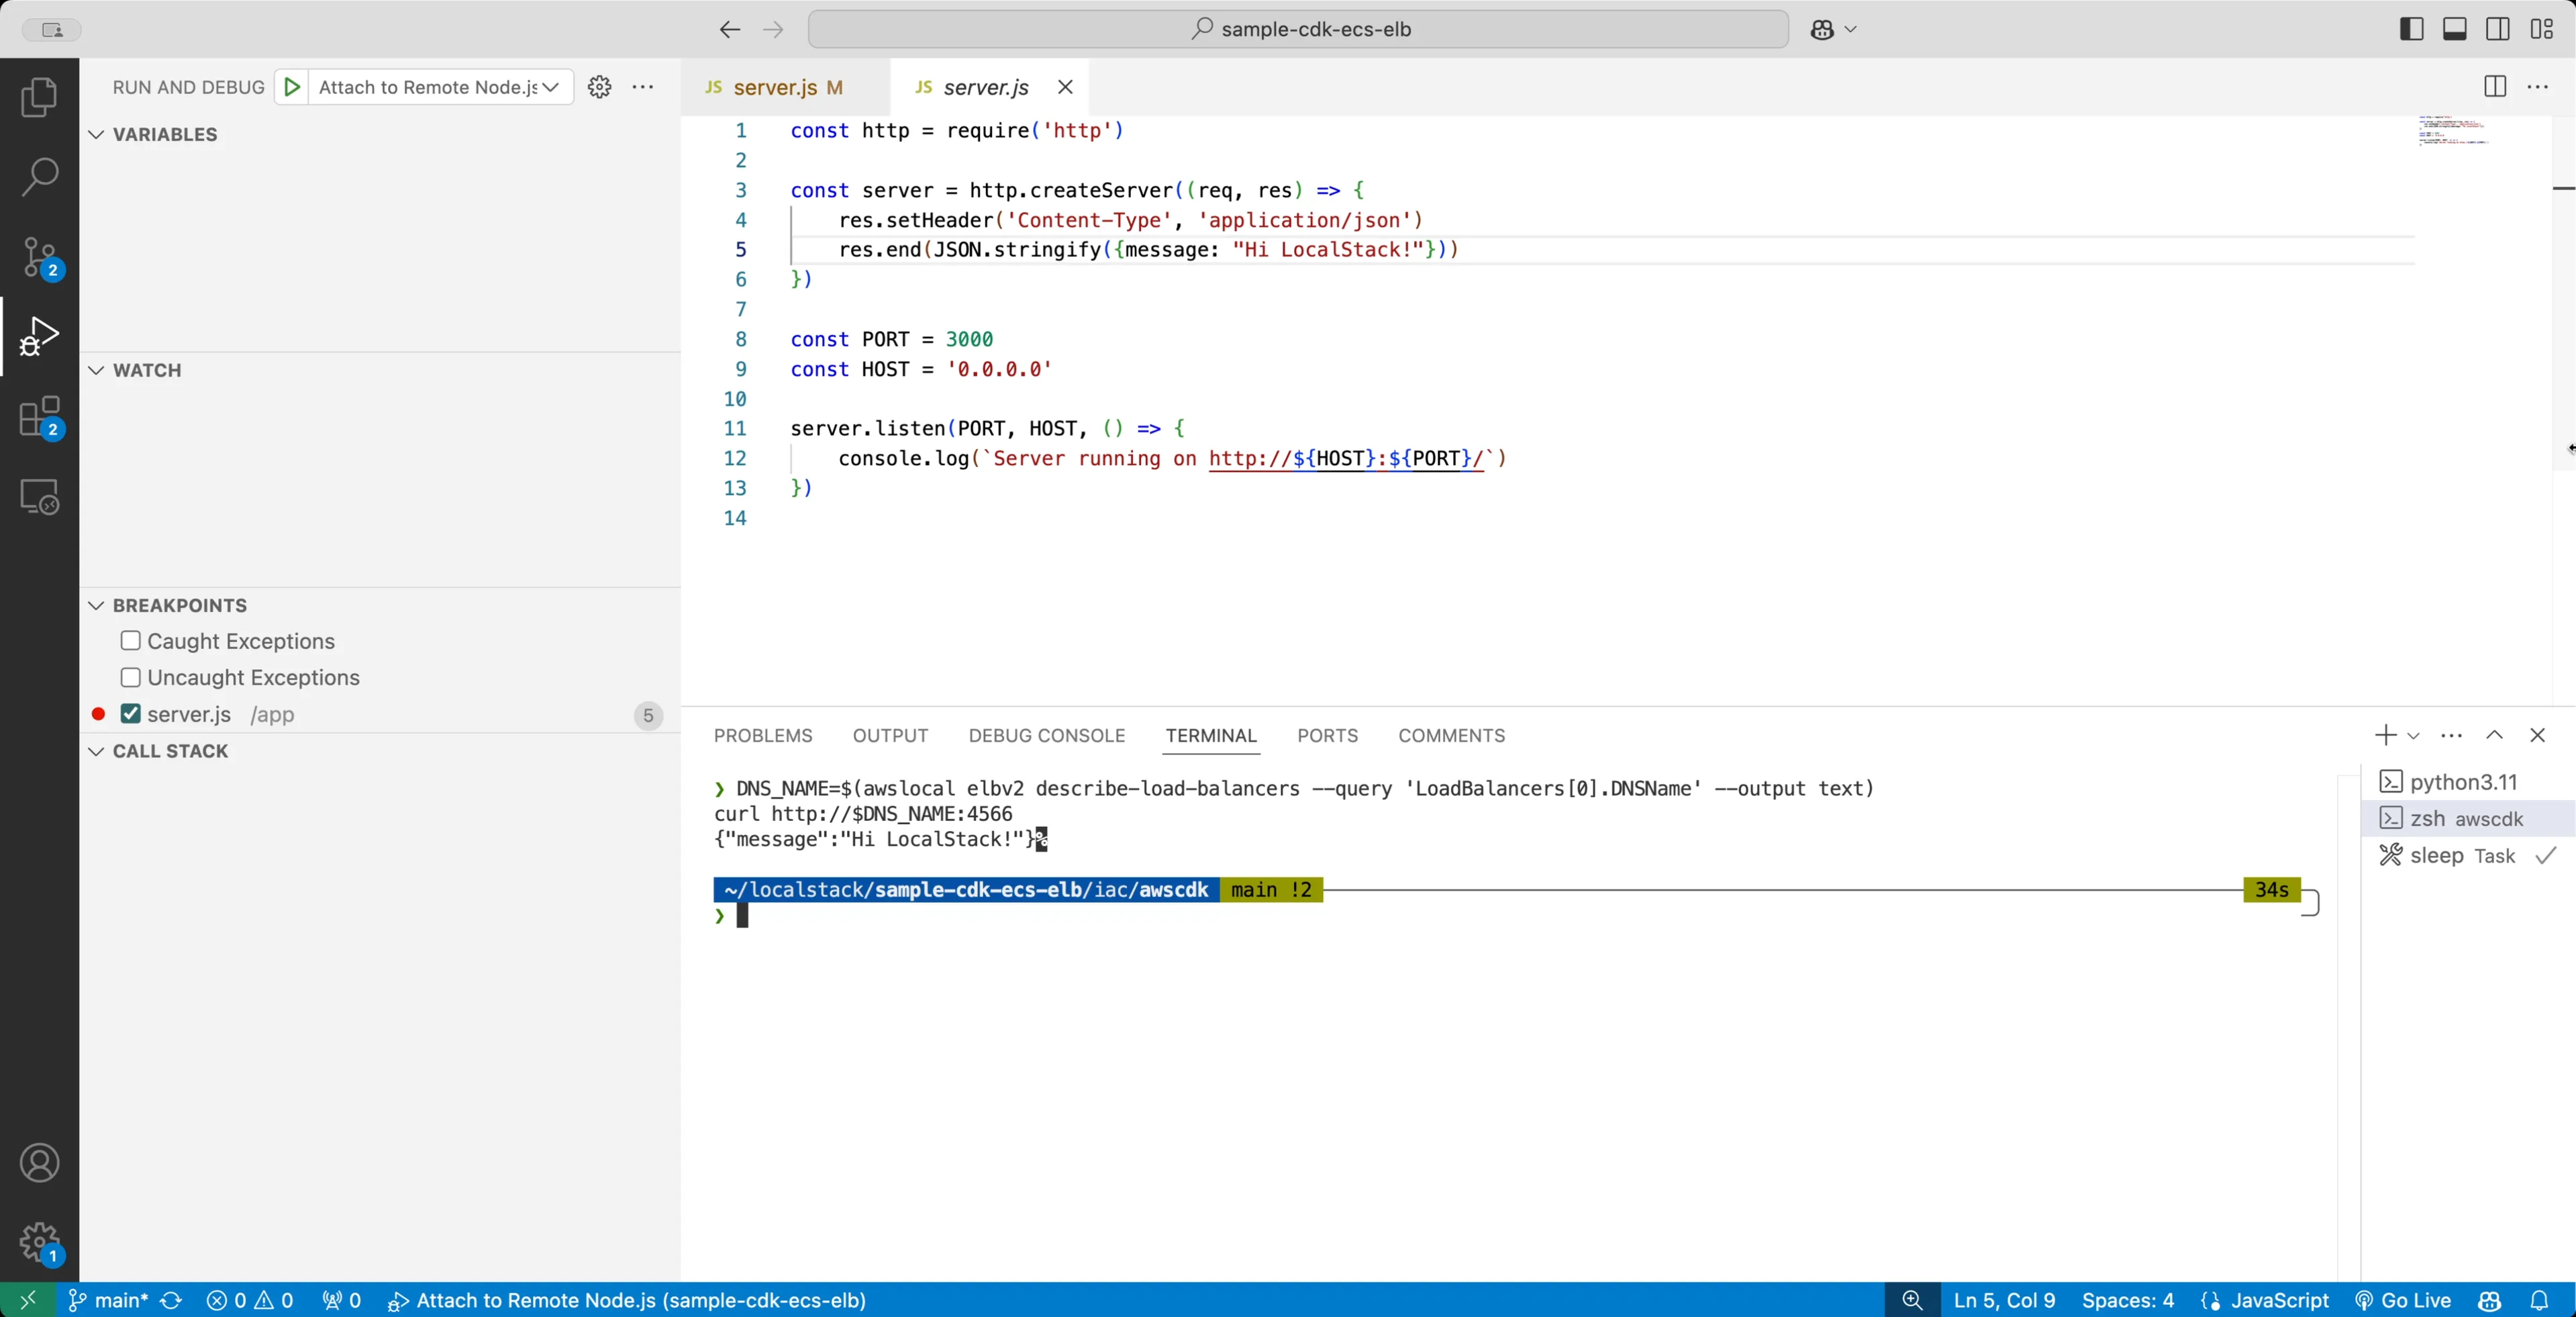
For the debugging process, you can set breakpoints in the Node.js application code. Breakpoints pause code execution on a specific line to inspect it. To attach the debugger and test the setup:
- Navigate to
src/app/server.js. - Click in the gutter next to Line 5 (or another line inside the request handler) to set a breakpoint (a red dot should appear).
- Go to the “Run and Debug” view in VS Code (usually the icon with a play button and a bug).
- Select “Attach to Remote Node.js (ECS)” from the dropdown menu at the top and click the green “Start Debugging” play button.
- Once attached (the status bar might turn orange), invoke the service endpoint. Use
awslocalto get the current DNS name if needed:Terminal window DNS_NAME=$(awslocal elbv2 describe-load-balancers --query 'LoadBalancers[0].DNSName' --output text)curl http://$DNS_NAME:4566
Execution should pause at the breakpoint you set:
You can now:
- Inspect variables in the “Variables” pane.
- Add expressions to the “Watch” pane.
- Use the debug toolbar (at the top) to step over, step into, step out, or continue execution.
After you continue execution (press F5 or the Continue button), the curl command in your terminal will complete and show the response:
You can now leverage code mounting to make changes to your Node.js app without rebuilding or redeploying the Docker image, allowing faster debugging and testing.
Summary
This tutorial demonstrates how LocalStack’s Developer Experience (DevEx) features allow you to leverage Docker bind mounts for instant code updates and VS Code’s remote debugging capabilities to debug ECS apps locally without time-consuming rebuilds and deployments.
Now that you’ve seen how LocalStack streamlines ECS development, you can:
- Apply this approach to more complex microservices architectures
- Extend debugging capabilities to other AWS services (e.g., Lambda)
- Write integration tests that leverage the local debugging environment
- Incorporate LocalStack into your CI pipelines for pre-deployment testing
Try our sample repository to experience this streamlined workflow firsthand. Whether you’re refining task definitions, fixing bugs, or experimenting with new logic, LocalStack empowers you to embrace trial and error without cloud costs or delays.