Emulate AWS CI/CD Services in LocalStack
Explore how the CI/CD service emulation capabilities in LocalStack allow fully local development and testing of pipelines including CodeBuild jobs, CodePipeline executions and CodeArtifact repositories.
Introduction
Continuous Integration and Continuous Deployment (CI/CD) are software engineering principles which espouse automation of software releases. The core focus is to streamline the entire process of getting a commit into production: building (compiling and packaging), testing (unit tests, integration tests, and other suites) and deploying. Depending on the type of software, this sometimes also includes infrastructure provisioning.
The outcome of this approach is that small changes are merged to the master branch on a frequent basis. Releases are made more often and incorporate short feedback cycles, thus providing better feature accessibility to the user.
Amazon Web Services (AWS) provide a range of services for CI/CD workflows. In this post, we’ll discuss what these tools are and how you can develop and test them locally using LocalStack.
AWS Developer Tools
AWS’ services for CI/CD are grouped in the Developer Tools suite.
LocalStack supports CodeBuild, CodeDeploy, CodeConnection and CodePipeline from v4.5, and CodeArtifact from v4.6. Here is a quick round-up of these services.
CodeBuild
CodeBuild is the build service on AWS. It provides an isolated environment which can run a given set of commands, such as compilation, or test execution. Depending on the nature of the job, a CodeBuild project can produce one or more outputs in the form of files.
In CodeBuild, the specification which defines a job is called a “BuildSpec”. The BuildSpec is used to specify the job parameters, including the compute platform to use. CodeBuild provides a range of instance types which determine the number of vCPUs (virtual CPUs), storage and memory. Furthermore, the build environment can use a range of base images called “Runtimes”. AWS provides runtimes for common programming environments like Python, Go, .NET, and others.
For more advanced use-cases, CodeBuild supports caching, retries, reporting, etc.
CodeDeploy
CodeDeploy is the deployment service on AWS. Its biggest advantage is its tight integration with other compute services on AWS. This allows the user to finely control the deployment strategy: for example, using blue/green deployment for an ECS service.
CodeDeploy uses “AppSpec” files to identify the what, where and how of the deployment. The file structure of AppSpecs vary based on the target. For example for Lambda targets, the hooks section can be used to run validation tests that check if the function is running as expected. In contrast for EC2 targets, this is used to run scripts at various stages of deployment.
CodeArtifact
CodeArtifact service allows creating and managing package repositories. It supports various library package formats, including:
- Cargo (Rust)
- Maven (Java)
- npm (JavaScript)
- NuGet (.NET)
- PyPI (Python)
- Ruby
- Swift
CodeArtifact is a good option when there is need for private package repositories. One neat feature of CodeArtifact is “Upstreams”. This is a proxy-like functionality which can fetch a package from another repository if it has not been published to the original CodeArtifact repository.
CodeConnections
CodeConnections, formerly known as “CodeStar Connections”, manages connections to external source code repositories. Functionally, it integrates AWS services with external repositories and facilitates authorisation along with asynchronous triggers to respond to events like commits being pushed.
CodePipeline
CodePipeline is the CI/CD pipeline orchestration service. It brings all of the above services together to provide a unified system to manage automation workflows. It also nicely integrates with other AWS services.
The core constructs of CI/CD are “Pipelines”, which are acyclic directional graphs that define the automation steps. CodePipelines uses a specification called “Pipeline Declaration” to define pipelines.
Get started
Let us build an end-to-end pipeline for the Lodash project entirely using LocalStack. We want this pipeline to:
- Retrieve the source code from a Git repository
- Run the test suite
- Publish the npm package to a private, local registry
To simulate a real-life scenario, the final step will involve installing this package using npm.
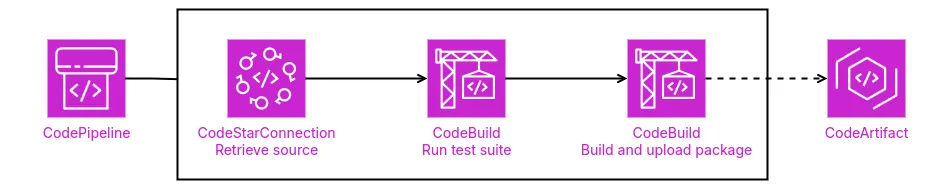
The pipeline will have three stages corresponding to each of the above tasks.
You can access this exercise on our CodePipeline samples repo.
To begin, install the awslocal wrapper and start the LocalStack container in the background.
Please note that you need to create a GitHub Personal Access Token and set it in the CODEPIPELINE_GH_TOKEN environment config option of the container.
Set up IAM
In the pipeline above, you will observe that there are dependencies on other AWS services. For instance, CodeBuild accesses CodeArtifact when publishing the npm package, and CodePipeline accesses CodeConnections when retrieving the source code. On AWS explicit IAM permissions must be set for services to be able to talk to one another. To enable this, we create a role which has the necessary permissions.
{ "Version": "2012-10-17", "Statement": [ { "Effect": "Allow", "Principal": { "Service": [ "codebuild.amazonaws.com", "codepipeline.amazonaws.com" ] }, "Action": "sts:AssumeRole" } ]}{ "Version": "2012-10-17", "Statement": [ { "Effect": "Allow", "Action": [ "s3:*", "sts:GetServiceBearerToken", "codebuild:BatchGetBuilds", "codebuild:StartBuild", "codestar-connections:UseConnection", "codeconnections:UseConnection", "codeartifact:GetAuthorizationToken", "codeartifact:GetRepositoryEndpoint", "codeartifact:PublishPackageVersion", "logs:CreateLogStream", "logs:CreateLogGroup", "logs:PutLogEvents" ], "Resource": "*" } ]}The above role and policy will be used for both CodeBuild and CodePipeline. You will notice that the policy has a long list of permissions. LocalStack does not strictly need all of them. For example, the CloudWatch Logs permissions are only required when this sample is deployed on AWS to report CodeBuild build logs.
Create the role and attach the policy as follows:
awslocal iam create-role --role-name demo-role --assume-role-policy-document file://role.json
awslocal iam put-role-policy --role-name demo-role \    --policy-name demo-policy \    --policy-document file://policy.json
Keep note of the IAM role ARN. This will be used later.
export ROLE_ARN="arn:aws:iam::000000000000:role/demo-role"Create the npm repository
Next create the npm repository on CodeArtifact where the package can be published.
awslocal codeartifact create-domain --domain demo-domain
awslocal codeartifact create-repository --domain demo-domain --repository demo-repo
Connect to GitHub
On AWS, one needs to create a CodeConnection connection in order to retrieve source code from GitHub. This also must be approved on the AWS console.
awslocal codeconnections create-connection \ --connection-name demo-connection \ --provider-type GitHubHowever on LocalStack, all you need is to create and set the PAT token, which was already done at the time of starting up the container.
Examine the BuildSpec
In the pipeline, we use CodeBuild to run the tests and to upload the package. Both these steps are done in separate CodeBuild projects because they are atomic steps in the pipeline.
Here is the BuildSpec for testing the project:
version: 0.2phases: install: runtime-versions: nodejs: 22 pre_build: commands: - npm ci build: commands: - npm testThe structure of this BuildSpec is simple: just install the dependencies and run the tests.
And here is the BuildSpec for publishing the npm package:
version: 0.2phases: install: runtime-versions: nodejs: 22 pre_build: commands: - yum install -y jq - aws codeartifact login --tool npm --domain demo-domain --repository demo-repo build: commands: - jq -r '.private |= false' package.json > package2.json - jq -r '.name |= "my-lodash-fork"' package2.json > package.json - npm publishThere is much more going on here. In the pre-build stage, we install jq, obtain the authentication token and the npm repository URL. In the build stage, jq is used to modify the name of the package to ‘my-lodash-fork’. Then, npm is configured to use the local repository, and the package is uploaded.
In both of the above cases, we use the nodejs runtime environment because Lodash is a JavaScript project.
Let us proceed to creating the CodeBuild projects. Upload both BuildSpecs to an S3 bucket:
awslocal s3 mb s3://demo-buildspecsawslocal s3 cp demo-test.yaml s3://demo-buildspecsawslocal s3 cp demo-publish.yaml s3://demo-buildspecsThen create the CodeBuild projects using:
awslocal codebuild create-project --name demo-test \    --source type=CODEPIPELINE,buildspec=arn:aws:s3:::demo-buildspecs/demo-test.yaml \    --artifacts type=CODEPIPELINE \    --environment type=LINUX_CONTAINER,image=aws/codebuild/amazonlinux-x86_64-standard:5.0,computeType=BUILD_GENERAL1_SMALL \    --service-role ${ROLE_ARN}
awslocal codebuild create-project --name demo-publish \    --source type=CODEPIPELINE,buildspec=arn:aws:s3:::demo-buildspecs/demo-publish.yaml \    --artifacts type=CODEPIPELINE \    --environment type=LINUX_CONTAINER,image=aws/codebuild/amazonlinux-x86_64-standard:5.0,computeType=BUILD_GENERAL1_SMALL \    --service-role ${ROLE_ARN}
Create the Pipeline
CodePipeline pipelines require an S3 bucket for storing intermediate objects between stages. This bucket is termed as the artifact bucket.
awslocal s3 mb s3://demo-artif-bucketThe pipeline structure depicted above can be defined in JSON as follows.
Make sure to substitute the correct ARNs for roleArn and ConnectionArn.
{ "pipelineType": "V1", "name": "demo-pipeline", "roleArn": "arn:aws:iam::000000000000:role/demo-role", "artifactStore": { "type": "S3", "location": "demo-artif-bucket" }, "stages": [ { "name": "source", "actions": [ { "name": "get-source-code", "actionTypeId": { "category": "Source", "owner": "AWS", "provider": "CodeStarSourceConnection", "version": "1" }, "outputArtifacts": [ { "name": "source-code" } ], "configuration": { "ConnectionArn": "arn:aws:codeconnections:eu-central-1:000000000000:connection/b61a7b14-1e38-4c0c-a276-556bdab96fa3", "FullRepositoryId": "lodash/lodash", "BranchName": "4.17.21" } } ] }, { "name": "test", "actions": [ { "name": "run-tests", "actionTypeId": { "category": "Test", "owner": "AWS", "provider": "CodeBuild", "version": "1" }, "inputArtifacts": [ { "name": "source-code" } ], "configuration": { "ProjectName": "demo-test" } } ] }, { "name": "publish", "actions": [ { "name": "publish-package", "actionTypeId": { "category": "Build", "owner": "AWS", "provider": "CodeBuild", "version": "1" }, "inputArtifacts": [ { "name": "source-code" } ], "configuration": { "ProjectName": "demo-publish" } } ] } ]}Create the pipeline using the following command:
awslocal codepipeline create-pipeline --pipeline file://./demo-pipeline.jsonTrigger pipeline execution
Upon creating the pipeline, CodePipeline will start executing it. Executions can be listed using:
awslocal codepipeline list-pipeline-executions --pipeline-name demo-pipelineThis command produces an output as follows, which also contains the status of the pipeline.
{ [ { "pipelineExecutionId": "4d38305c-6bd5-4a89-b1ff-74447d2c0a75", "status": "Succeeded", "startTime": 1752151205.197, "lastUpdateTime": 1752151207.002, "sourceRevisions": [], "trigger": { "triggerType": "CreatePipeline", "triggerDetail": "arn:aws:iam::000000000000:user/user" }, "executionMode": "SUPERSEDED" } ]}If the pipeline was successful, it means that Lodash was published to the local npm repository.
Access the npm repository
To list the available packages on our local npm repository, run:
awslocal codeartifact list-packages --domain demo-domain --repository demo-repoYou will see in the output that the custom package ‘my-lodash-fork’ is available.
{ "packages": [ { "format": "npm", "package": "my-lodash-fork", "originConfiguration": { "restrictions": { "publish": "ALLOW", "upstream": "BLOCK" } } } ]}To fetch this package on your machine using npm, first log in to the local repository in LocalStack using the following command.
Note that this reconfigures the system .npmrc to point to LocalStack.
If LocalStack is not running, npm may throw an error, so consider backing up and restoring this file when you are done.
awslocal codeartifact login --tool npm --domain demo-domain --repository demo-repoYou can now retrieve your custom package using:
npm pack my-lodash-forkConclusion
The CI/CD service emulation capability in LocalStack allows fully local development and testing of pipelines. It features tight integration with other emulated services, bringing you the full benefits of both cost-savings and fast feedback loops.
To further explore CodePipeline with LocalStack, you could consider:
- Modifying the pipeline to have multiple actions within the test stage and speed up test execution by parallelising it.
- Extending the pipeline to build a Docker image containing the npm package, then publish it to ECR.