Generating & testing AWS IAM policies locally with LocalStack
LocalStack's IAM Policy Stream streamlines the generation of IAM policies for cloud applications by documenting required permissions and highlighting missing actions. We'll explore how to use it to discover missing permissions for a serverless app, ensuring the enforcement of least-privilege access and optimizing your development and testing workflows.

Introduction
Cloud and serverless applications can involve many resources – things like S3 buckets or RDS databases, for example. By default, these resources cannot communicate with each other. This is done to keep your application resources secure using the principle of least privilege which grants resources only the access they need to do their job.
Within AWS, you handle this by creating IAM roles and assigning permissions through policies, but configuring these policies properly can be very challenging. LocalStack’s IAM Policy Stream simplifies this process by automating the generation of IAM policies for your AWS API requests on your local machine. This stream helps you identify the necessary permissions for your cloud application and allows you to detect logical errors, such as unexpected actions in your policies. This feature also allows you to switch from a LocalStack default setting with no IAM restrictions to a stricter enforcement that mimics real cloud conditions, with a simple toggle.
In this blog, we’ll guide you through setting up IAM Policy Stream for a locally running AWS application. We’ll demonstrate a sample LocalStack application where one Lambda function sends a message to an SQS queue, invoking another Lambda function through an Event Source Mapping. You’ll be able to identify IAM violations & missing permissions through the IAM Policy Stream dashboard and generate the policy without manual effort, adhering to the principle of least privilege.
Why use IAM Policy Stream?
LocalStack enables you to create and enforce local IAM roles and policies with our IAM Enforcement feature. However, users often struggle to figure out the necessary permissions for different actions. It’s important to find a balance, avoiding giving too many permissions while making sure the right ones are granted.
This challenge becomes more complex when dealing with AWS services that make requests that are not directly visible to users. For instance, if an SNS topic sends a message to an SQS queue and the underlying call fails, there might be no clear error message, confusing, especially for those less familiar with the services.
IAM Policy Stream simplifies this by automatically generating the necessary policies and showing them to users. This makes it easier to integrate with resources, roles, and users, streamlining the development process. Additionally, it serves as a useful learning tool, helping users understand the permissions linked to various AWS calls and improving the onboarding experience for newcomers to AWS.
If you have a LocalStack container running with a valid Auth Token, you can test it now at https://app.localstack.cloud/inst/default/policy-stream
Tutorial: Identifying and resolving missing IAM policies in a serverless quiz app
In this tutorial, we’ll deploy a Serverless Quiz Application locally using LocalStack and AWS CLI. While the complete infrastructure architecture is too detailed for this tutorial, we’ll concentrate on a simpler part of the event workflow:
- A user submits a quiz through the
QuizAPIAPI Gateway at the/submitquizendpoint. - This action triggers the
SubmitQuizFunctionLambda function, which sends a message to theQuizSubmissionQueueSQS queue. - The SQS message then invokes the
ScoringFunctionLambda function, which calculates the quiz score and records the result in theUserSubmissionsDynamoDB table.

After deploying, you can use the IAM Policy Stream to see the permissions each API call needs. We’ve omitted some policies to make the app non-operational under strict IAM enforcement, and we’ll use the IAM Policy Stream to find and fix these missing policies for production readiness.
Prerequisites
- LocalStack CLI with
LOCALSTACK_AUTH_TOKEN - Docker
- AWS CLI with
awslocalwrapper - LocalStack Web Application account
- Python & Node.js
jq&zip
Start your LocalStack container
Launch the LocalStack container on your local machine using the specified command:
localstack auth set-token <your-auth-token>localstack startOnce initiated, you’ll receive a confirmation output indicating that the LocalStack container is up and running.
     __                     _______ __             __    / /   ____  _________ _/ / ___// /_____ ______/ /__   / /   / __ \/ ___/ __ `/ /\__ \/ __/ __ `/ ___/ //_/  / /___/ /_/ / /__/ /_/ / /___/ / /_/ /_/ / /__/ ,< /_____/\____/\___/\__,_/_//____/\__/\__,_/\___/_/|_|
- LocalStack CLI: 4.1.1- Profile: default- App: https://app.localstack.cloud
[17:44:40] starting LocalStack in Docker mode 🐳               localstack.py:5122025-02-06T17:44:42.721  INFO --- [  MainThread] l.p.c.b.licensingv2        : Successfully requested and activated new license ff47be60-0aa5-45c6-aa6d-6ecfaca1b392:enterprise 🔑✅2025-02-06T17:44:42.731  INFO --- [  MainThread] localstack.utils.bootstrap : Execution of "prepare_host" took 1948.33ms──────────────── LocalStack Runtime Log (press CTRL-C to quit) ─────────────────
LocalStack version: 4.1.2.dev1LocalStack build date: 2025-02-06LocalStack build git hash: bcd5dcb0a
2025-02-06T12:14:43.775  INFO --- [  MainThread] l.p.c.b.licensingv2        : Successfully activated cached license ff47be60-0aa5-45c6-aa6d-6ecfaca1b392:enterprise from /etc/localstack/conf.d/license.json 🔑✅...Ready.
Setup the infrastructure locally
To start, clone the repository to your local machine using the following command:
git clone https://github.com/localstack-samples/serverless-quiz-app.gitTo deploy the AWS infrastructure locally, use awslocal, a CLI wrapper that redirects AWS API requests to LocalStack’s emulated services. Run the command below to deploy the infrastructure:
bin/deploy.shAfter a successful deployment, the output will provide the CloudFront URL to access the quiz app and the API Gateway endpoint.
[2025-02-06 17:44:48] Creating DynamoDB tables...[2025-02-06 17:44:48] Creating 'Quizzes' table...[2025-02-06 17:44:50] Creating 'UserSubmissions' table...[2025-02-06 17:44:50] DynamoDB tables created successfully.[2025-02-06 17:44:50] Creating SQS queue 'QuizSubmissionQueue'......[2025-02-06 17:46:03] Creating Star Wars Quiz...[2025-02-06 17:46:03] Created quiz with ID: delicate-phoenixes-assembled[2025-02-06 17:46:03] Submitting responses for Star Wars Quiz...[2025-02-06 17:46:03] Successfully submitted quiz response for user: jediMaster101[2025-02-06 17:46:03] Successfully submitted quiz response for user: starWarsFan88[2025-02-06 17:46:03] Successfully submitted quiz response for user: galacticExplorer[2025-02-06 17:46:03] Seed process completed successfully.[2025-02-06 17:46:03] Deployment completed successfully.
CloudFront URL: https://bb269c1b.cloudfront.localhost.localstack.cloudAPI Gateway Endpoint: http://localhost:4566/_aws/execute-api/zihev2nu2a/test
You can launch the quiz app and choose from three available quizzes (AWS, Star Wars, and Comic Book) to see how it functions from an end-to-end perspective. Note that you are operating in a permit-all environment where IAM policies are not enforced. It’s crucial to test for missing permissions that could potentially disrupt your infrastructure setup. Let’s explore that!

Enable the IAM Policy Stream
Access the LocalStack Web Application and navigate to the IAM Policy Stream dashboard. This tool allows you to examine generated policies, showing the exact permissions needed for each API call and enabling on-the-fly enforcement of your IAM policies.
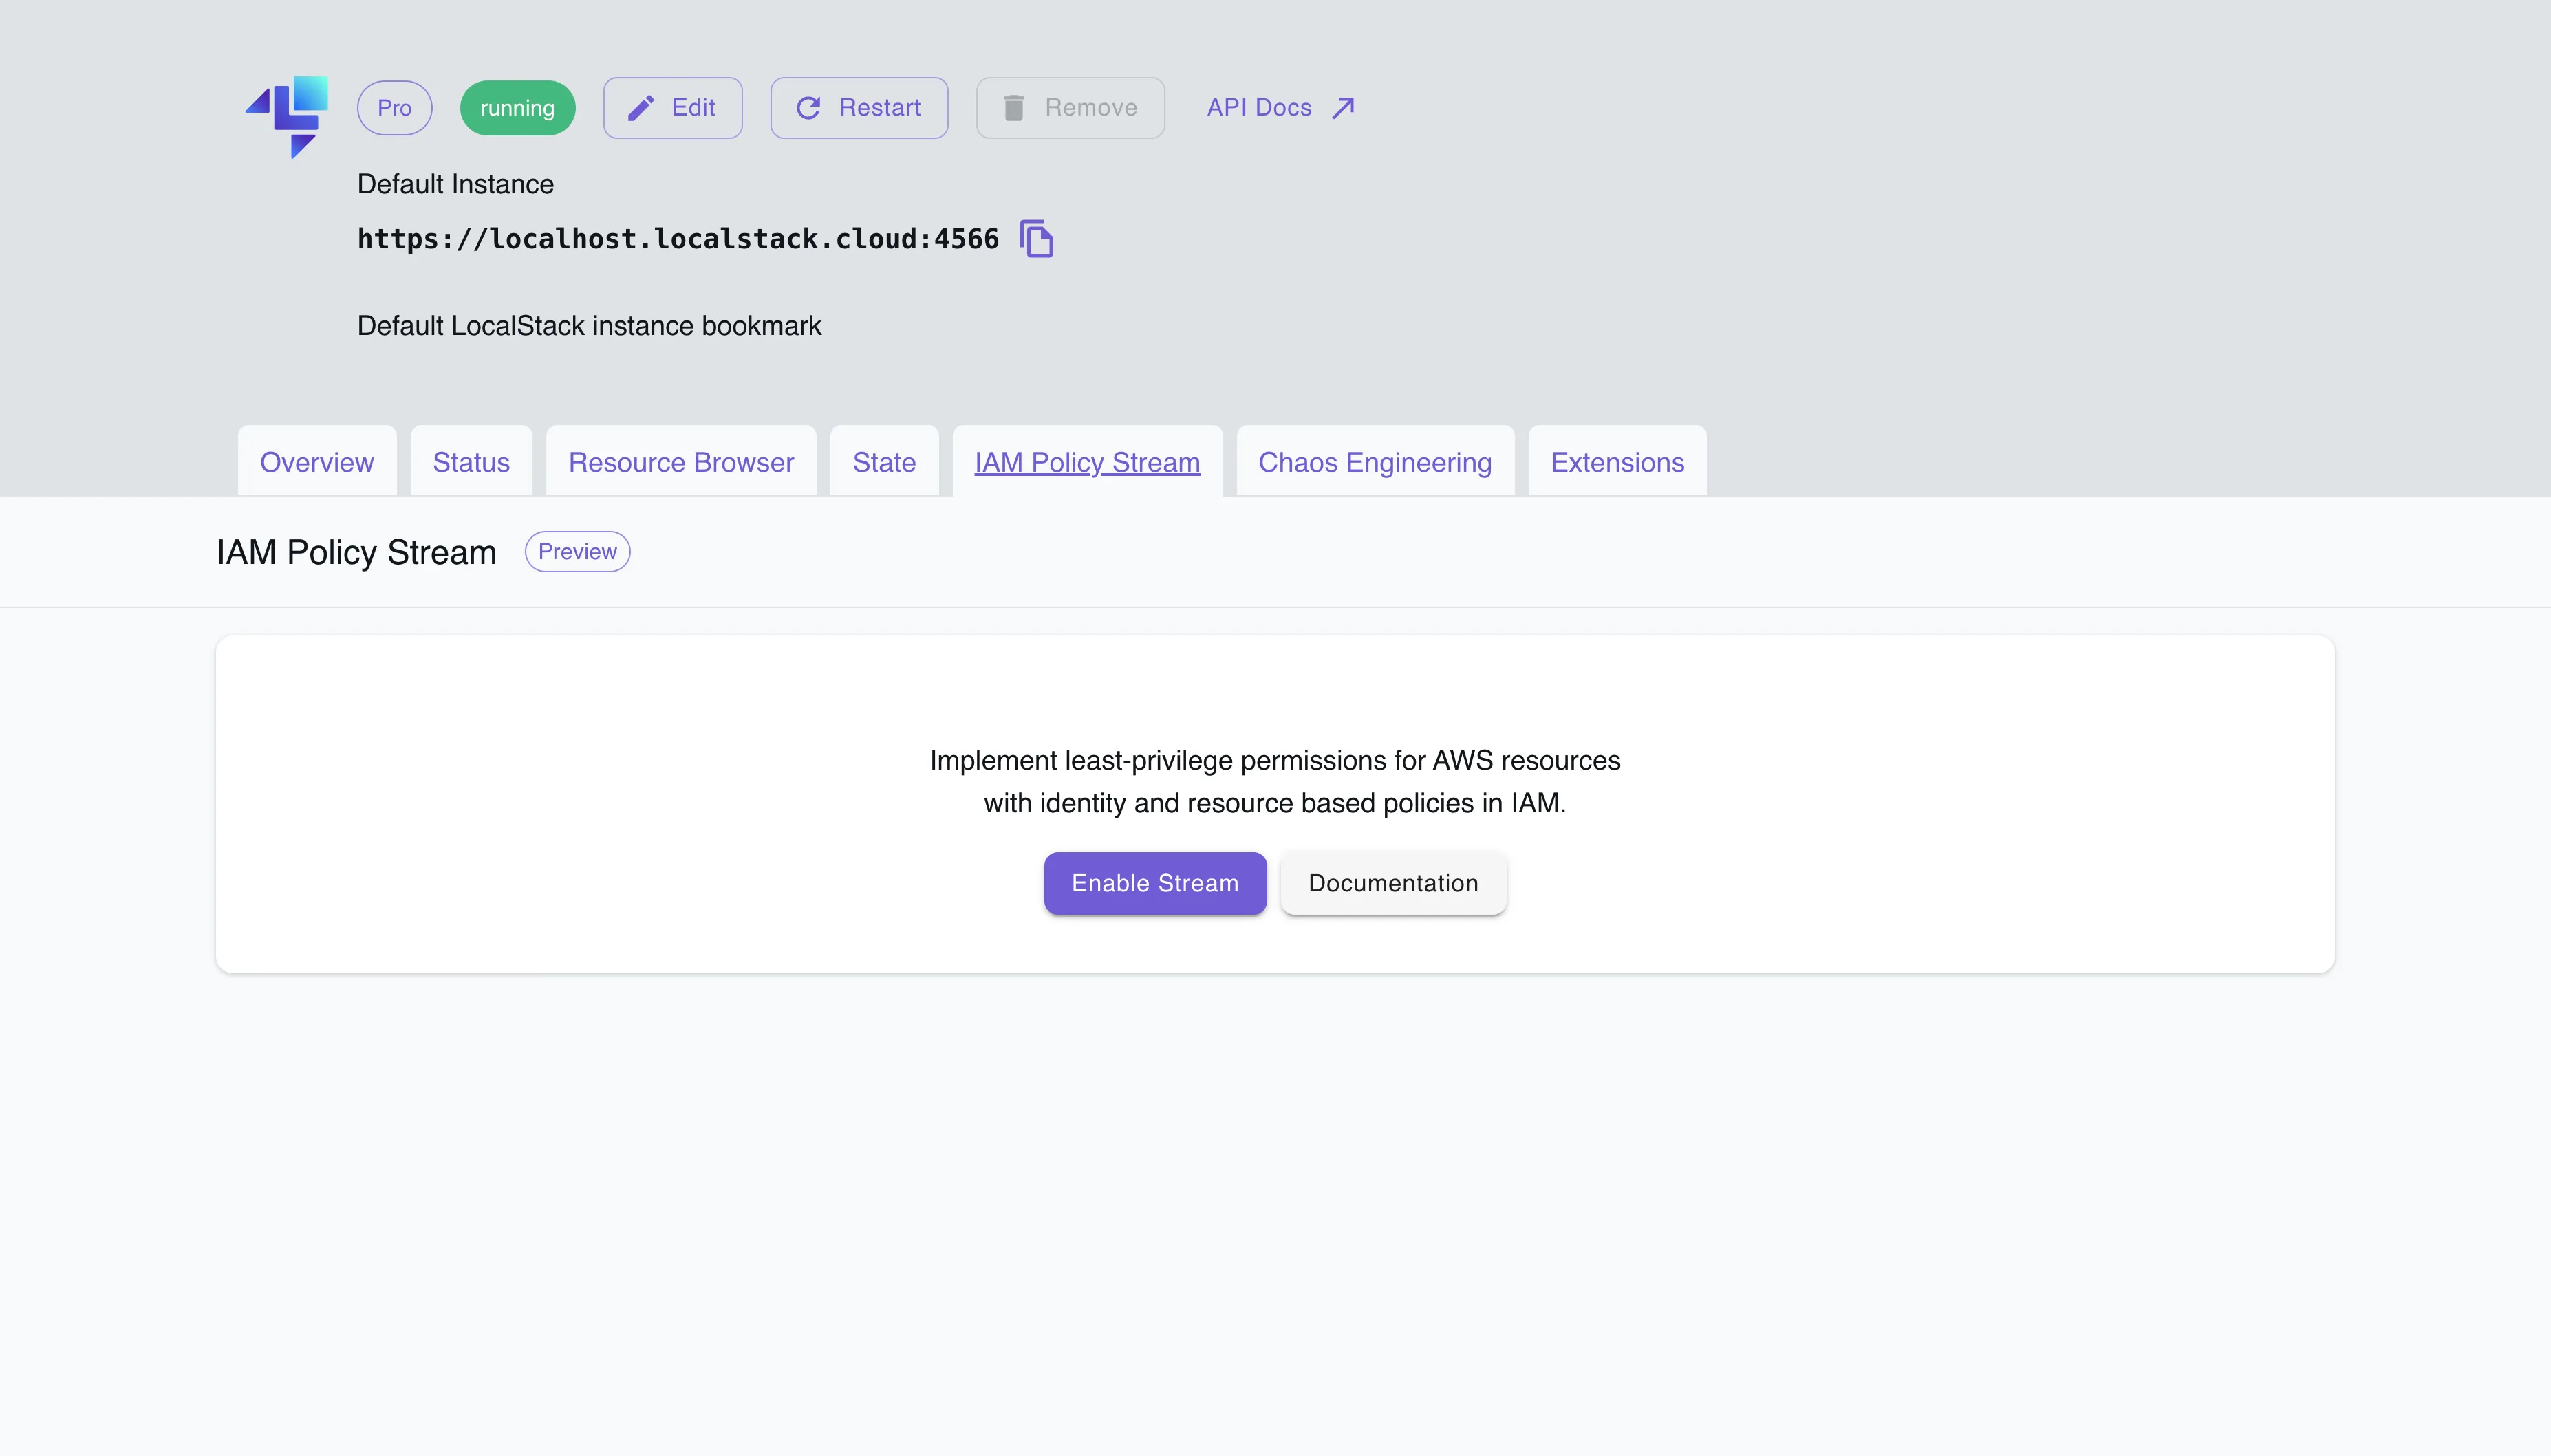
Click on “Enable Stream” to activate the IAM Policy Stream. You may notice that some IAM policies have already been generated due to internal AWS API calls. If you prefer not to stream these internal IAM policies, as they are irrelevant to this tutorial, you can toggle off “Show internal calls”.
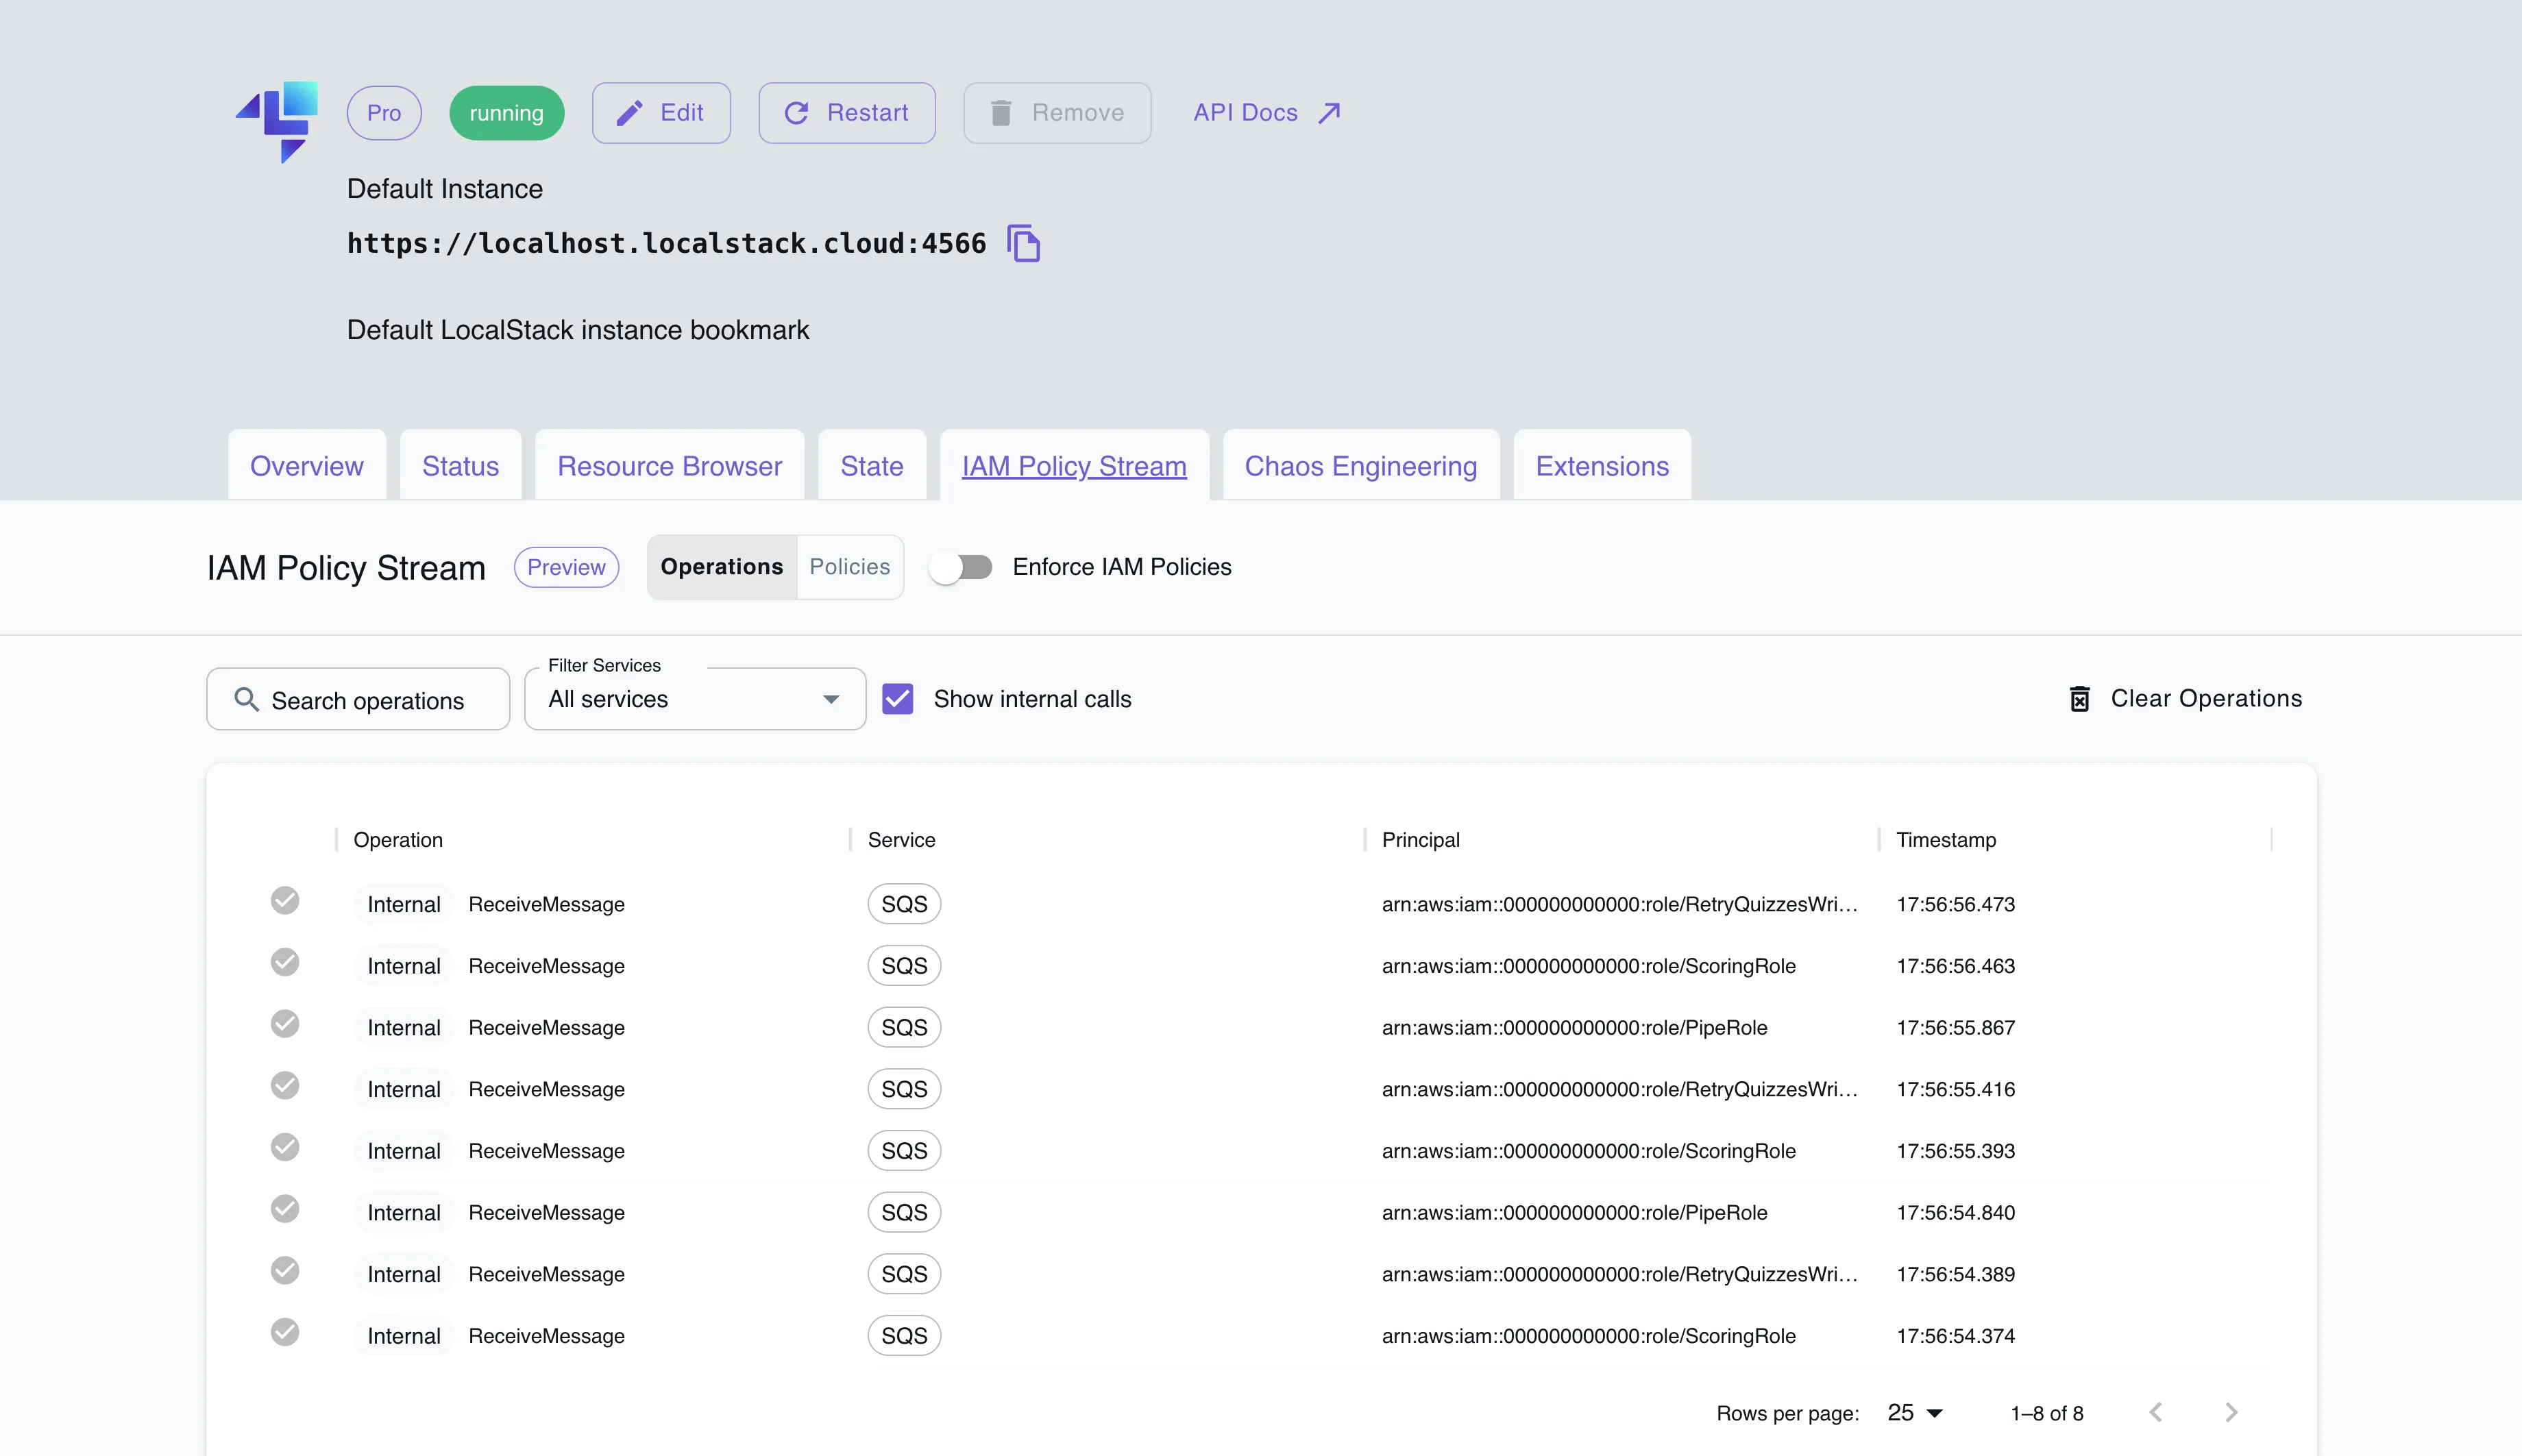
Toggle on “Enforce IAM Policies” and interact with the quiz app by attempting a quiz submission. If the submission fails, an alert will display: Failed to submit quiz. Please try again.
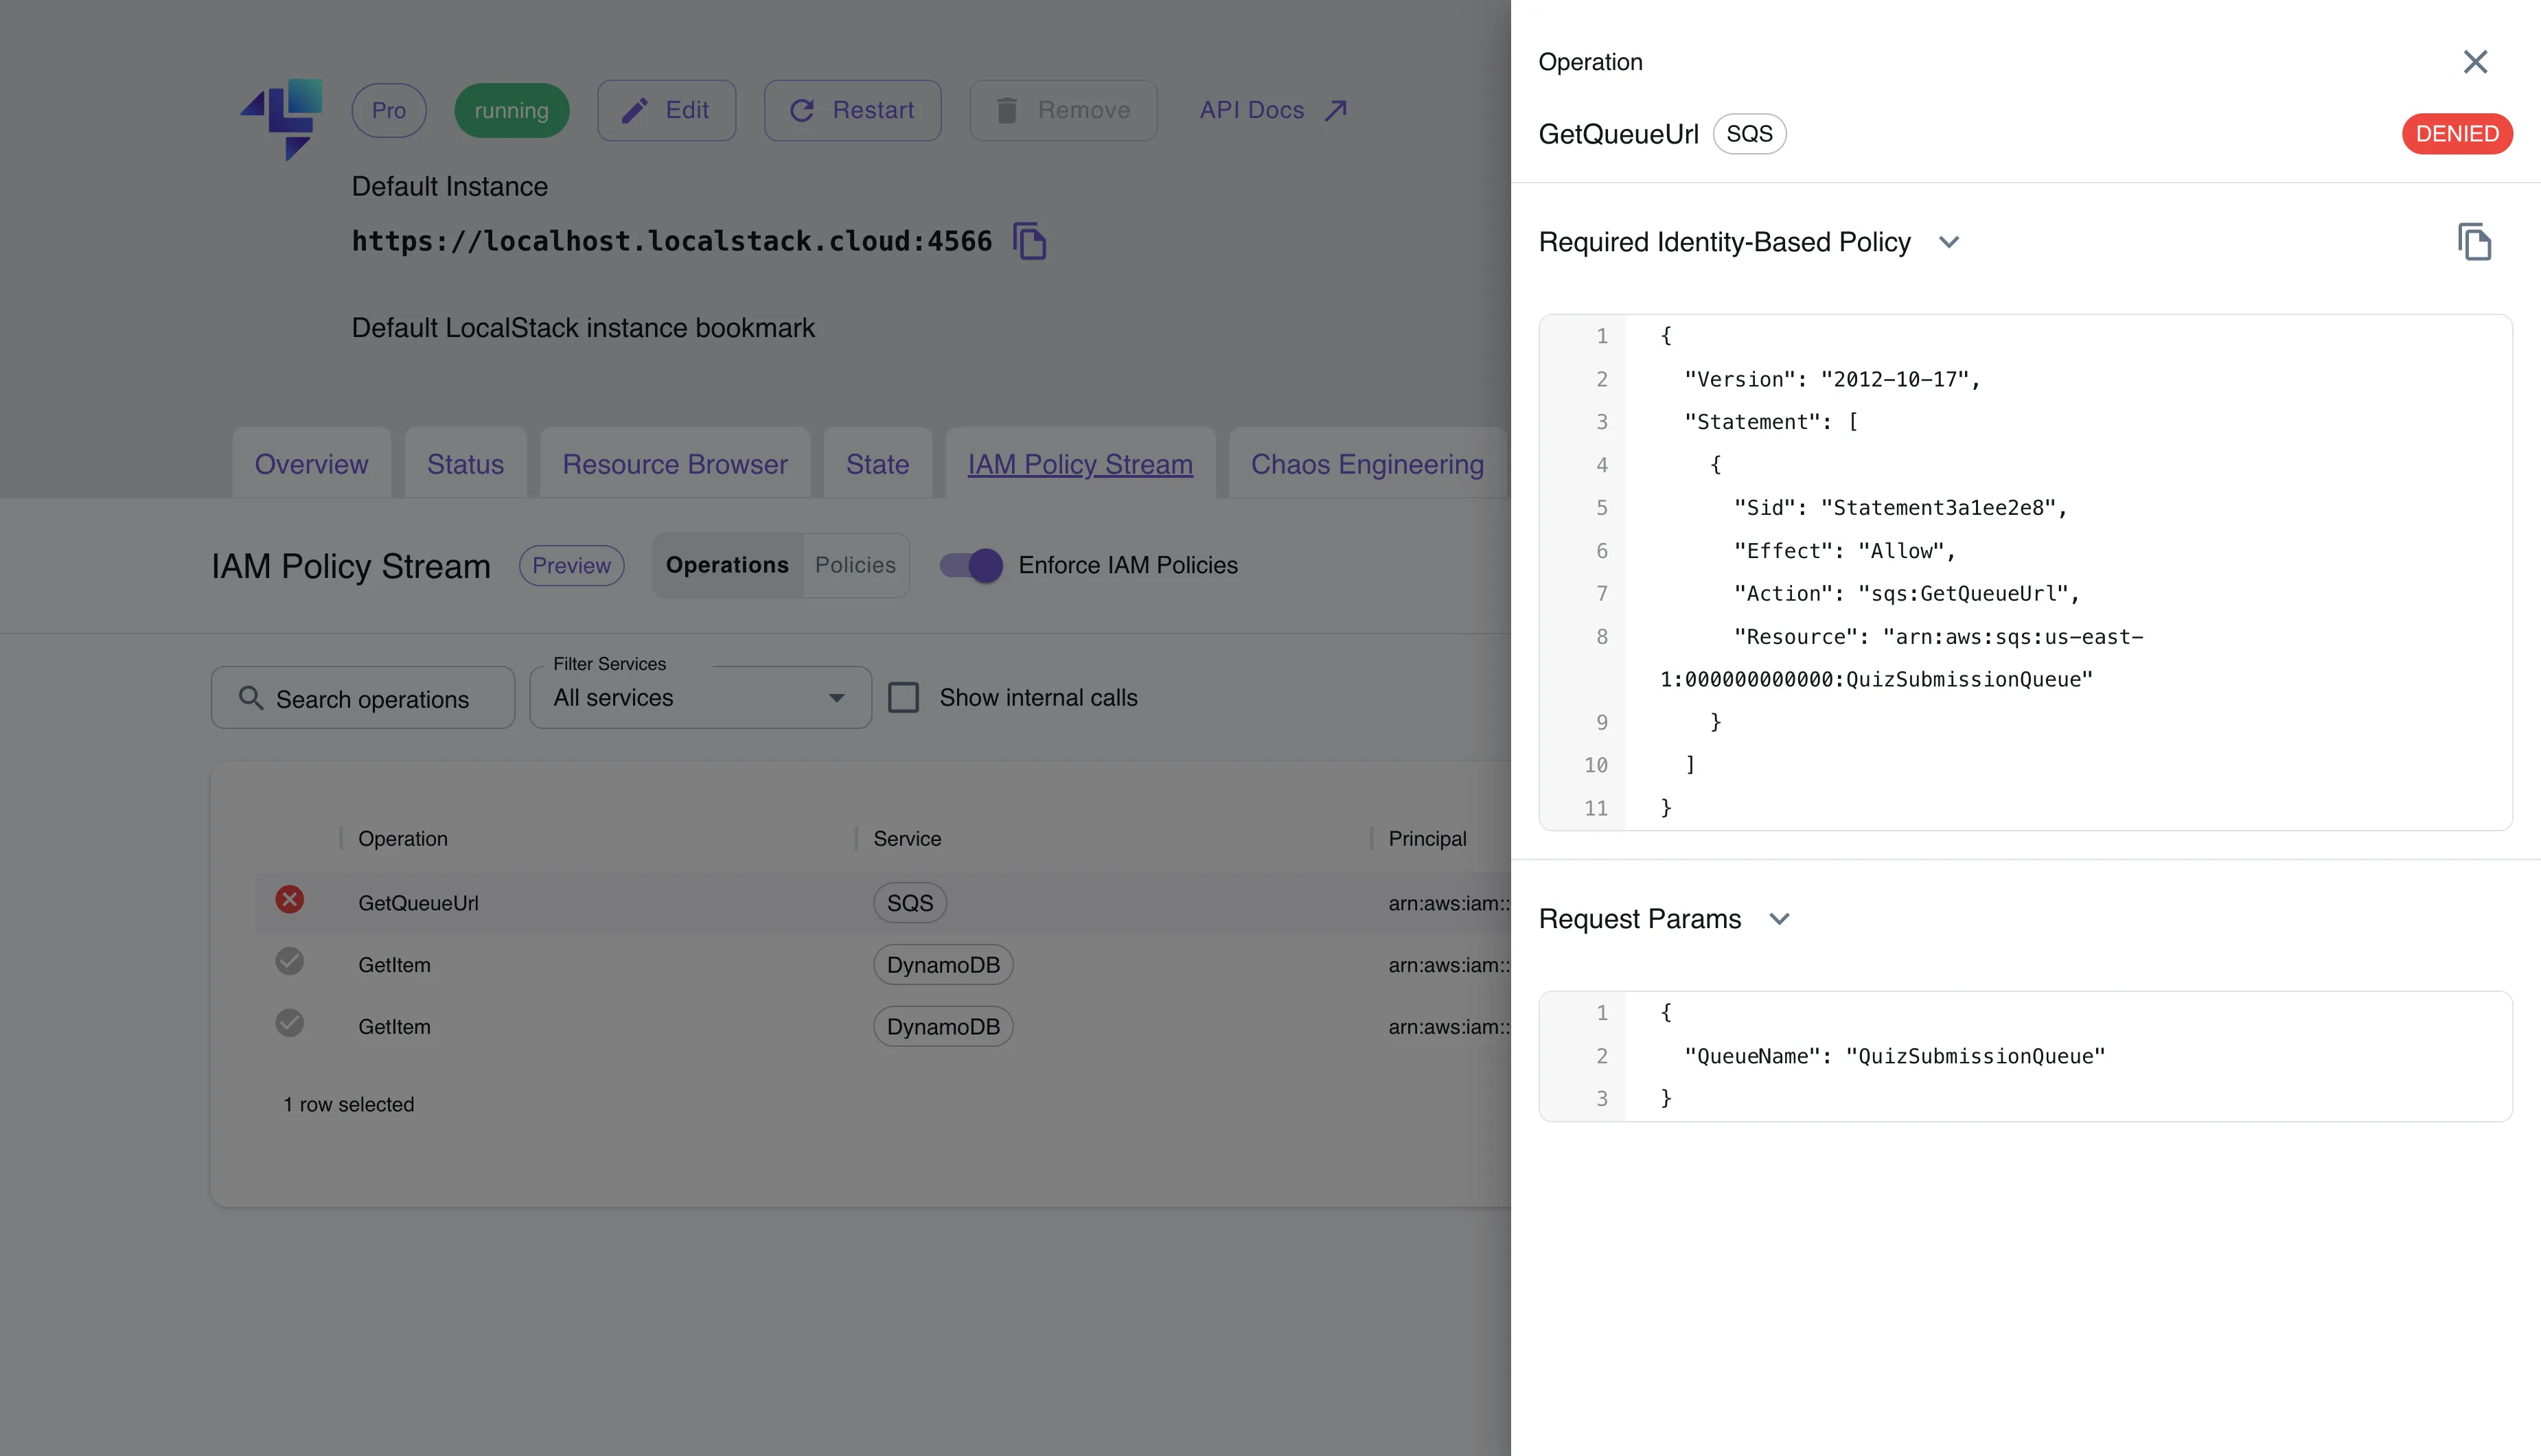
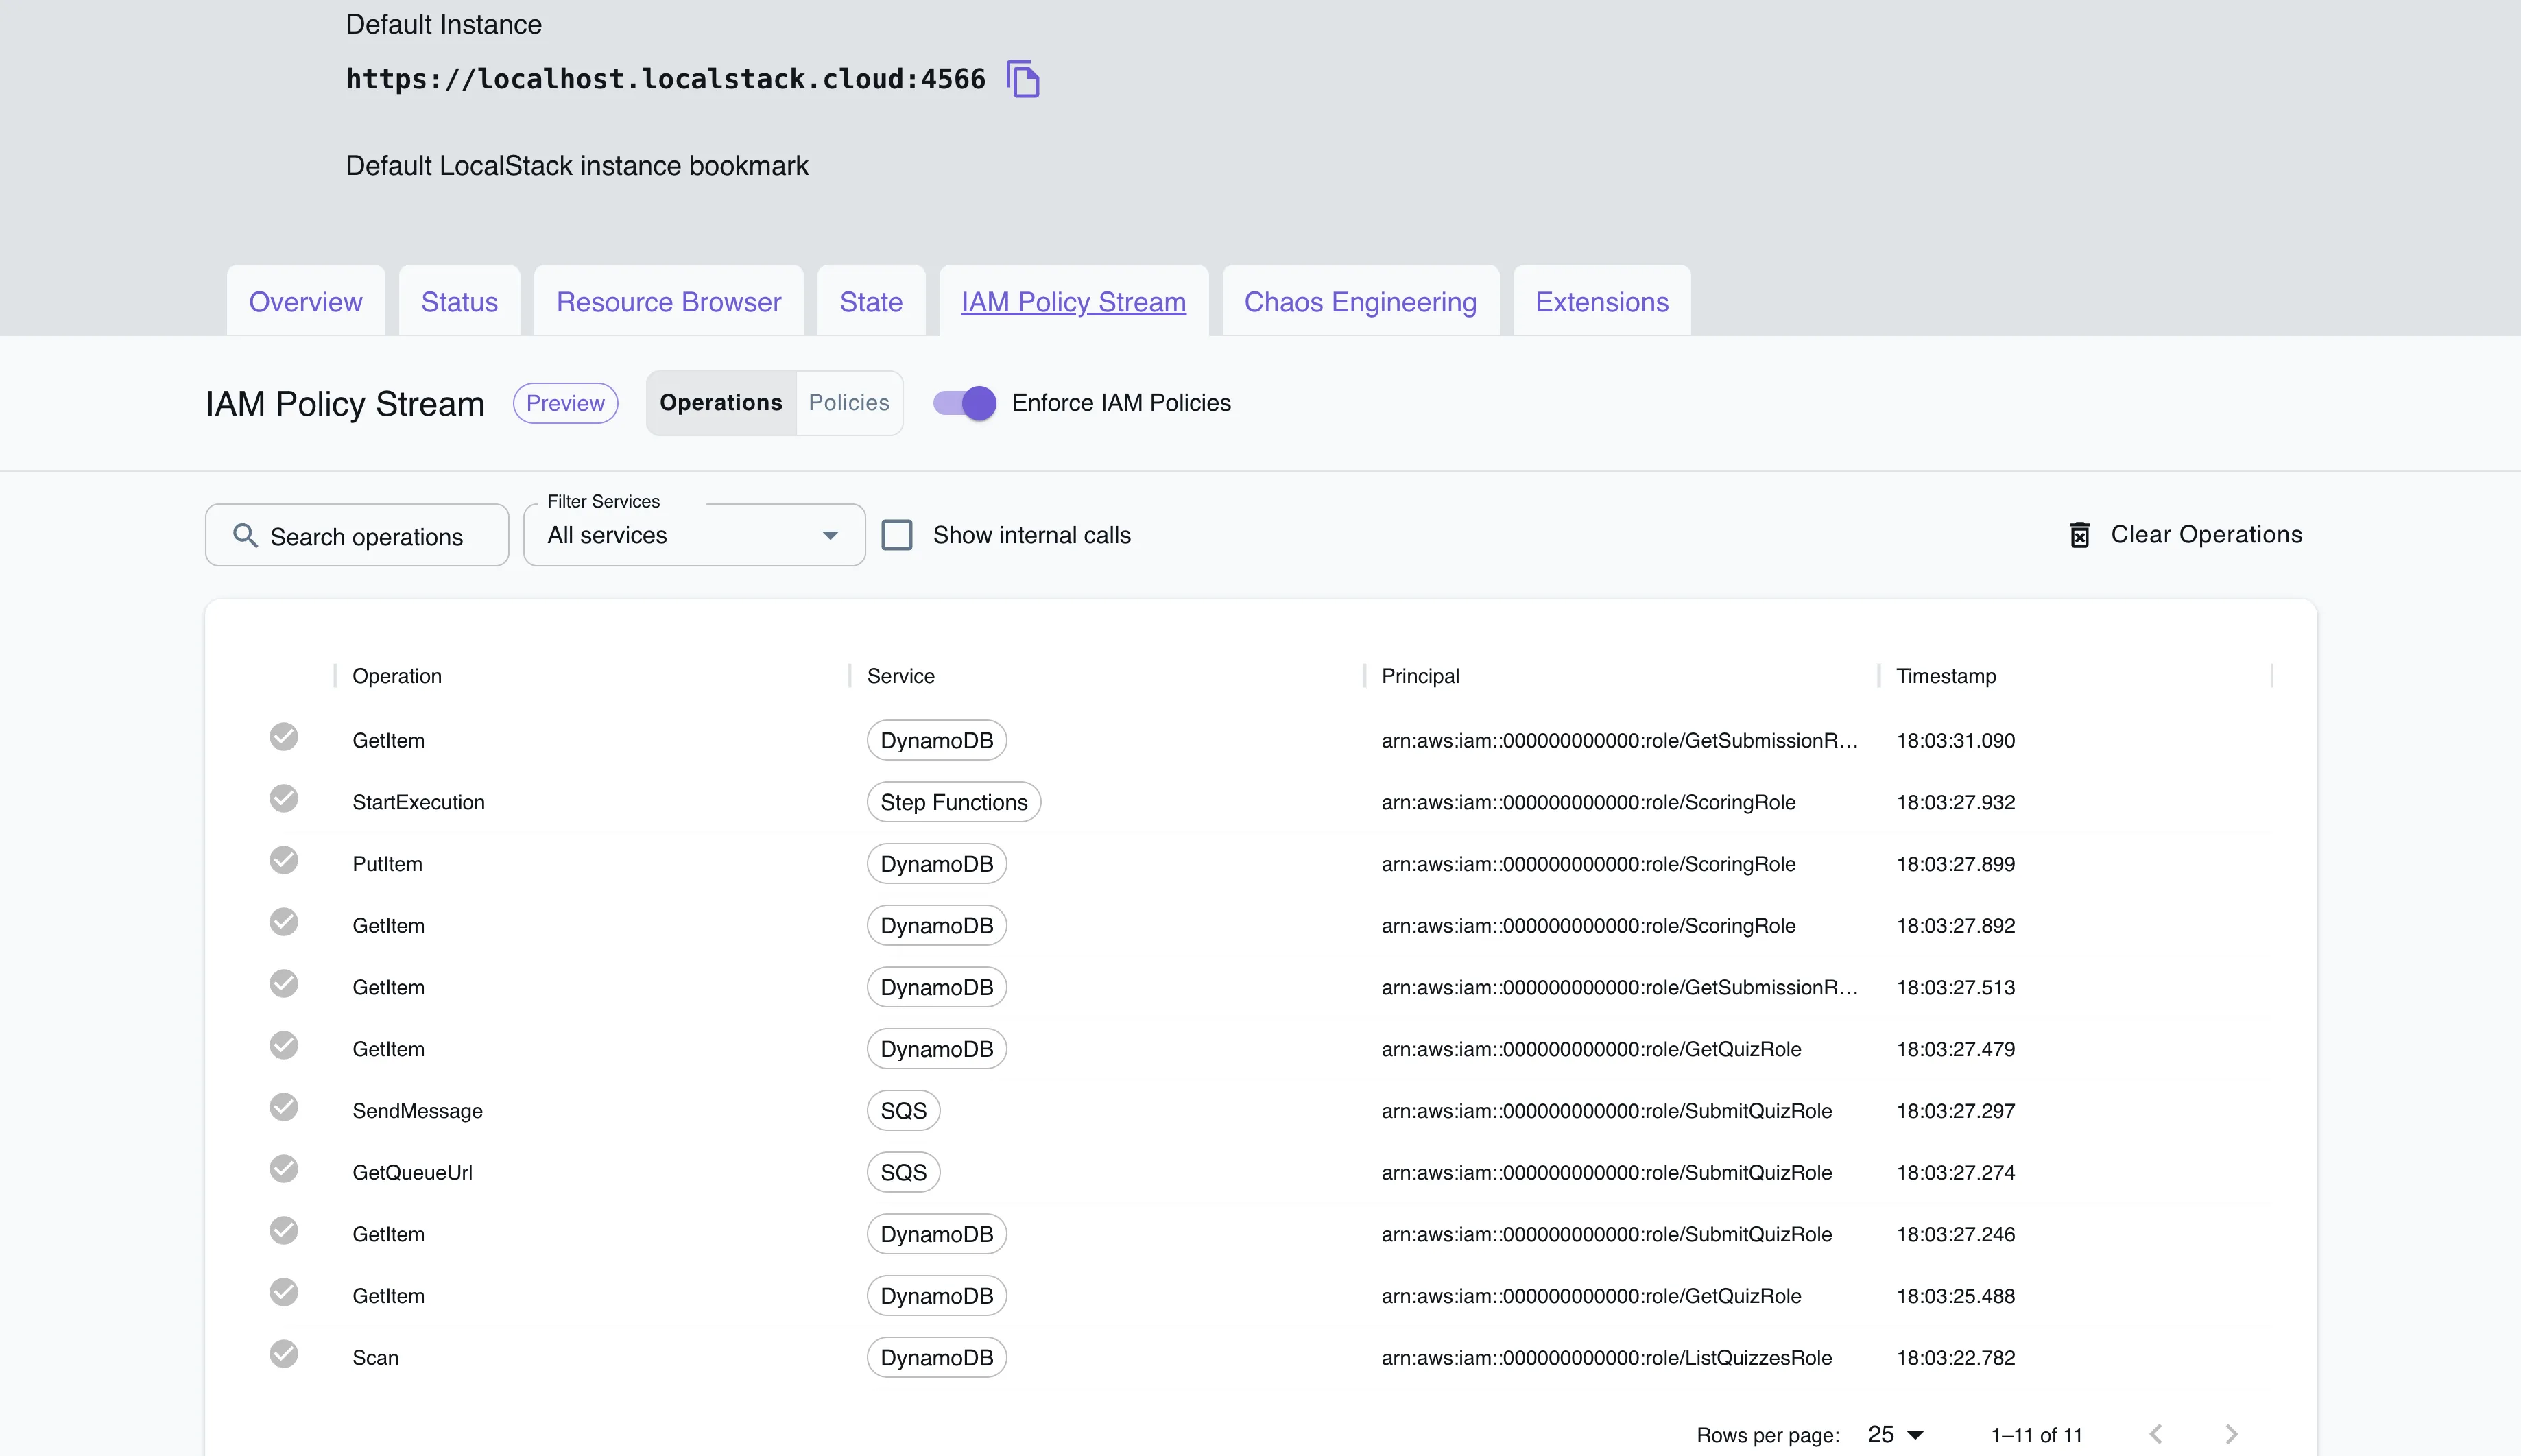
Return to the IAM Policy Stream dashboard and observe the following:
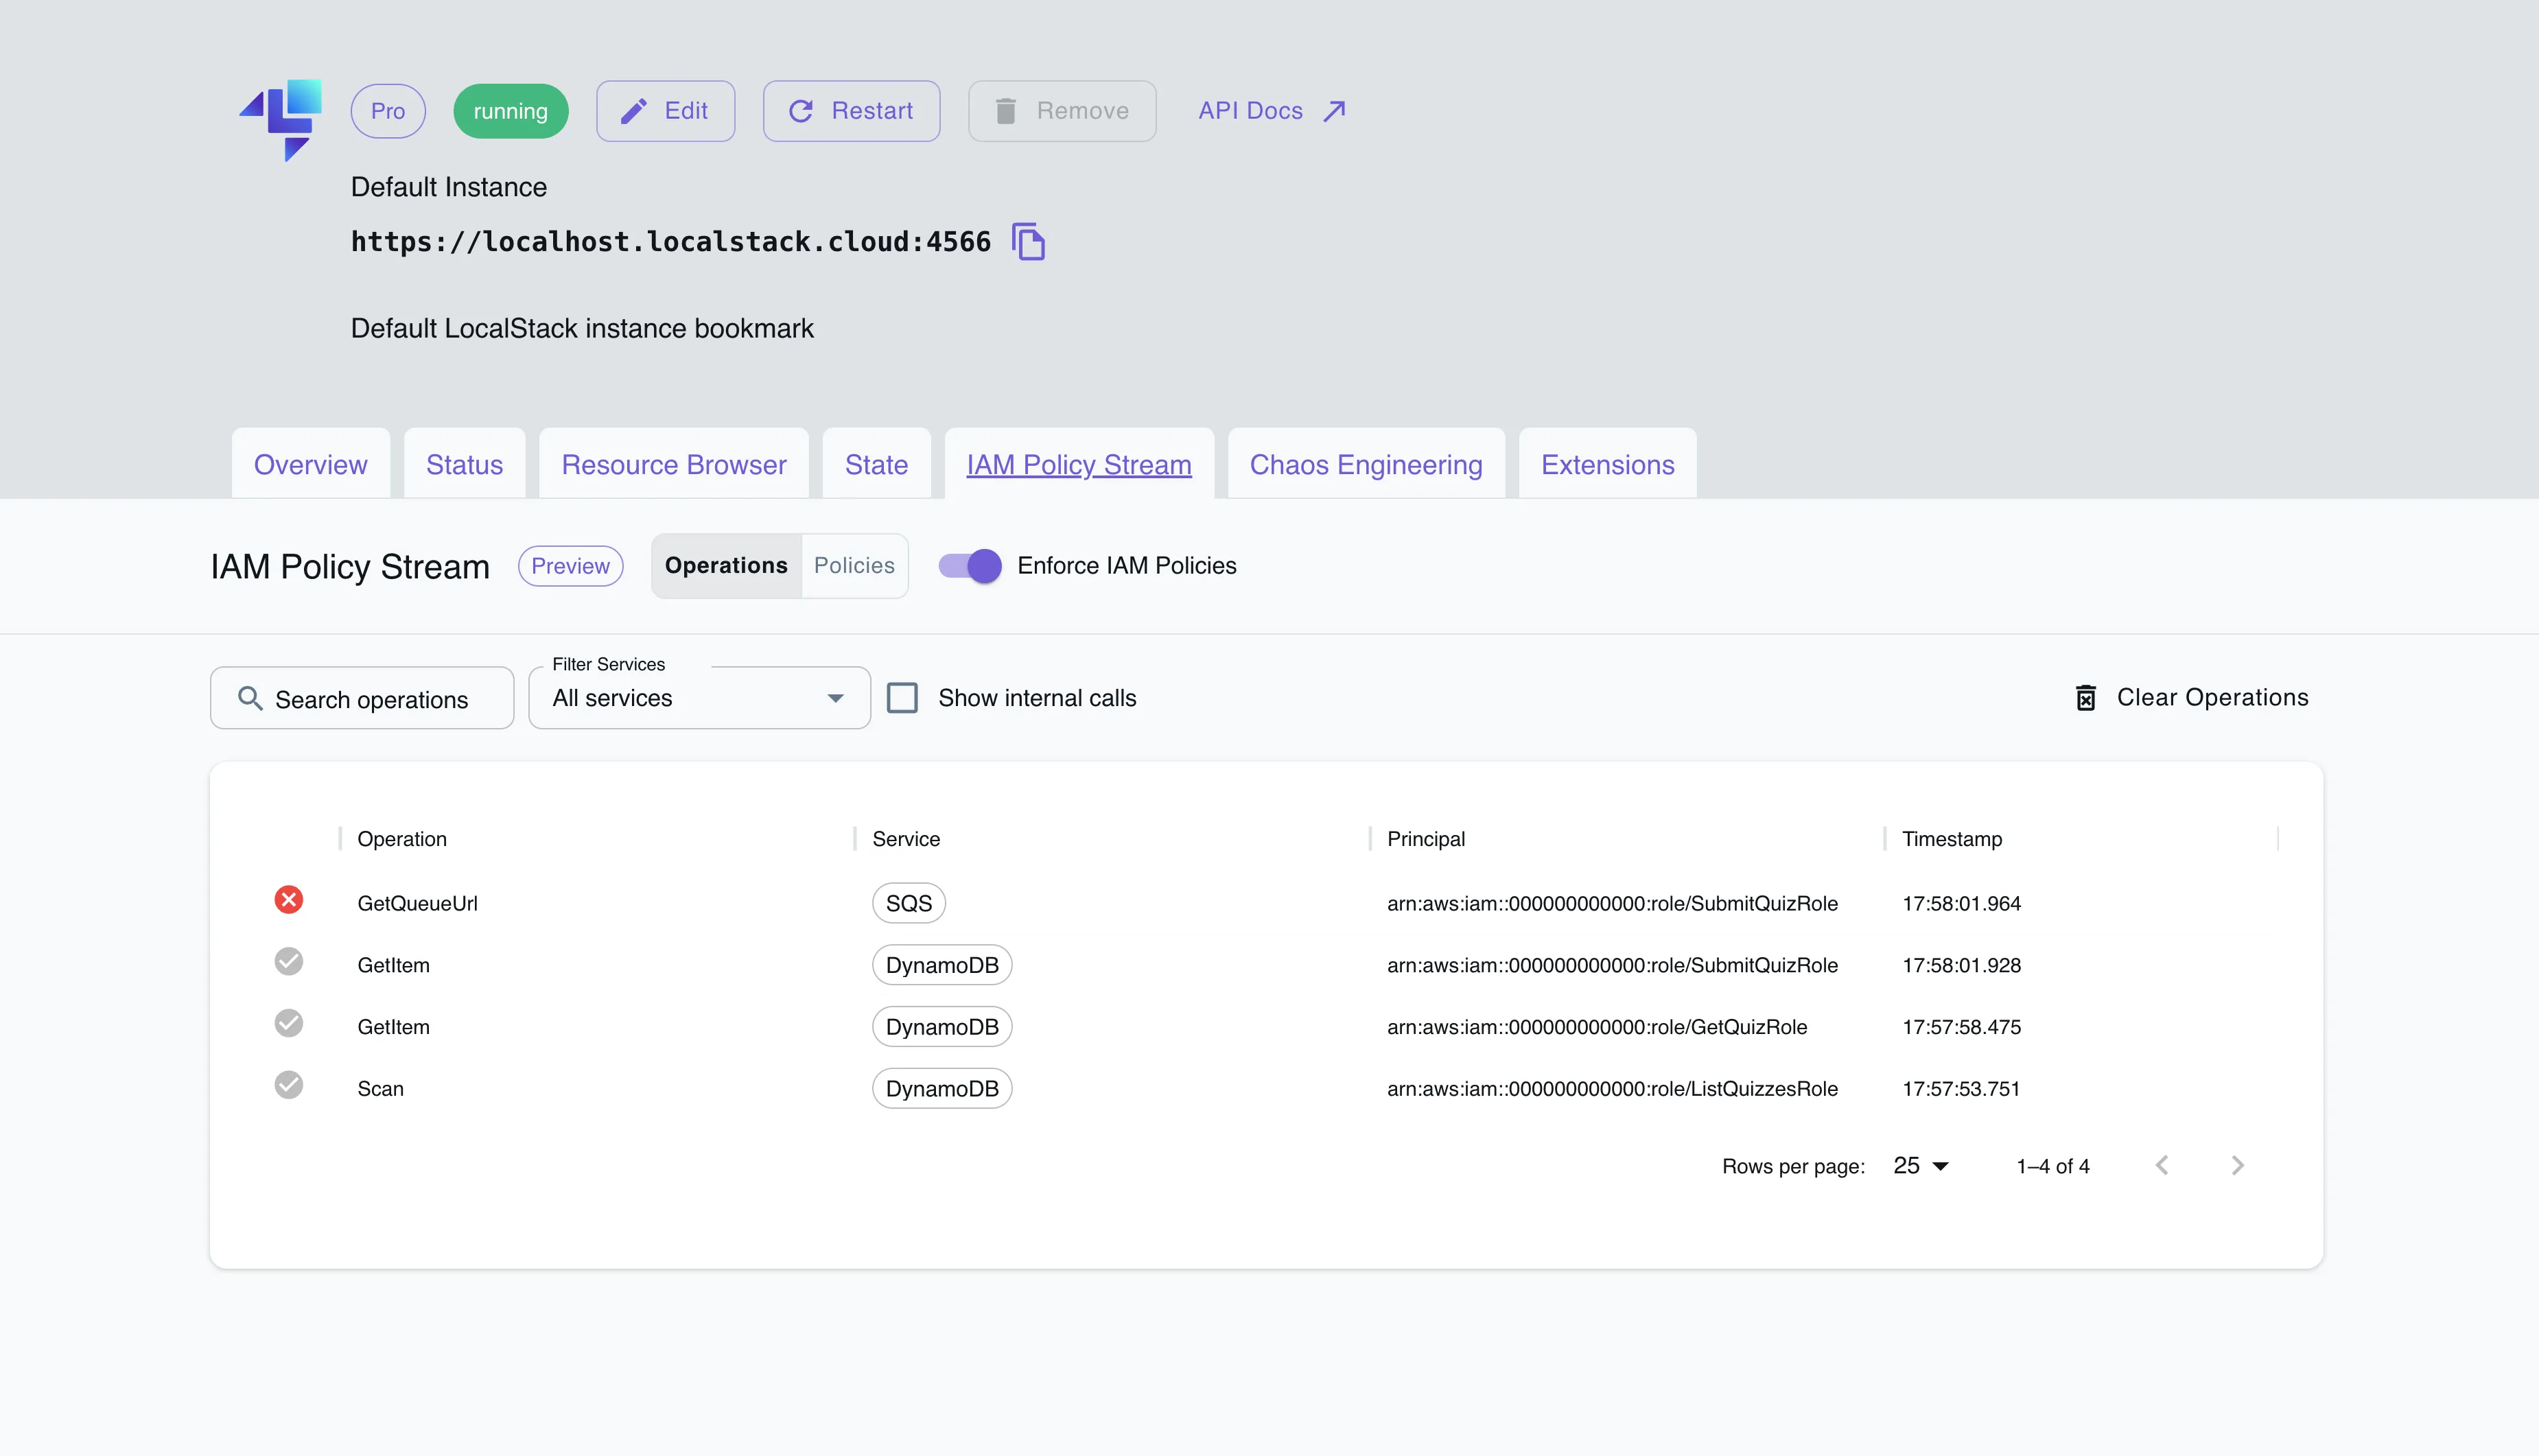
The dashboard lists operations along with the corresponding service, principal, and timestamp. You will see a red cross mark next to certain operations, indicating that these failed due to missing IAM permissions.
You can now examine the request parameters and the necessary resource-based policy for operations that have failed. To streamline the process, let’s move forward and determine the least permissive permissions required for our app to function smoothly.
Find the right permissions
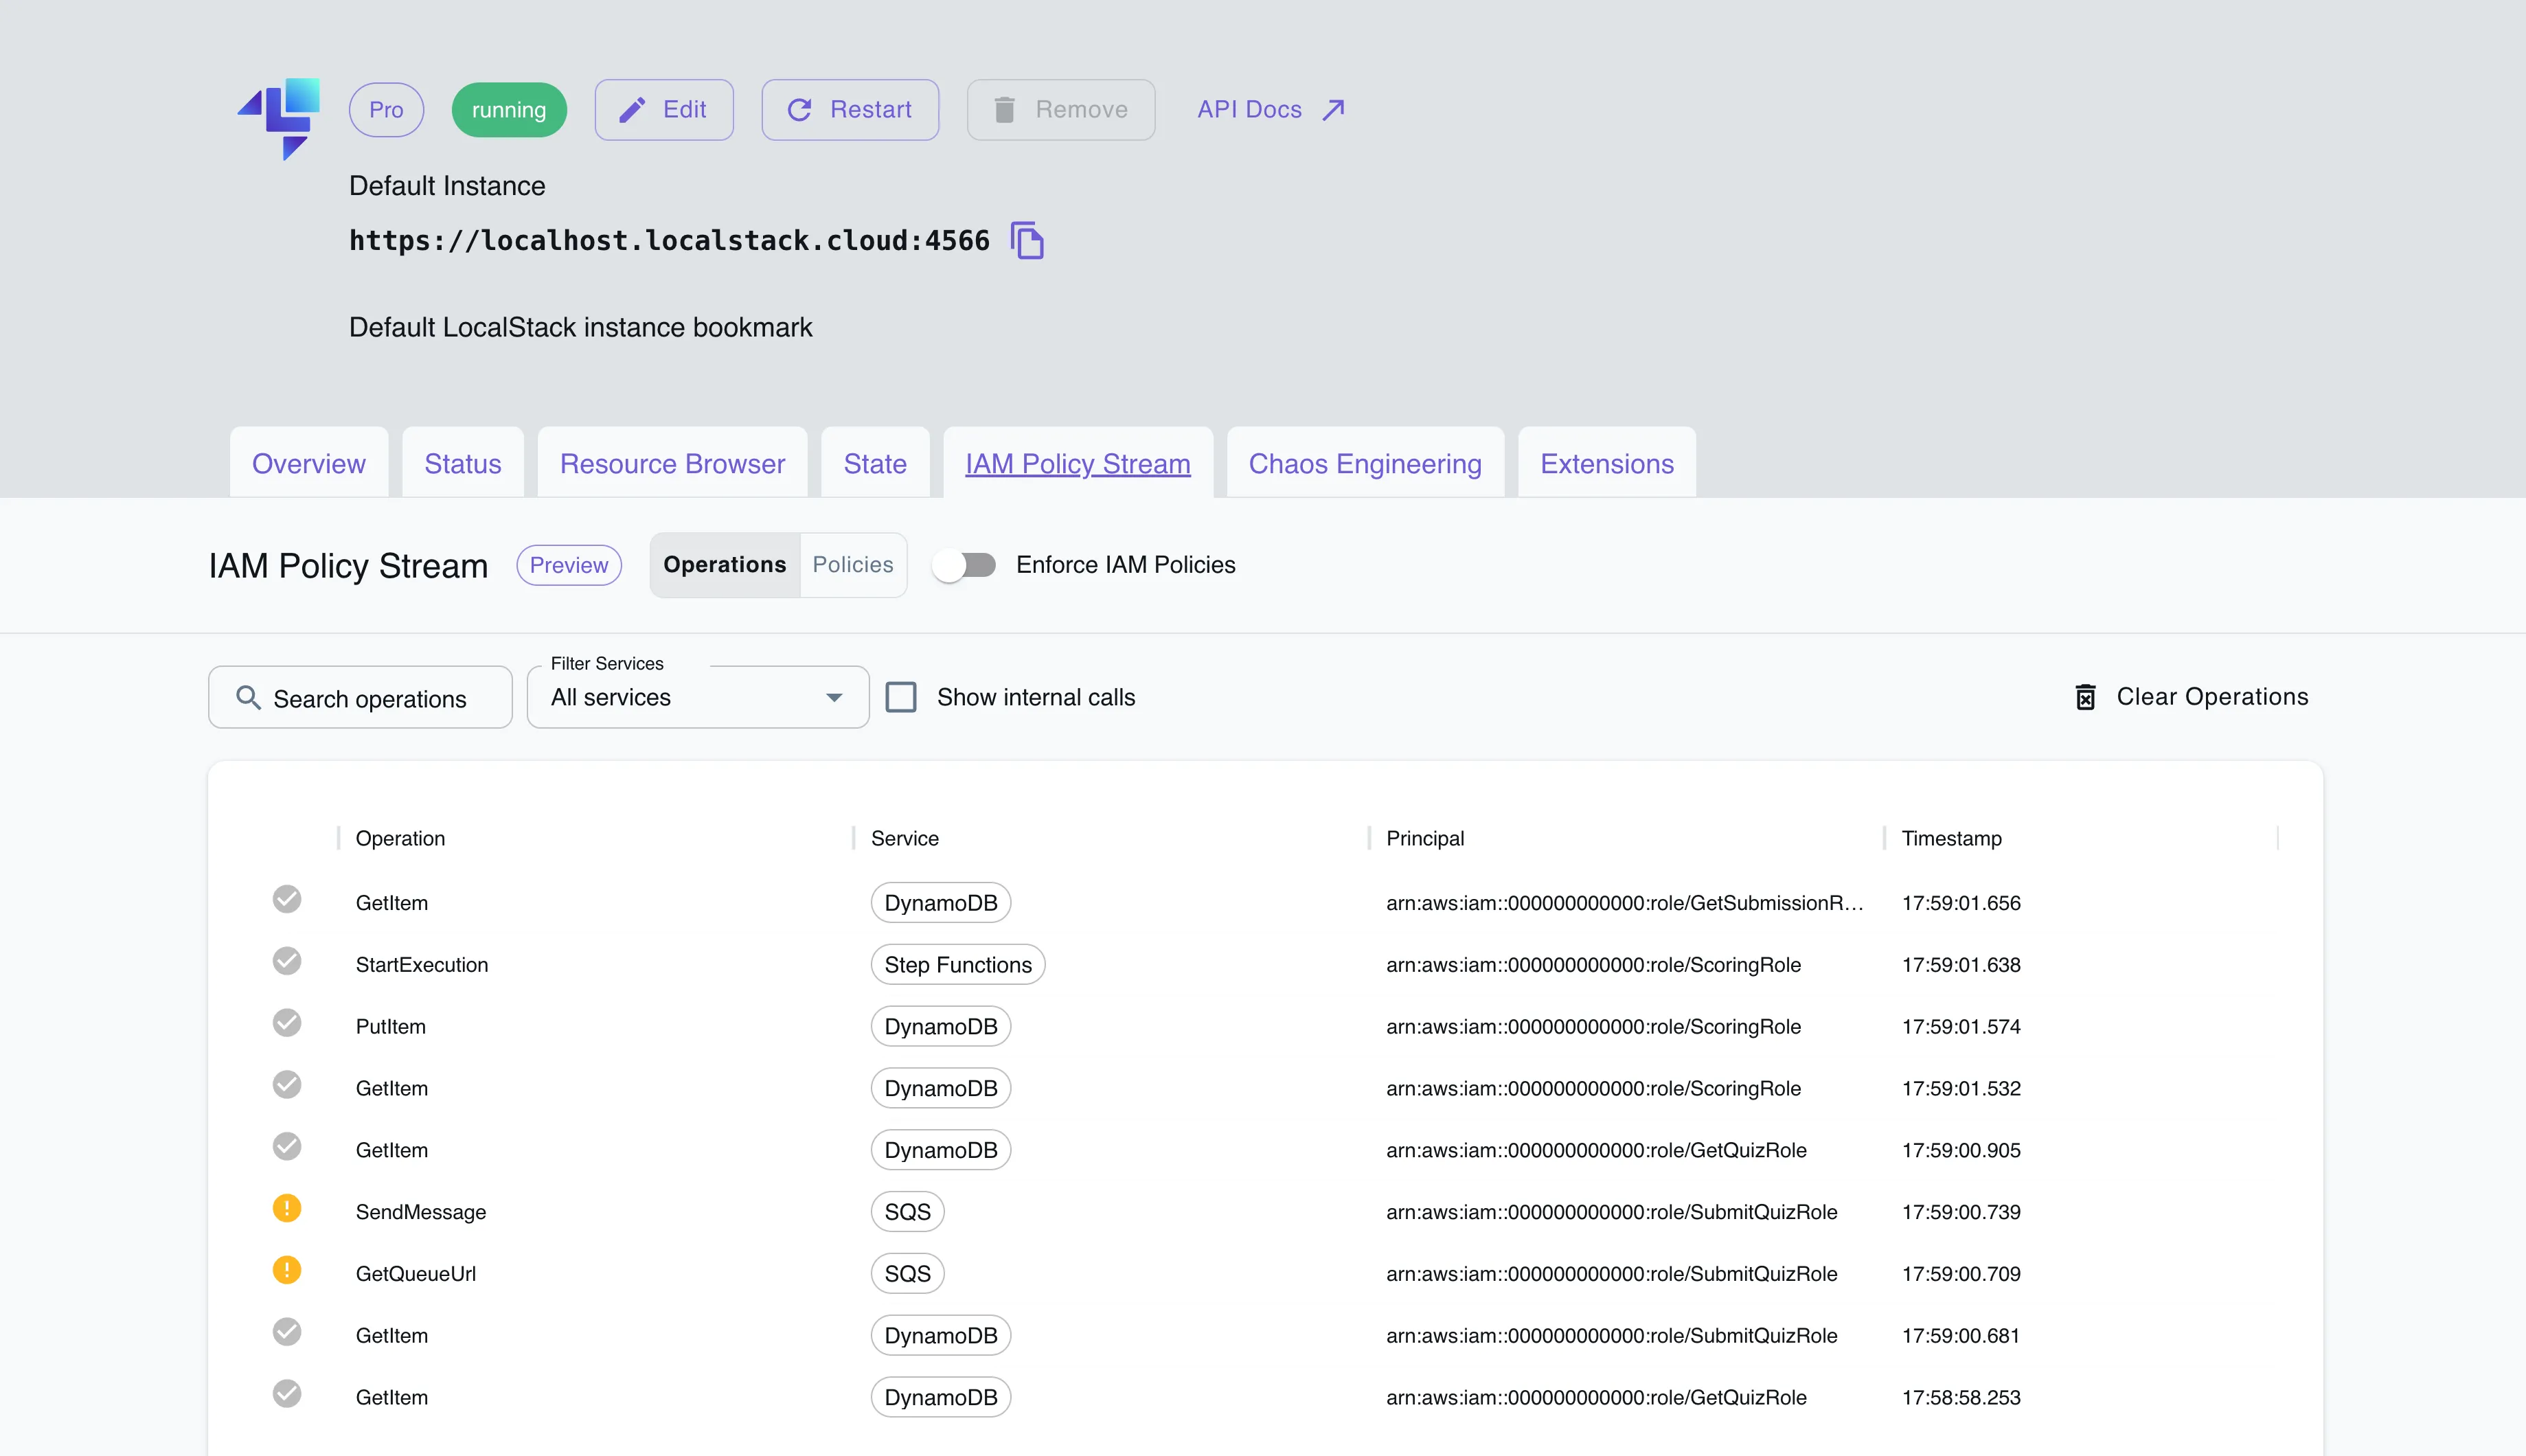
Toggle off “Enforce IAM Policies”, click on “Clear Operations”, and run the quiz app again. This time, you’ll see that two operations (SendMessage & GetQueueUrl) have exclamation marks indicating missing policies. If policies are strictly enforced, these could disrupt your infrastructure.
Click on the SendMessage operation to view the required identity-based policy for sending messages. The policy allows the operation to get the queue URL and send messages to the specified SQS queue.
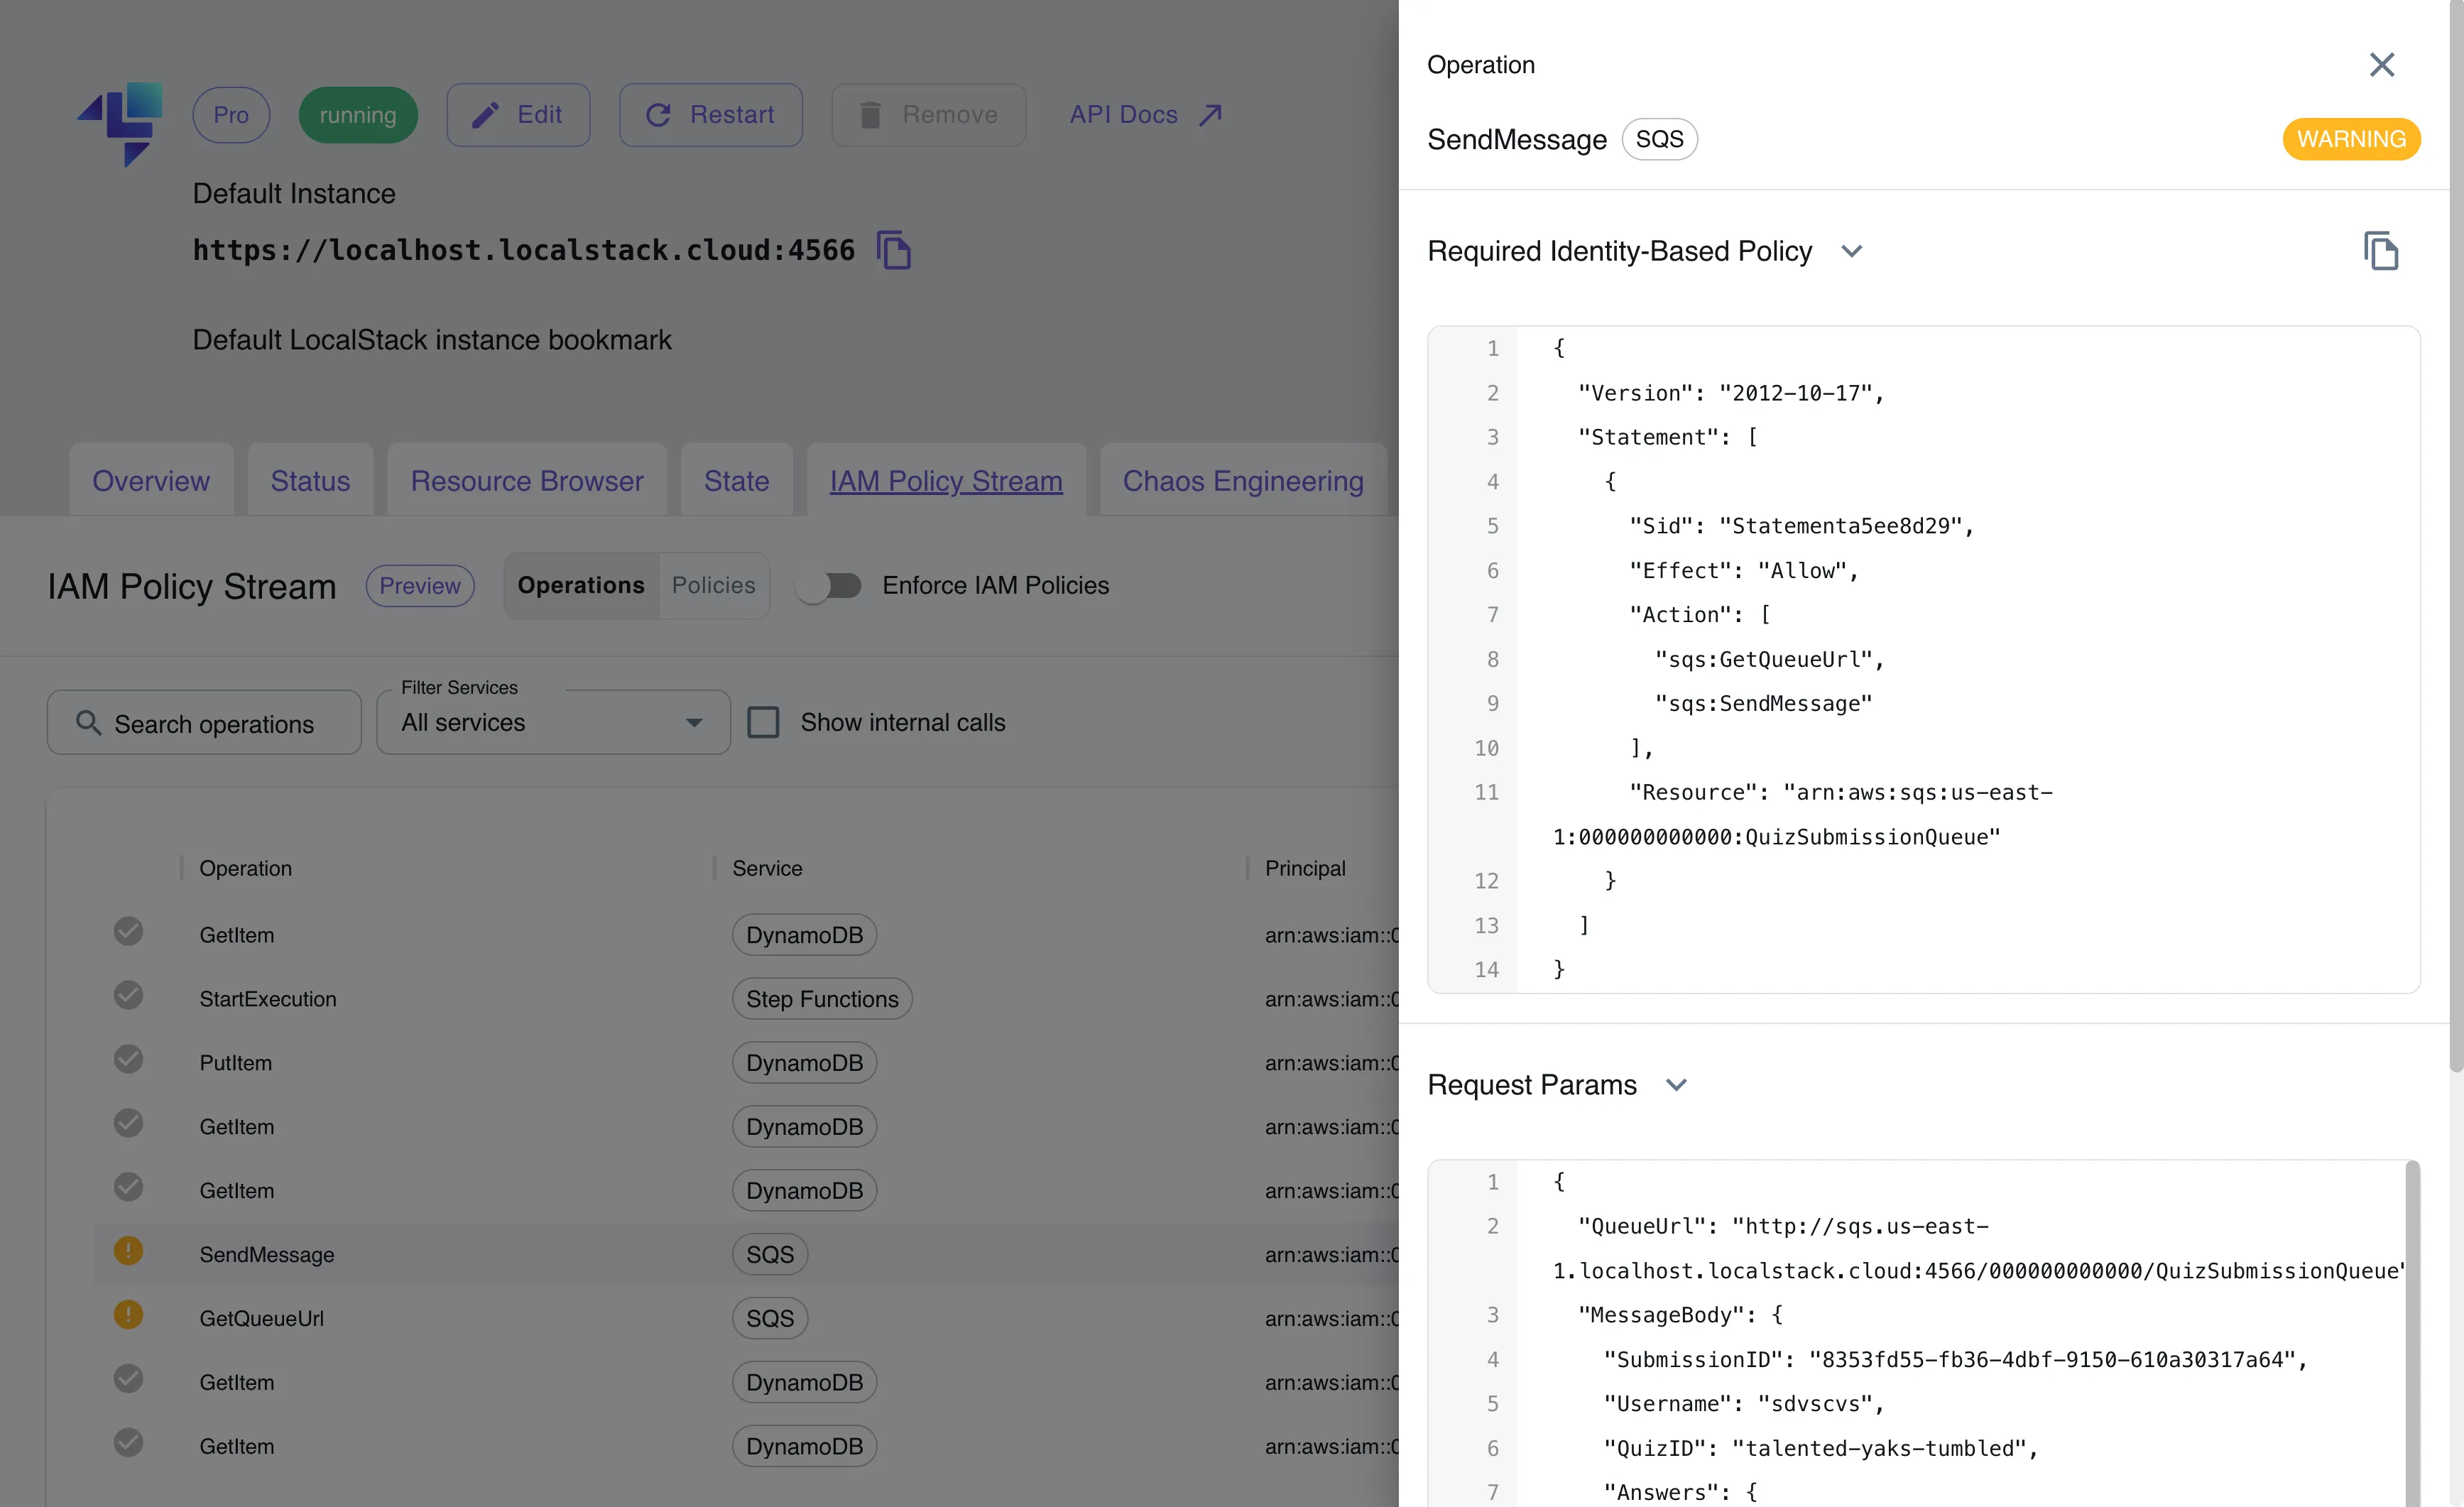
Here is the JSON representation of the missing actions in the SubmitQuizRole:
{ "Version": "2012-10-17", "Statement": [ { "Effect": "Allow", "Action": [ "sqs:GetQueueUrl", "sqs:SendMessage" ], "Resource": "arn:aws:sqs:us-east-1:000000000000:QuizSubmissionQueue" } ]}Add the right permissions
Now that we’ve identified the missing actions that need to be added, you can update the SubmitQuizFunctionPolicy associated with the SubmitQuizRole IAM role. You can do this either by using the awslocal CLI or through the IAM Resource Browser.
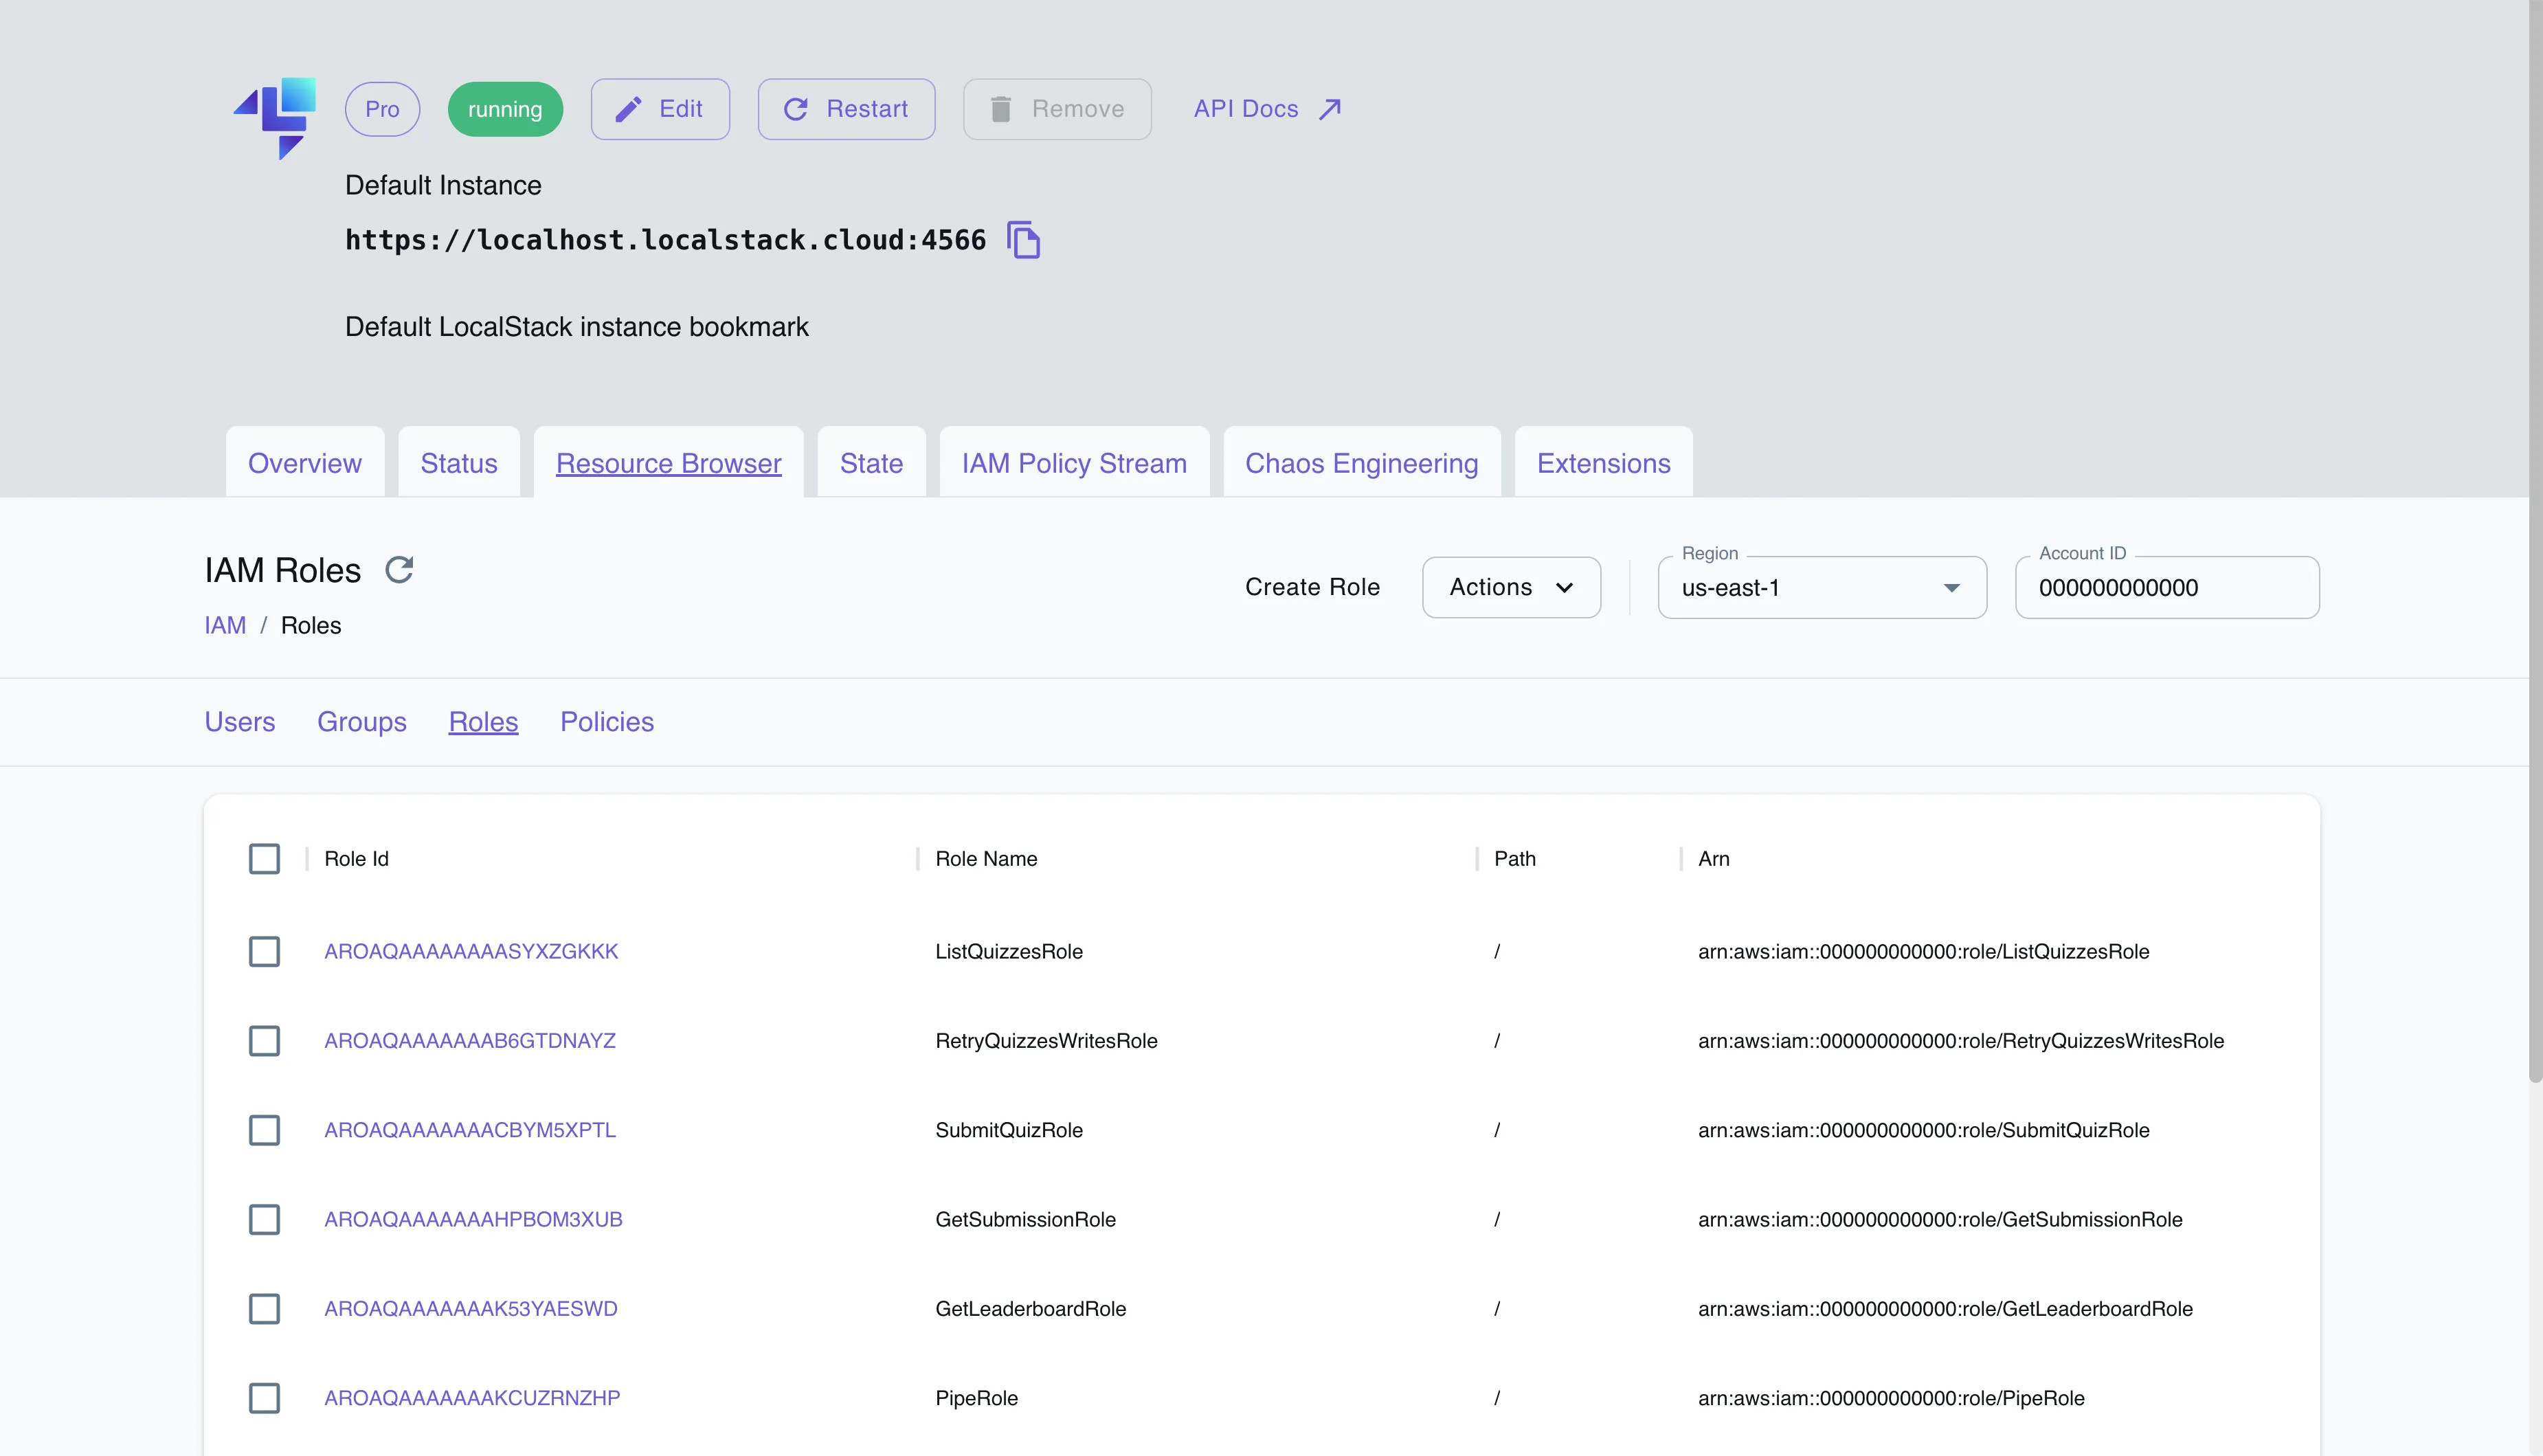
To edit the role policy for SubmitQuizRole in the IAM Resource Browser, follow these steps:
- Click on “Roles”.
- Select the Role ID for
SubmitQuizRole. - Navigate to “Role Policies”.
- Click on the policy name “SubmitQuizFunctionPolicy”.
- In the top right-hand corner, click on “UpdatePolicyVersion”.
- Add the following new entry in the
Statementblock to cover the previously missing actions:
{ "Effect": "Allow", "Action": [ "sqs:GetQueueUrl", "sqs:SendMessage" ], "Resource": "arn:aws:sqs:us-east-1:000000000000:QuizSubmissionQueue"}- The updated policy should now include this new statement.
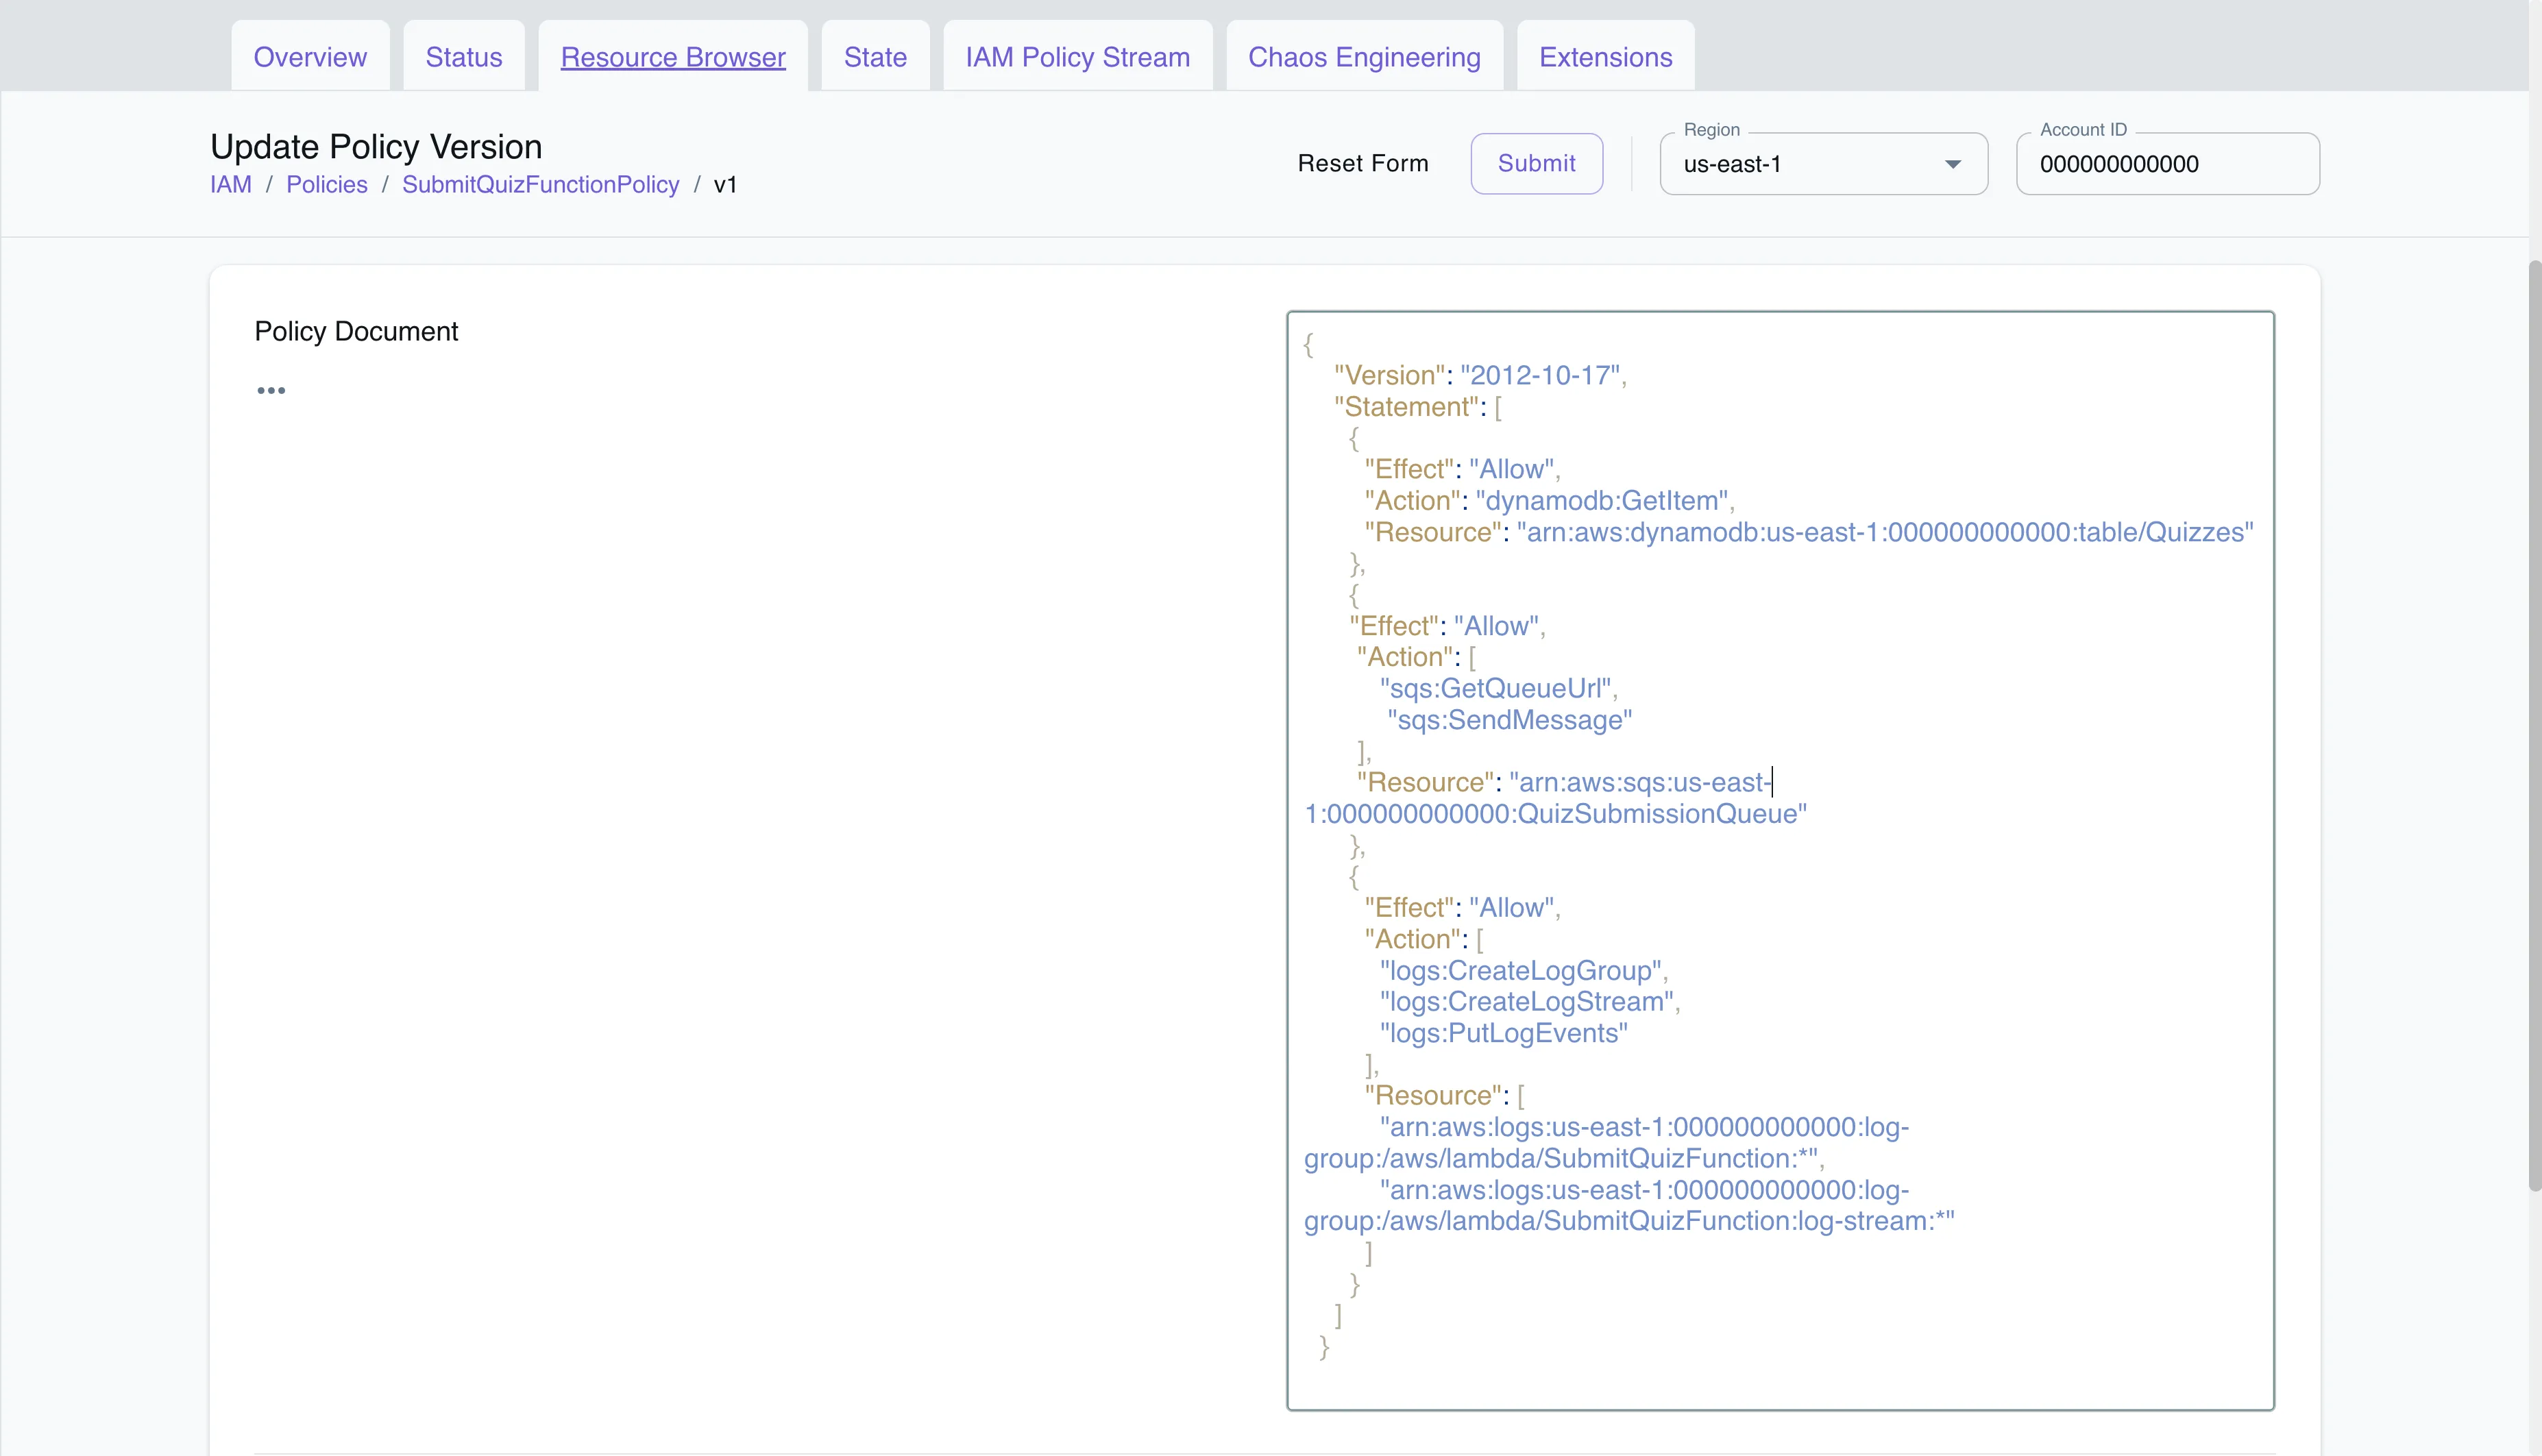
- Click on “Submit” to save the updated role policy.
Return to the “IAM Policy Stream” dashboard, toggle on “Enforce IAM Policies,” and run the quiz application again. This time, no IAM violations should be reported, and your AWS API requests will execute successfully with the correct IAM policies.
Generate comprehensive policies
In scenarios where there are many AWS services, and every AWS API request generates a policy it might be cumbersome to analyze every policy. In such cases, you can generate one comprehensive policy for all your AWS resources together.
Navigate to the “Policies” tab on the IAM Policy Stream dashboard to see the concatenated policies for each principal. This section consolidates the policies that should be attached to each role or user. Here, you can view the combined identity-based and resource-based policies for each principal, detailing the allowed actions and resources.
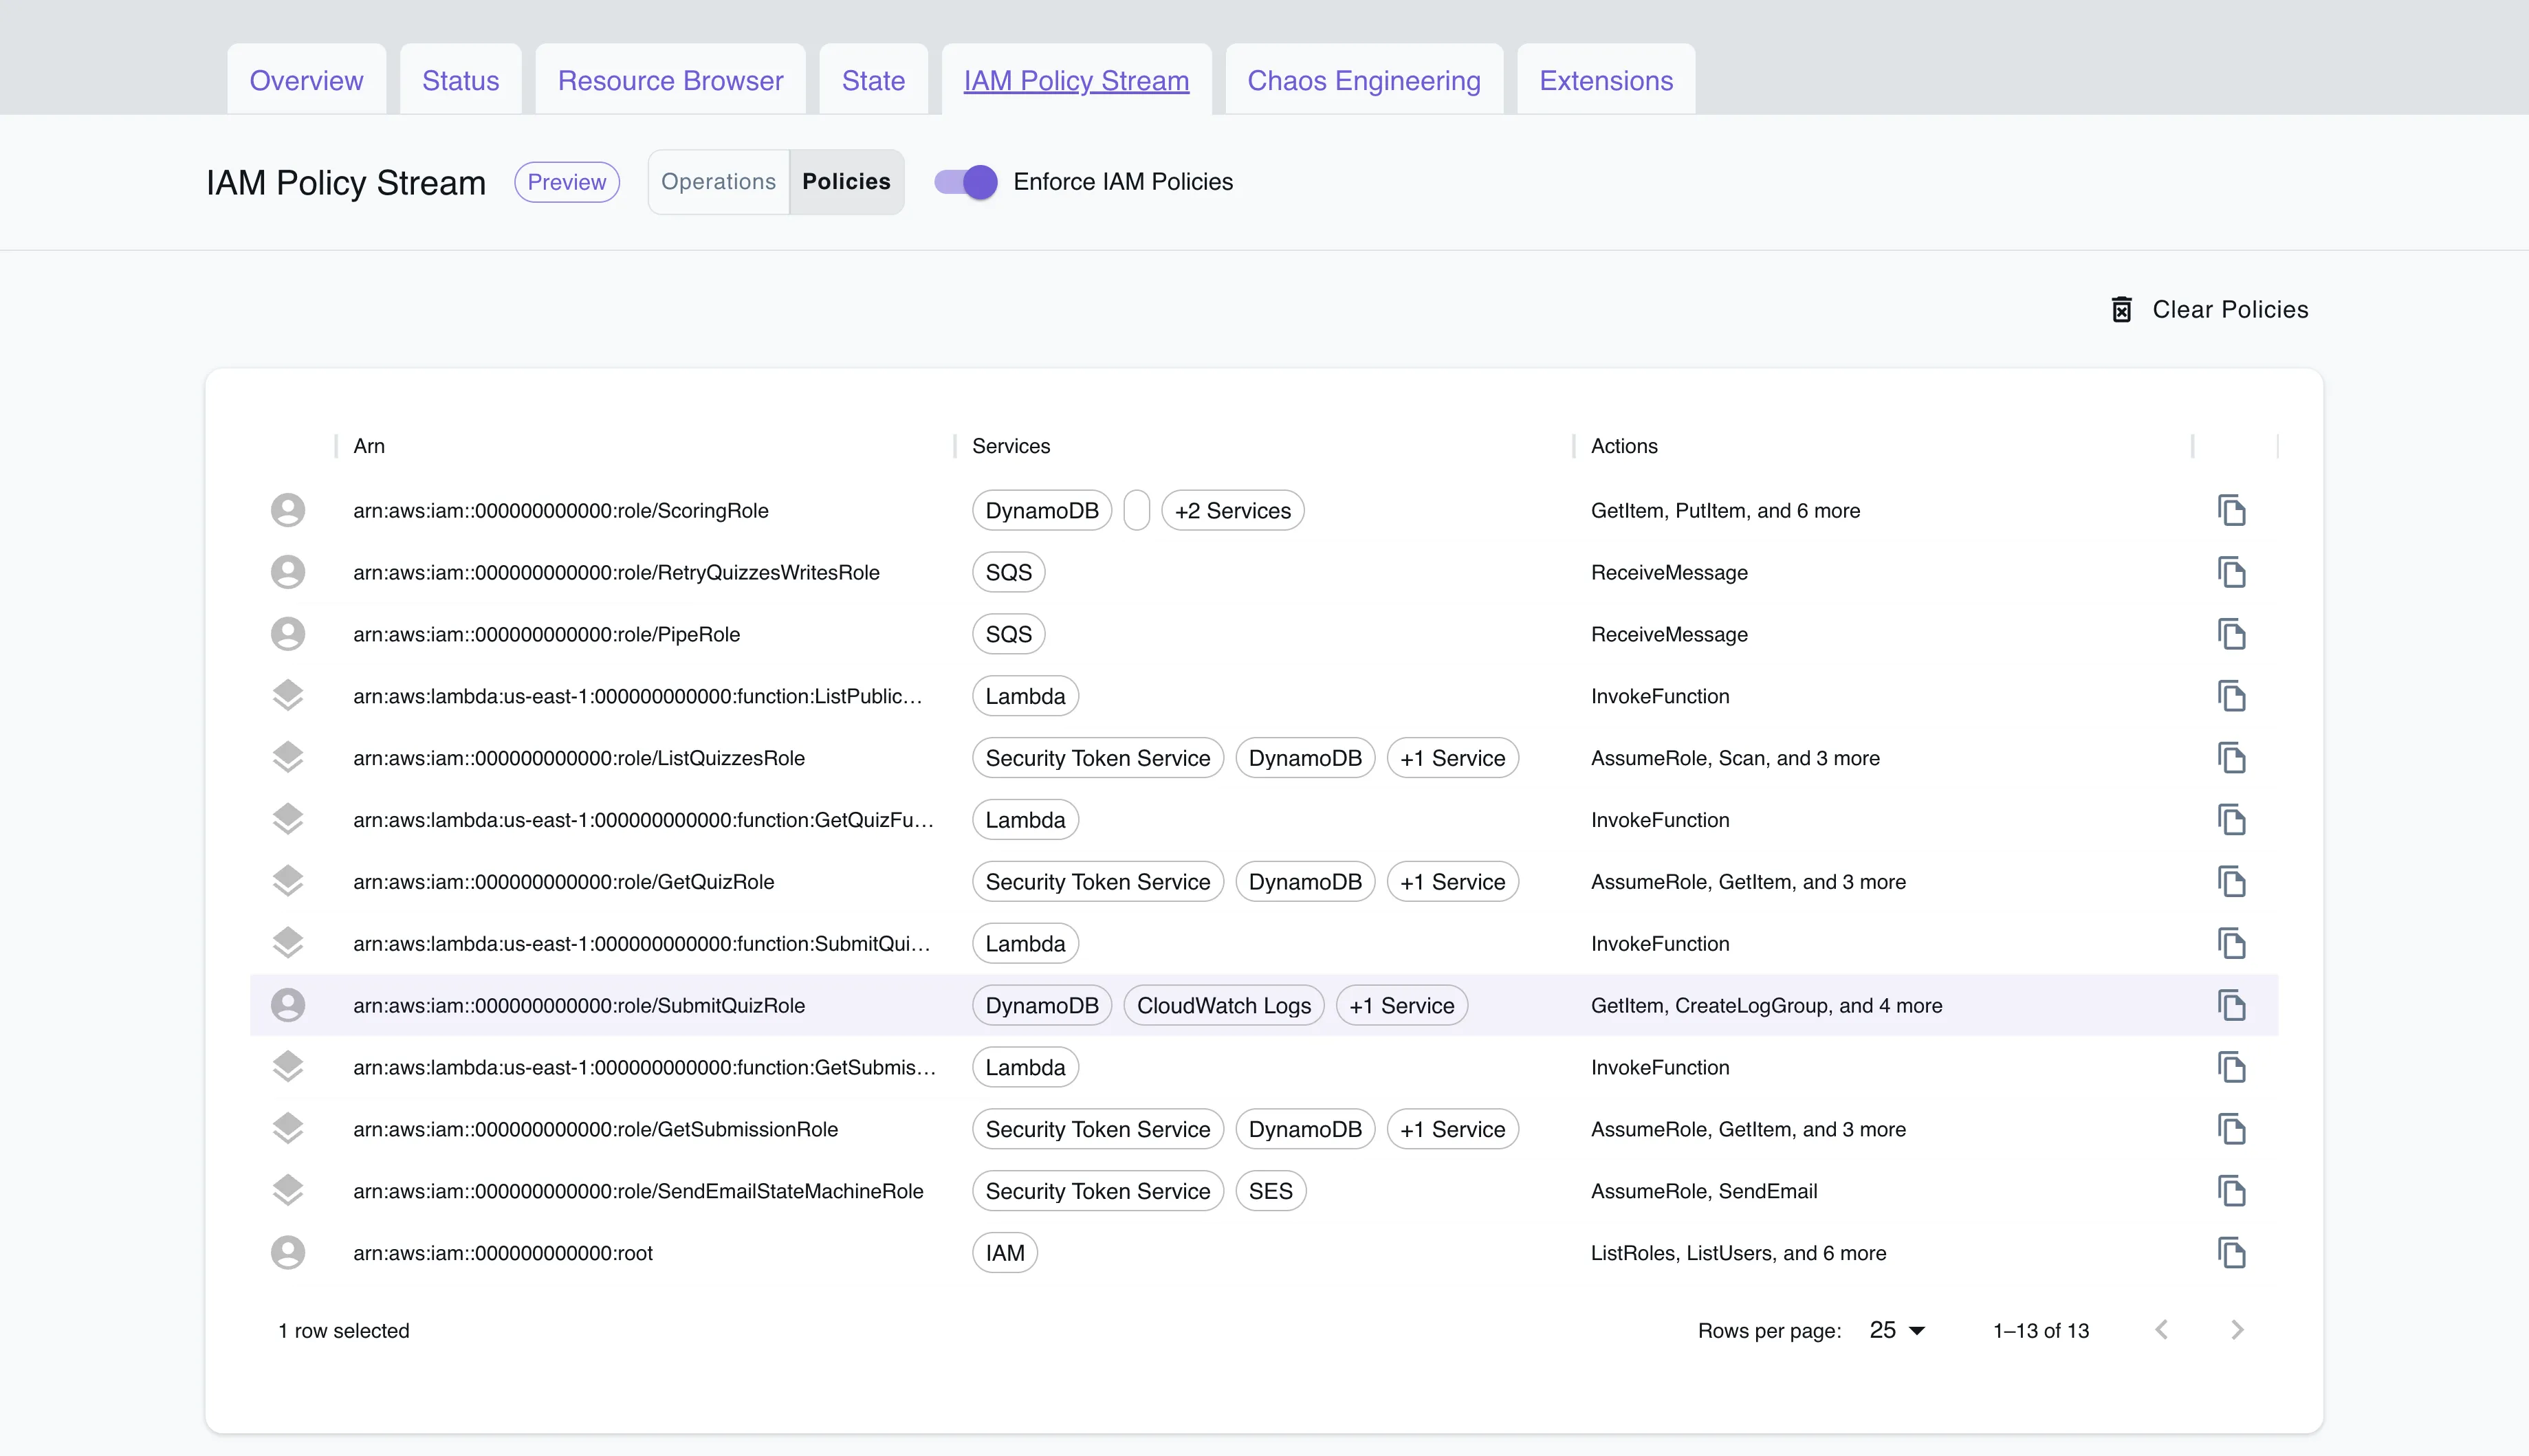
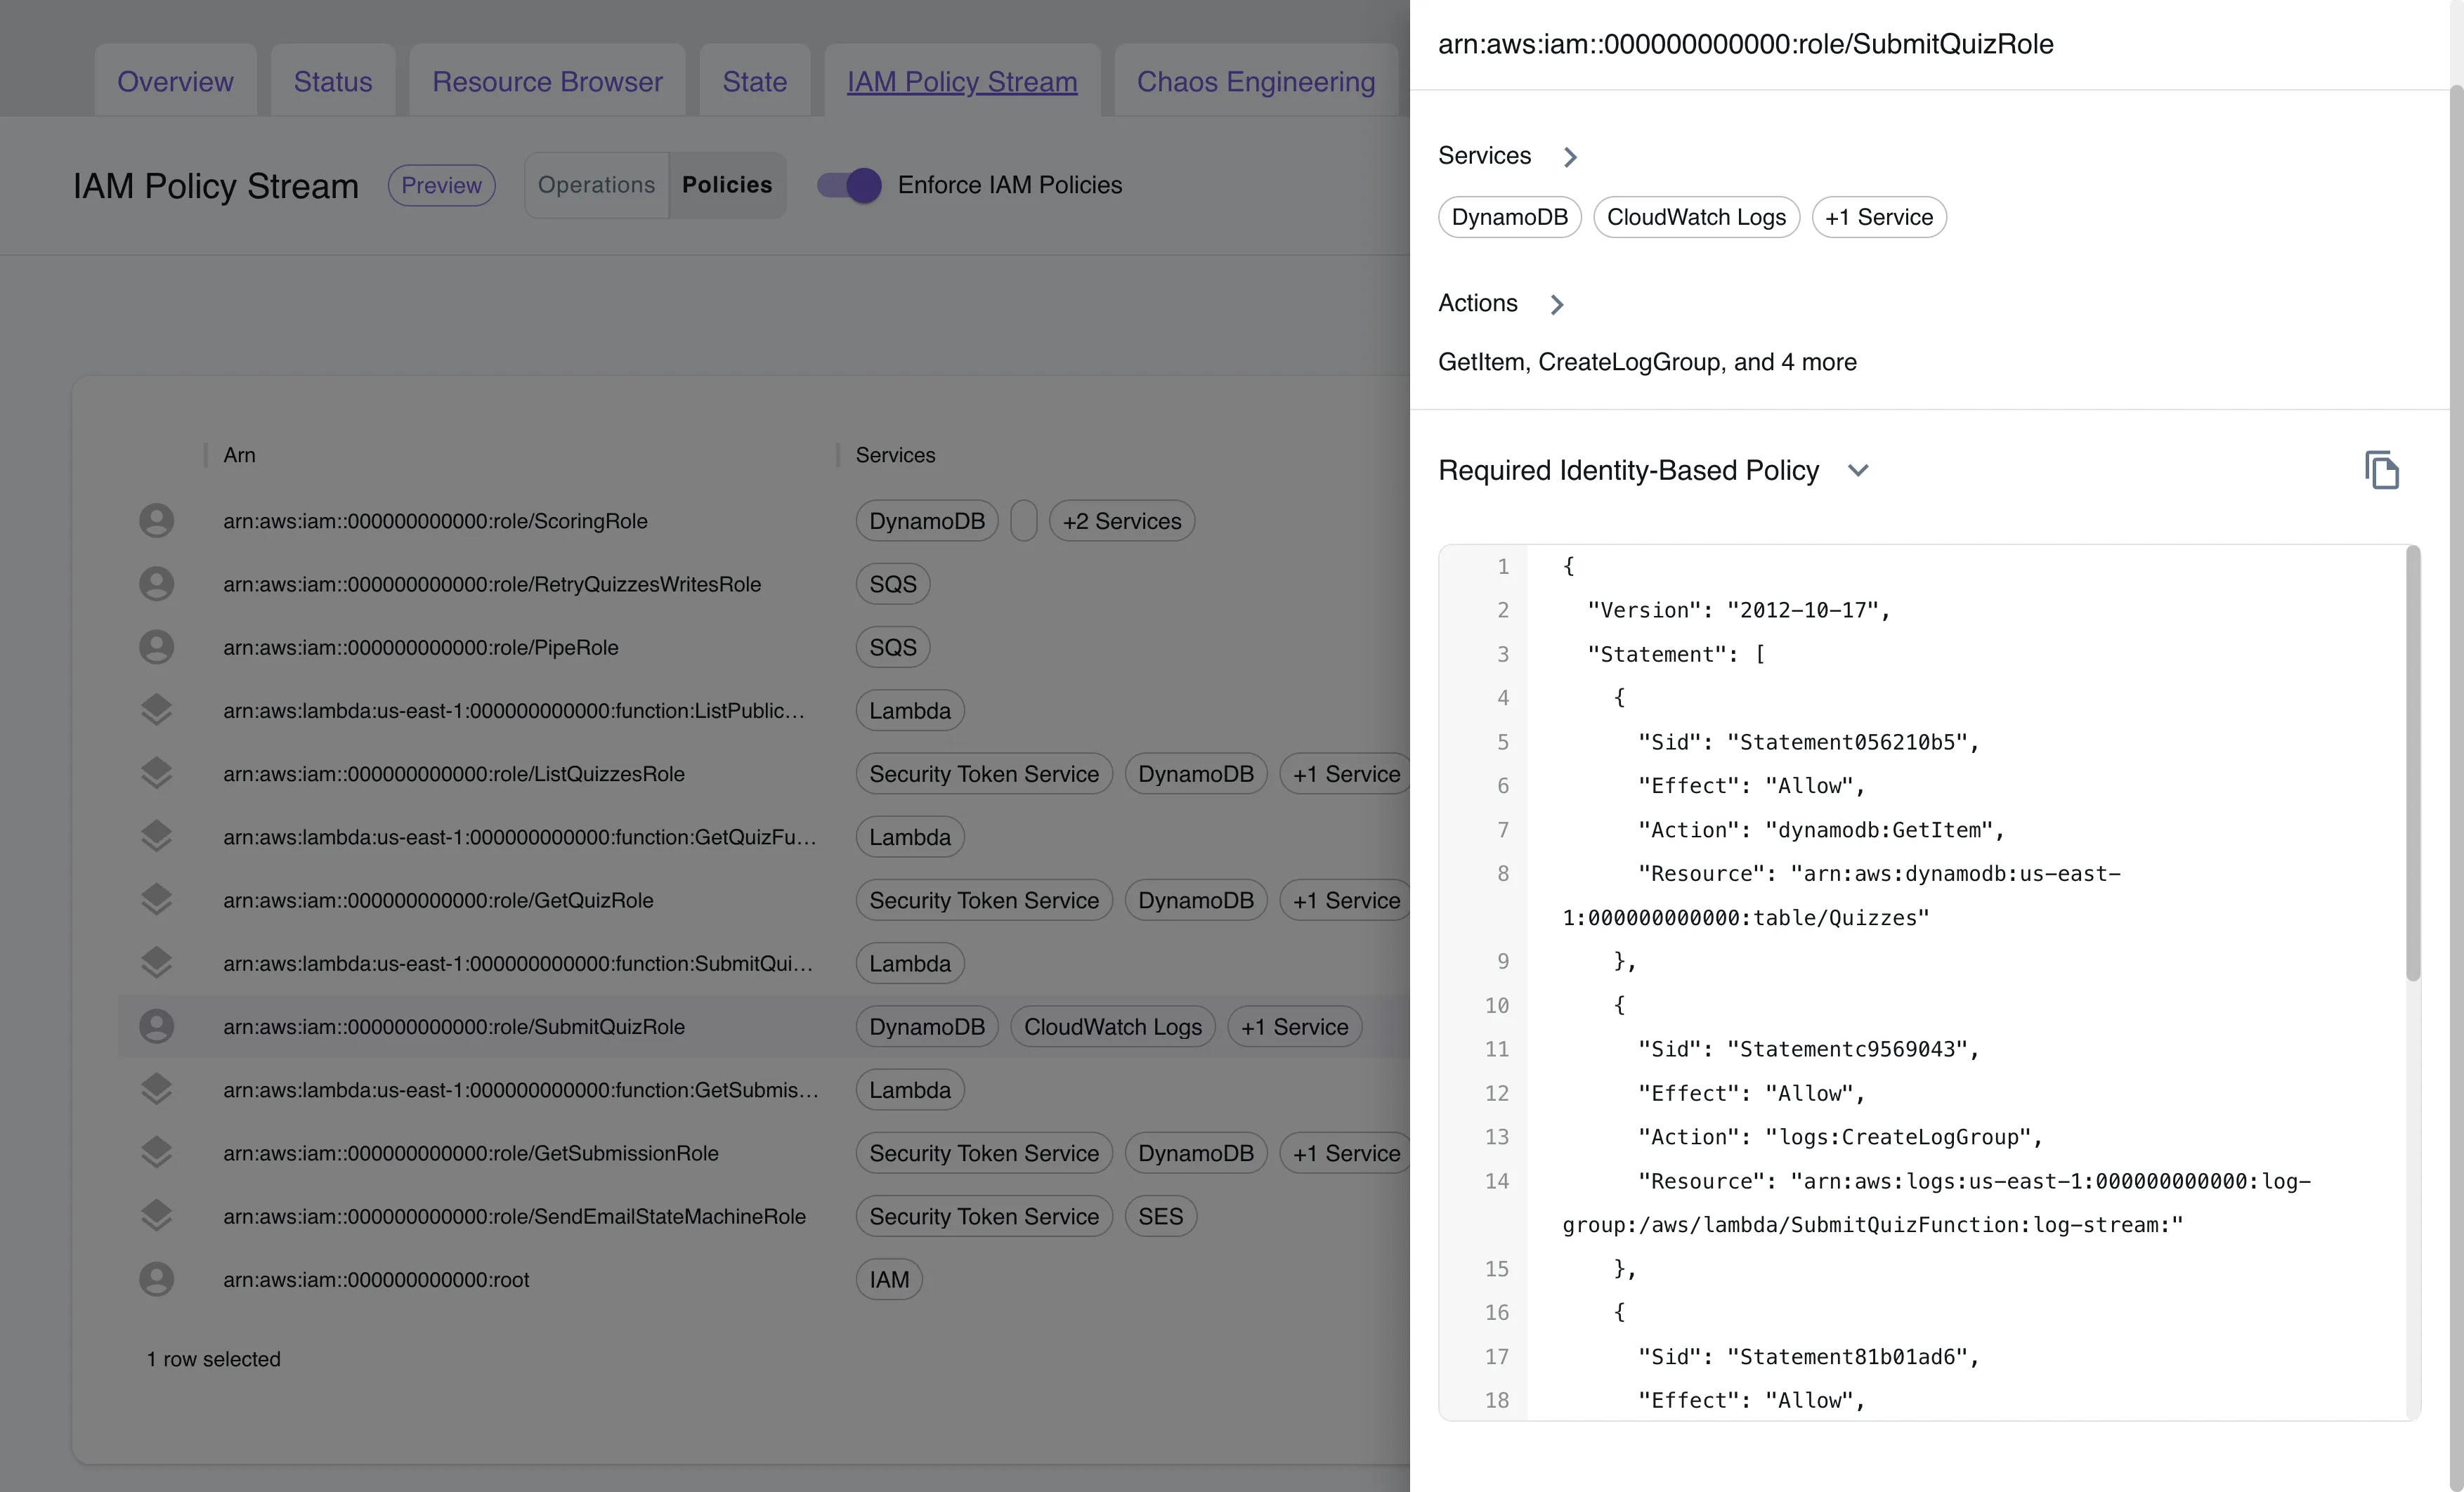
Clicking on a specific Arn will show the services involved, actions executed, and the corresponding policy, which can be copied and applied in your workflows.
Conclusion
IAM Policy Stream streamlines your development process by minimizing the manual creation of policies and confirming the necessity of granted permissions. However, it is advisable to manually confirm that your policy aligns with your intended actions. Your code may unintentionally make requests, and LocalStack considers all requests made during policy generation as valid.
A practical scenario is automating tests like integration or end-to-end testing against your app, allowing LocalStack to automatically generate policies with required permissions. You can find an example in the tests/test_infra.py file. To use it, install the required dependencies and run pytest tests/test_infra.py.
This will automatically help you identify the necessary permissions to get started. You can then review and customize them to meet your needs, ensuring that overly permissive policies don’t find their way into production environments.