Integrating Polaris with LocalStack for Snowflake and Trino
Learn how to build a fully local data lakehouse by integrating Snowflake emulator with Apache Polaris and Trino. This tutorial walks through creating shared Iceberg tables backed by LocalStack S3, enabling seamless interoperability across, without touching the cloud.
Introduction
Managing data across query engines like Snowflake and Trino is complex and often results in data silos, making it hard to maintain a single source of truth. Apache Iceberg, an open table format, combined with a central catalog service like Apache Polaris, facilitates access to the same data by multiple engines, enabling a unified architecture.
However, building and testing pipelines across engines remains slow and expensive due to long feedback loops and high cloud costs, which delay development and hinder early issue detection. The LocalStack for Snowflake emulator addresses these problems by letting you run a local Snowflake environment in Docker with a “shift-left” approach to data engineering.
This tutorial shows how to set up a local data lakehouse using the Snowflake emulator with Apache Polaris and Trino. You will use both engines to query the same shared Apache Iceberg tables stored in LocalStack S3 for interoperable local development.
How LocalStack works with Polaris
To support local development, LocalStack provides a localstack/polaris Docker image that runs Apache Polaris as a containerized service, enabling easy setup of a REST-based Iceberg catalog locally.
The integration between the Snowflake emulator and the Polaris container is achieved through a series of SQL commands that enable Snowflake to utilize Polaris for metadata and LocalStack S3 for data storage.
Here is how the connection is made:
- A
CREATE EXTERNAL VOLUMEstatement is used to define a pointer to a storage location in LocalStack S3. This tells the Snowflake emulator where to store Parquet data files and Iceberg metadata files. It includes:- S3 bucket URI in LocalStack
- Access key and secret key for authentication
- A
CREATE CATALOG INTEGRATIONstatement sets up the connection to Polaris as an external Iceberg REST catalog. Key parameters include:CATALOG_SOURCE=ICEBERG_REST: Indicates the use of the Iceberg REST API, which Polaris implementsCATALOG_URI: Set to the network address of the Polaris container (e.g.,http://polaris:8181)REST_AUTHENTICATION: Includes OAuth credentials required for Polaris API access
Once the integration is configured, you can create Iceberg tables using CREATE ICEBERG TABLE with the CATALOG='iceberg_catalog' parameter.
Snowflake sends metadata operations to Polaris, which handles schema and partition management, while actual data is written to the S3 location specified by the external volume.
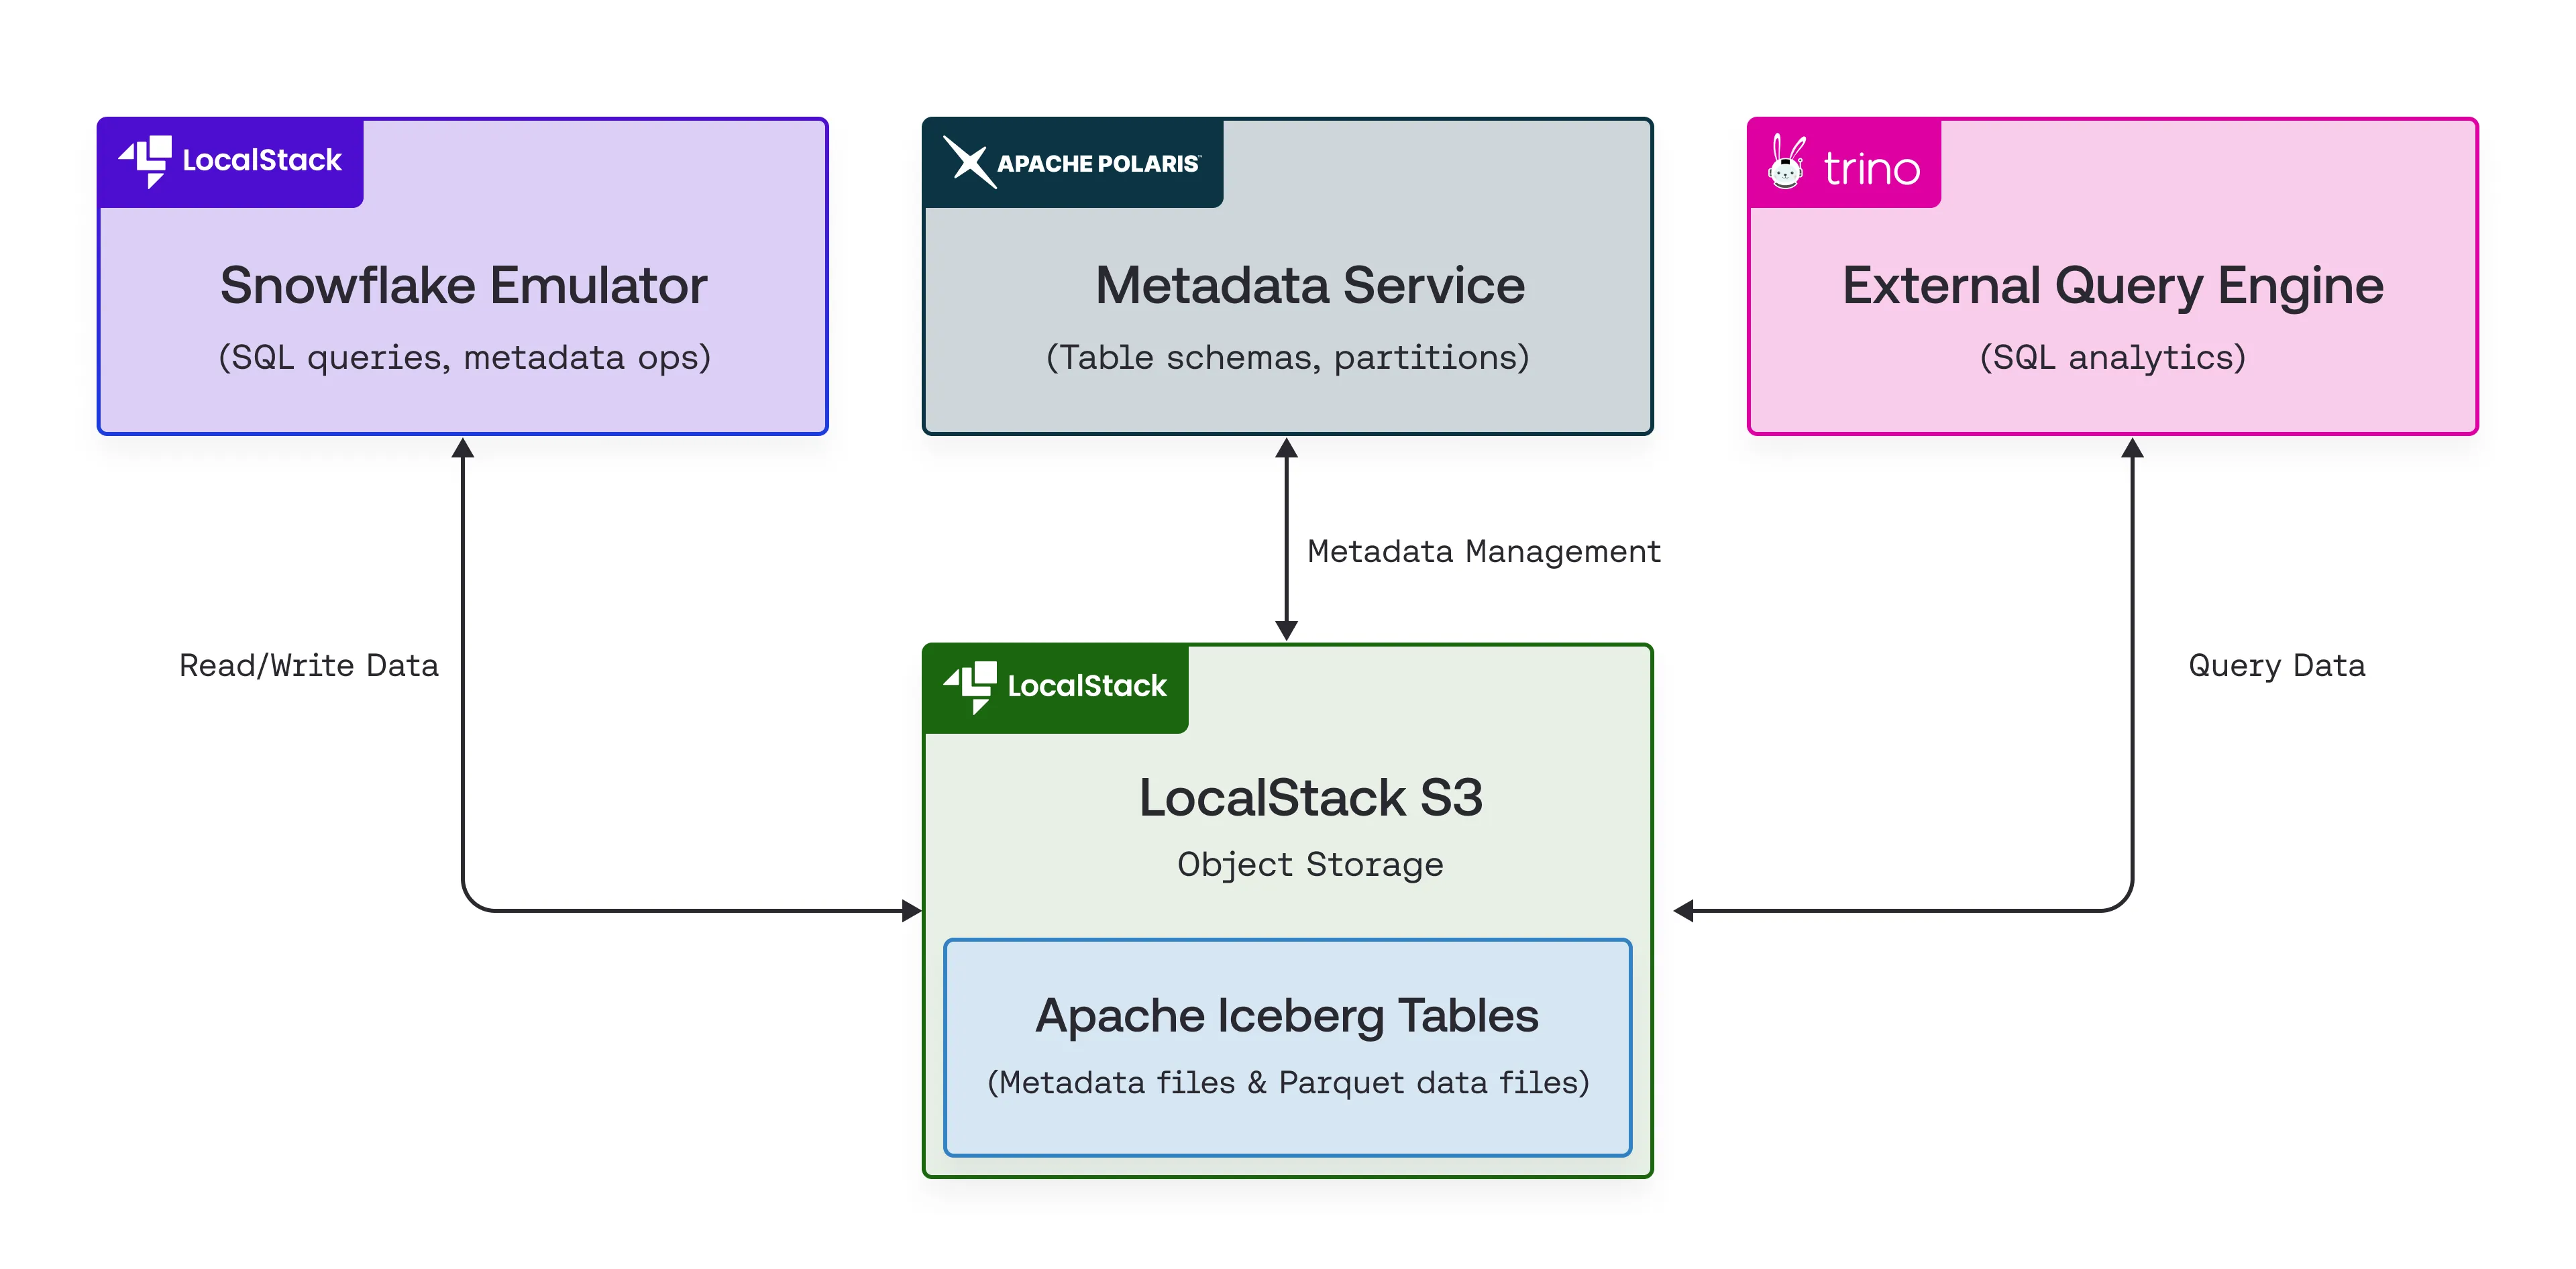
This separation of metadata and storage enables other engines like Trino to access and query the same Iceberg tables.
Prerequisites
Before you start, make sure you have the following installed:
- A valid LocalStack Auth Token with a Snowflake license
- Docker and Docker Compose
- A SQL client compatible with Snowflake (like DBeaver)
- AWS CLI with
awslocalwrapper script - Git
Step 1: Set up the project
First, clone the sample application repository from GitHub and navigate into the project directory.
git clone https://github.com/localstack-samples/polaris-demo.gitcd polaris-demoStep 2: Understand and start the services
The sample application uses Docker Compose to start the services. The interoperability between Snowflake and Trino is setup via their respective configurations pointing to the same Polaris Catalog and S3 backend.
2.1: Understanding the Docker Compose configuration
The docker-compose.yml file, provided in the repository, sets up and configures all required services for the sample app.
services:  localstack:    image: localstack/snowflake:latest    ports:      - "127.0.0.1:4566:4566"      - "127.0.0.1:4510-4559:4510-4559"      - "127.0.0.1:443:443"    environment:      - LOCALSTACK_AUTH_TOKEN=${LOCALSTACK_AUTH_TOKEN:?}      - DEBUG=1      - DOCKER_FLAGS='-e SF_LOG=trace'    volumes:      - "./volume:/var/lib/localstack"      - "/var/run/docker.sock:/var/run/docker.sock"
  polaris:    image: localstack/polaris:latest    ports:      - "8181:8181"      - "8182"    environment:      AWS_REGION: us-east-1      AWS_ACCESS_KEY_ID: test      AWS_SECRET_ACCESS_KEY: test      AWS_ENDPOINT_URL: http://localstack:4566      POLARIS_BOOTSTRAP_CREDENTIALS: default-realm,root,s3cr3t      polaris.realm-context.realms: default-realm      quarkus.otel.sdk.disabled: "true"
    healthcheck:      test: ["CMD", "curl", "http://localhost:8182/healthcheck"]      interval: 10s      timeout: 10s      retries: 5
  create-polaris-catalog:    image: curlimages/curl    depends_on:      polaris:        condition: service_healthy    volumes:      - ./create-polaris-catalog.sh:/create-polaris-catalog.sh    command: ["/bin/sh", "/create-polaris-catalog.sh"]
  trino:    image: trinodb/trino:latest    ports:      - "8080:8080"    volumes:      - ./trino-config/catalog:/etc/trino/catalog    depends_on:      polaris:        condition: service_healthy
Here is a breakdown of the services:
localstack: Runs the LocalStack container with the Snowflake emulator enabled, exposing ports for AWS services and the Snowflake API.polaris: Deploys the Apache Polaris Catalog service, configured to use LocalStack as its S3-compatible backend via theAWS_ENDPOINT_URLenvironment variable.create-polaris-catalog: A temporary service that executes thecreate-polaris-catalog.shscript (provided in the repository) to set up the Polaris Catalog after the service becomes healthy.trino: Launches the Trino query engine with configuration files mounted from the localtrino-configdirectory (provided in the repository).
2.2: Understanding the Polaris Catalog Setup
The create-polaris-catalog.sh script automates Polaris Catalog setup by performing the following steps:
- Waits for the Polaris service to report as healthy.
- Requests an OAuth2 bearer token from Polaris for authentication.
- Sends a POST request to the Polaris management API to create a catalog named
polaris, configured to uses3://test-bucket/in LocalStack S3 as its default storage location. - Adds
TABLE_WRITE_DATAprivilege tocatalog_adminrole.
2.3: Understanding the Trino Configuration
The configuration for Trino’s Iceberg connector is in trino-config/catalog/iceberg.properties.
# iceberg.properties
connector.name=icebergiceberg.catalog.type=resticeberg.rest-catalog.uri=http://polaris:8181/api/catalogiceberg.rest-catalog.security=OAUTH2iceberg.rest-catalog.oauth2.credential=root:s3cr3ticeberg.rest-catalog.oauth2.scope=PRINCIPAL_ROLE:ALLiceberg.rest-catalog.case-insensitive-name-matching=trueiceberg.rest-catalog.warehouse=polarisfs.native-s3.enabled=trues3.endpoint=http://localstack:4566s3.aws-access-key=tests3.aws-secret-key=tests3.region=us-east-1s3.path-style-access=true
This file defines how Trino connects to Iceberg data.
Key properties include:
connector.name=iceberg: Specifies use of the Iceberg connectoriceberg.catalog.type=rest: Sets the catalog type to RESTiceberg.rest-catalog.uri=http://polaris:8181/api/catalog: Points to Polaris’s API endpoints3.endpoint=http://localstack:4566: Uses the LocalStack S3 endpoint for data access
2.4: Launch the Docker Compose
Before starting, ensure your LOCALSTACK_AUTH_TOKEN is exported as an environment variable.
export LOCALSTACK_AUTH_TOKEN=<your-localstack-auth-token>Now, start all the services using Docker Compose:
docker-compose upIt will take a few minutes to start all the services. Once all the services are running, you can check the status of the services using the following command:
docker psYou should see the following output:
CONTAINER ID IMAGE COMMAND CREATED STATUS PORTS NAMESf82c9dc1defd trinodb/trino:latest "/usr/lib/trino/bin/…" 19 hours ago Up 9 seconds (health: starting) 0.0.0.0:8080->8080/tcp polaris-demo-trino-1849aab637b09 localstack/polaris:latest "/opt/jboss/containe…" 19 hours ago Up 20 seconds (healthy) 8080/tcp, 8443/tcp, 0.0.0.0:8181->8181/tcp, 0.0.0.0:58598->8182/tcp polaris-demo-polaris-12264db66c672 localstack/snowflake:latest "docker-entrypoint.sh" 19 hours ago Up 19 seconds (healthy) 127.0.0.1:443->443/tcp, 127.0.0.1:4510-4559->4510-4559/tcp, 53/tcp, 5678/tcp, 127.0.0.1:4566->4566/tcp polaris-demo-localstack-1Step 3: Create AWS and Snowflake Resources
With all services running, you can now create the required LocalStack S3 bucket and then use SQL commands to define the data structures in the Snowflake emulator.
3.1: Create the S3 Bucket
The Polaris Catalog uses a bucket named test-bucket. Create this bucket in LocalStack S3 using the awslocal CLI:
awslocal s3 mb s3://test-bucket3.2: Create an External Volume
Next, you need to define a named location in LocalStack S3 that Snowflake can use to read and write data. Run the following SQL statement on your preferred SQL client:
CREATE OR REPLACE EXTERNAL VOLUME iceberg_volume STORAGE_LOCATIONS = ( ( NAME = 'aws-s3-test' STORAGE_PROVIDER = 'S3' STORAGE_BASE_URL = 's3://test-bucket/' STORAGE_AWS_ROLE_ARN = 'arn:aws:iam::000000000000:root' ENCRYPTION=(TYPE='AWS_SSE_S3') ) ) ALLOW_WRITES = TRUE;3.3: Create a Catalog Integration
Now you need to define a Catalog Integration that connects Snowflake to the external Polaris REST Catalog, enabling it to discover and manage Iceberg tables through Polaris.
Run the following SQL statement on your preferred SQL client:
CREATE CATALOG INTEGRATION iceberg_catalogCATALOG_SOURCE=ICEBERG_RESTTABLE_FORMAT=ICEBERGCATALOG_NAMESPACE='test_namespace'REST_CONFIG=( CATALOG_URI='http://polaris:8181' CATALOG_NAME='polaris')REST_AUTHENTICATION=( TYPE=OAUTH OAUTH_CLIENT_ID='root' OAUTH_CLIENT_SECRET='s3cr3t' OAUTH_ALLOWED_SCOPES=(PRINCIPAL_ROLE:ALL))ENABLED=TRUE;3.4: Create an Iceberg Table
This statement creates a new Iceberg table.
CREATE ICEBERG TABLE iceberg_table (c1 TEXT)CATALOG='iceberg_catalog',EXTERNAL_VOLUME='iceberg_volume',BASE_LOCATION='test/test_namespace';The CATALOG and EXTERNAL_VOLUME tell Snowflake to use the Polaris integration and the S3 volume you just created.
3.5: Insert and Query Data
Now, insert data into the table and query it back to confirm that it works.
INSERT INTO iceberg_table(c1) VALUES ('test'), ('foobar');SELECT * FROM iceberg_table;The output would be:
+--------+| C1 ||--------|| test || foobar |+--------+Step 4: Querying Data with Trino
The main benefit of this setup is that the table created through the Snowflake emulator can also be queried using Trino. Connect to the Trino container to run queries from its CLI:
docker exec -it polaris-demo-trino-1 trinoAt the trino> prompt, query the table using the full name: iceberg.test_namespace.iceberg_table, which includes the catalog, namespace, and table name.
SELECT * FROM iceberg.test_namespace.iceberg_table;You should see the exact same output, demonstrating successful interoperability:
c1-------- test foobar(2 rows)Step 5: Inspect the S3 bucket
You can inspect the raw files in LocalStack S3 to see how Apache Iceberg organizes data. Open the S3 Resource Browser on LocalStack Web Application and navigate to the test-bucket.
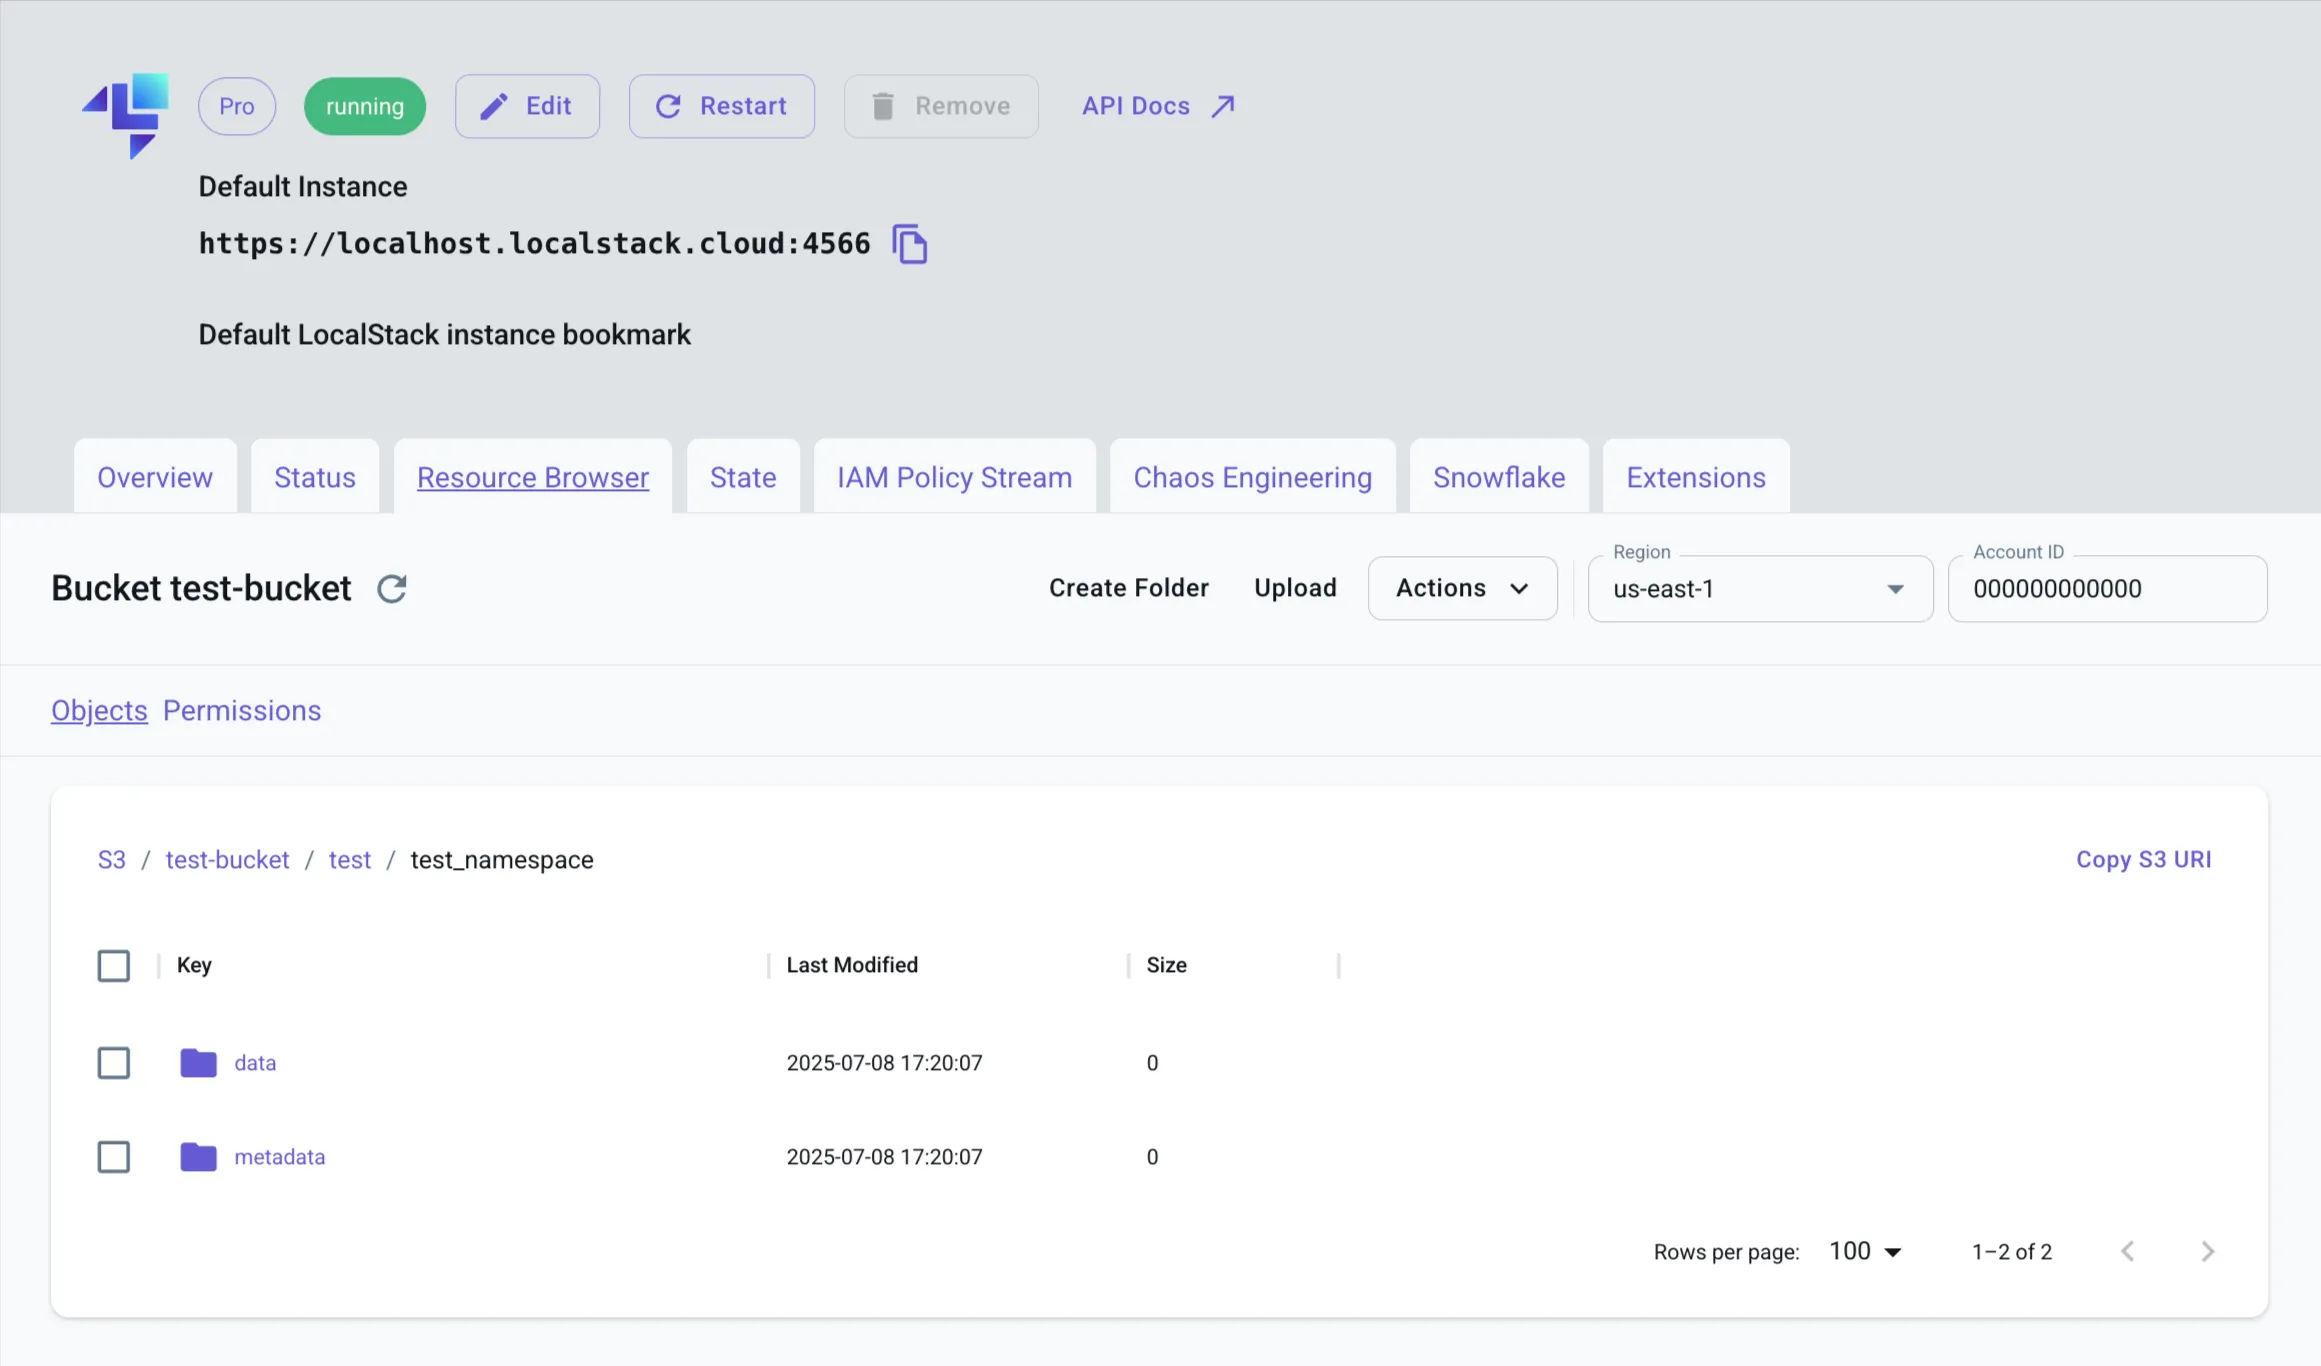
Inside the test/test_namespace/ prefix, you’ll find:
data/: Contains Parquet files (.parquet), each holding a subset of table rowsmetadata/: Contains Iceberg metadata, including:- Manifest lists and manifest files (
.avro) - Core table metadata (
.json) defining schema, partitions, snapshots, and data-file mapping.
- Manifest lists and manifest files (
This confirms that both the Snowflake emulator and Trino use the standard Iceberg file layout, relying on Polaris as the metadata catalog for interoperability.
Conclusion
This tutorial showed how to build a local data lakehouse using LocalStack for Snowflake, Apache Polaris, and Trino. By leveraging the Apache Iceberg format and a centralized REST catalog, you can enable seamless interoperability between query engines.
With LocalStack, you gain a fully local, containerized environment that emulates critical cloud resources, including Snowflake and S3, making it ideal for developing and testing complex data architectures. This local-first setup lets you:
- Maintain a single source of truth accessible by multiple engines
- Develop and iterate on multi-engine data pipelines locally
- Accelerate feedback loops by avoiding real cloud dependencies
- Validate data logic in an isolated, reproducible environment