Replicating live cloud resources locally with LocalStack's AWS Replicator
Learn how to use LocalStack's AWS Replicator to clone live cloud resources like VPCs and subnets into your local environment, preserving their original ARNs and identifiers to run your unmodified Infrastructure-as-Code (IaC) stacks without dependency errors.
Introduction
Many Infrastructure-as-Code (IaC) stacks rely on shared cloud resources that are not fully controlled by individual teams. For example, a cloud app might depend on a pre-existing VPC, subnets, or parameters that are owned by another part of the organization. This can sometimes make it difficult to properly emulate resources locally on LocalStack.
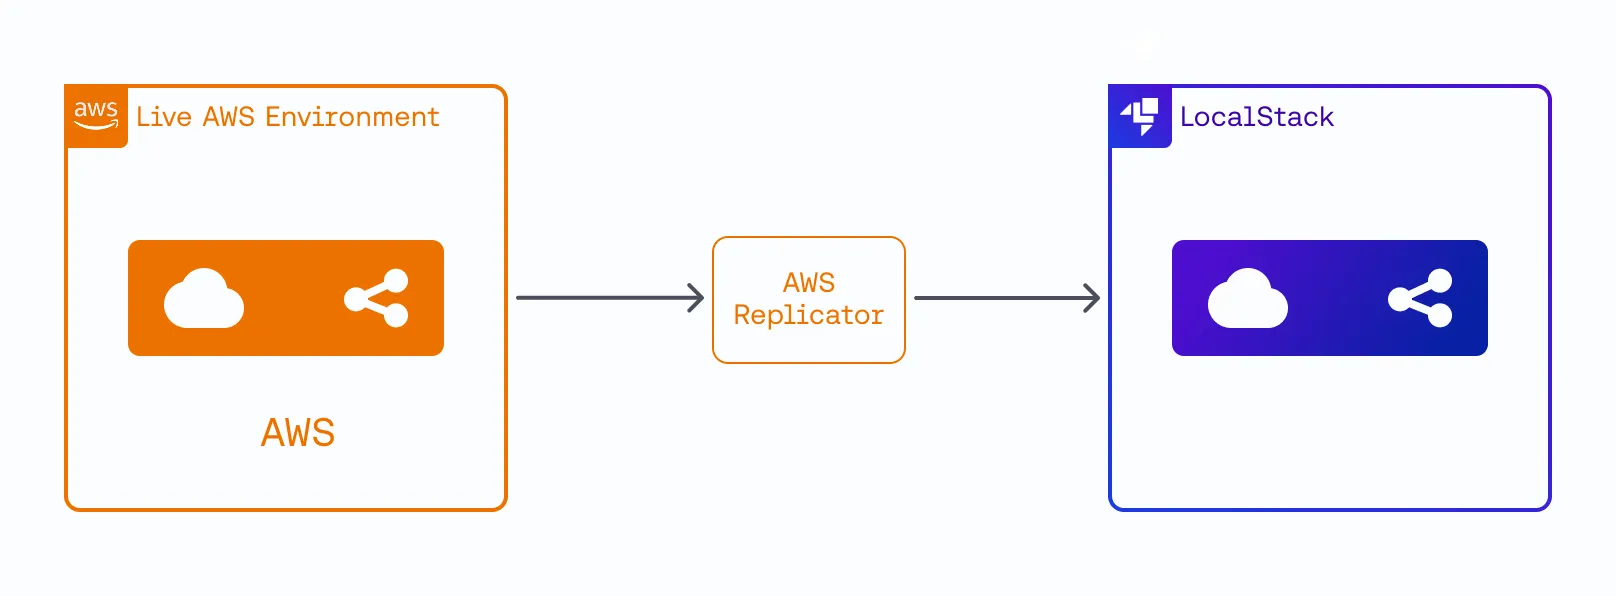
LocalStack’s AWS Replicator addresses this challenge by copying the resources at the API level from a live AWS environment into a LocalStack instance. It copies all relevant details – including names and IDs – so that the replicated resources have the same references as in the actual AWS account.
This tutorial demonstrates how AWS Replicator works by walking through a sample setup and replicating critical components to ensure that our cloud app can be tested and validated locally – all without requiring the deployment of any resource dependencies or modification of existing infrastructure references.
Challenges with local testing
In a typical cloud environment, applications are built on top of foundational infrastructure that may be managed by a separate platform or infrastructure team. This creates a dependency on resources like VPCs, subnets, IAM Roles, or ECR repositories that your application’s IaC needs to reference.
When you try to run your application stack locally with LocalStack, you hit a roadblock, such as:
- Your IaC fails because local resource IDs don’t match the real ones in your AWS account.
- You may not have the source code to recreate shared resources that are managed by other teams.
- You’re forced to modify your application code just for local testing, creating a divergence from production.
These issues slow down the development feedback loop, making local testing an unreliable and frustrating experience.
AWS Replicator allows teams to provision the necessary infrastructure locally without manual workarounds or code changes, to enable local testing with minimal disruption. Let’s see how it works.
How does AWS Replicator work?
LocalStack’s AWS Replicator works by interacting with AWS to:
- Fetch the configuration details of a specified resource.
- Rebuild an identical version of that resource in your LocalStack environment.
Think of it like a copy machine for cloud resources: you feed in the AWS resource you want to clone (via an ARN or a type/identifier combination), and the AWS Replicator outputs an equivalent resource inside LocalStack, complete with the same settings and identifiers.
This ensures that any references in your Infrastructure-as-Code remain consistent, making local testing more reliable and straightforward.
To get started with the AWS Replicator tool, you can either use the LocalStack CLI or an HTTP API. Behind the scenes, LocalStack communicates with AWS to collect the resource details and create a replication job that runs asynchronously in the background.
Now that we know how the Replicator works, let’s walk through a hands-on tutorial using the LocalStack CLI to replicate real-world resources for a cloud app that runs locally.
Prerequisites
To make replication work, there are a few prerequisites:
- You need a valid
LOCALSTACK_AUTH_TOKEN. - You must have AWS credentials with read access to the resources you want to replicate. Typically, this means setting
AWS_ACCESS_KEY_IDandAWS_SECRET_ACCESS_KEY(and optionallyAWS_SESSION_TOKEN). It is strongly recommended to assume a minimal IAM role that limits your permissions to read-only operations for replication. - The Replicator needs to know which AWS account and region to connect to, typically via
AWS_DEFAULT_REGION, so it knows where to look for resources.
Additionally, ensure you have the following tools installed and properly configured to run this tutorial successfully:
- LocalStack CLI (>= 4.2.0) to run the AWS Replicator commands.
- Docker to run containers orchestrated by LocalStack.
- Terraform to define and deploy the infrastructure (or you can use an alternative, like OpenTofu)
- AWS CLI v2 (optional) for credential management and can be handy for validating AWS resources or exporting credentials for replication.
Step 1: Project Setup
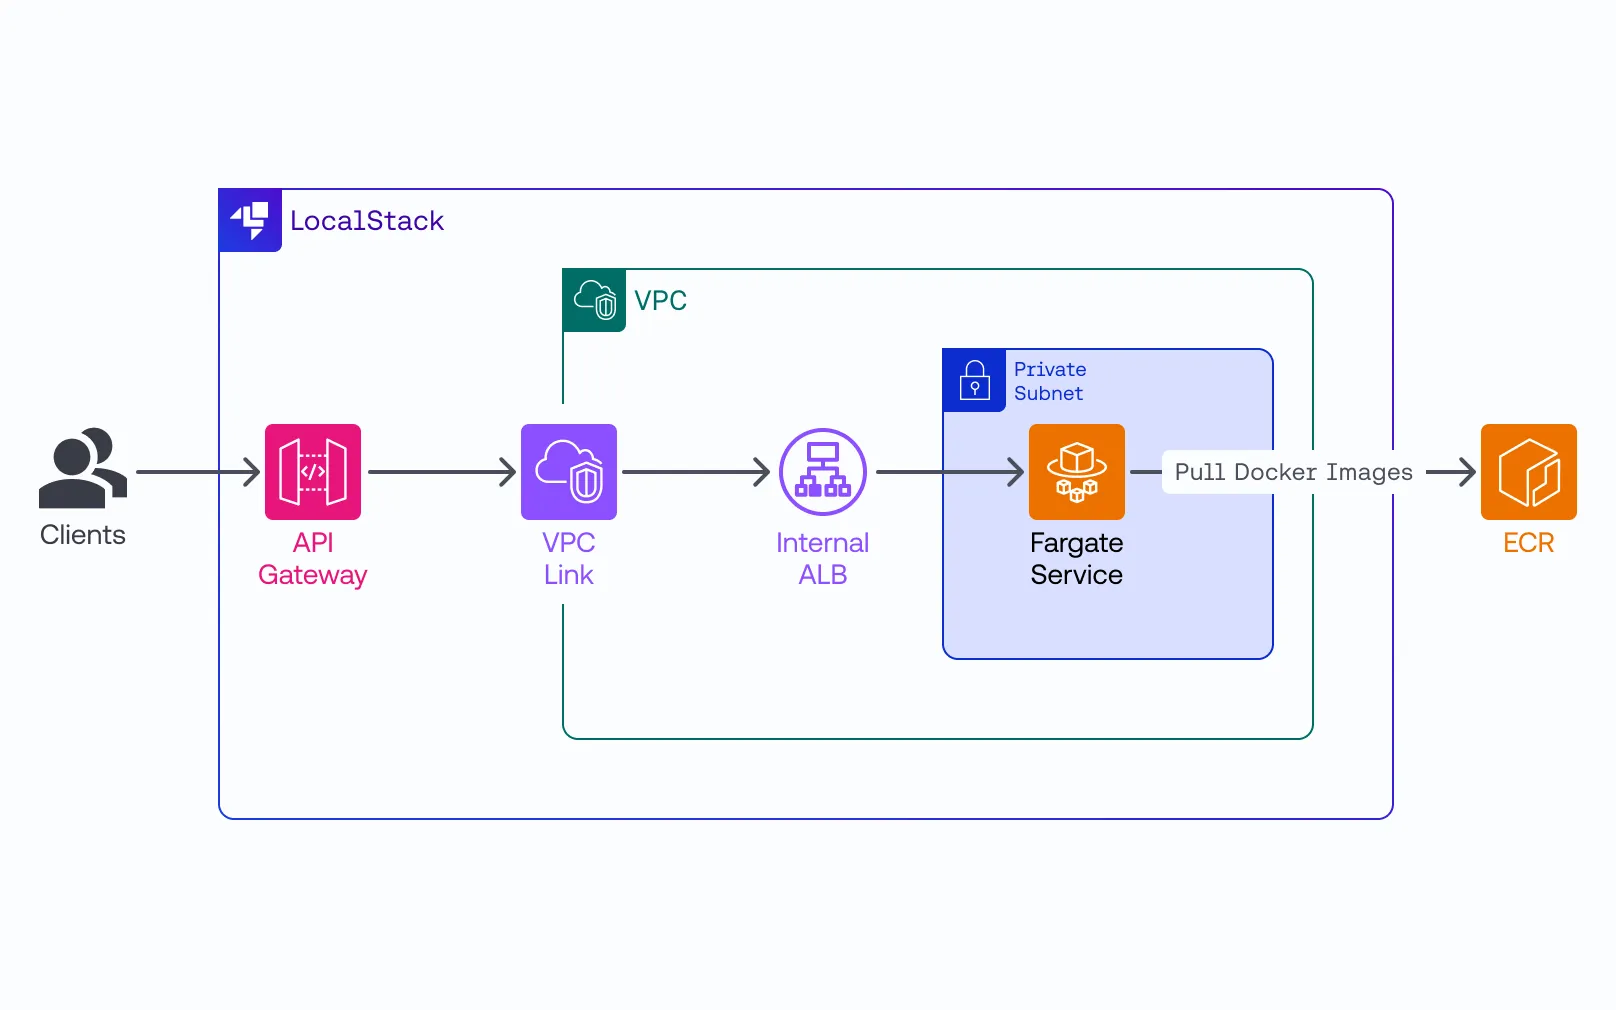
In this tutorial, we define an ECS application with an Application Load Balancer (ALB) and an API Gateway – all configured within a VPC containing both private and public subnets. We use Terraform to provision the VPC and subnets in AWS and then rely on LocalStack’s AWS Replicator to replicate them from AWS into our local instance.
1.1: Clone the repository
To begin, clone the repository to your local machine and enter the repository:
git clone https://github.com/localstack-samples/replicator-infrastructure/cd replicator-infrastructure/The repository contains two main directories:
terraform/platformfor the shared networking infrastructure.terraform/applicationfor the ECS application itself.
1.2: Create a LocalStack profile
Before starting with resource replication or deployments, it’s useful to set up a custom AWS profile for LocalStack. This lets you switch between your actual AWS account and LocalStack without mixing credentials.
If you already have the AWS CLI installed and configured, you likely have a default profile in your:
- Linux/macOS:
~/.aws/credentials - Windows:
%USERPROFILE%\.aws\credentials
To create a new profile for LocalStack, run:
aws configure --profile localstackWhen prompted, enter placeholder credentials:
AWS Access Key ID [None]: testAWS Secret Access Key [None]: testDefault region name [None]: us-east-1Default output format [None]: jsonAfter running these commands, you’ll find a [localstack] section in your AWS credentials and config files.
Next, edit the ~/.aws/config (Linux/macOS) or %USERPROFILE%\.aws\config (Windows) file to add the endpoint URL:
[profile localstack]region=us-east-1output=jsonendpoint_url = http://localhost:4566You can adjust the region and output format as needed. Test the new profile by running (assuming you have LocalStack started):
aws s3 mb s3://test --profile localstackaws s3 ls --profile localstackIf those commands run successfully against LocalStack, then the new LocalStack profile is correctly configured and ready for use 🎉
Step 2: Deploy the networking infrastructure on AWS
First, we will deploy the foundational networking resources to a real AWS account. These are the “shared” resources our application depends on.
Navigate into the terraform/platform directory and run the following Terraform commands:
cd terraform/platformterraform initterraform applyWhen prompted for the AWS profile (e.g., default), select the one you want to use for deploying the resources to AWS. Terraform will then provision the VPC and subnets, as defined in the Terraform configuration.
Once the deployment completes, you should see an output similar to:
Apply complete! Resources: 22 added, 0 changed, 0 destroyed.
Outputs:
private_subnets = [  "subnet-09a7b4d46eb9caf3c",  "subnet-057d7d4850b97b653",  "subnet-0a1c75851d185bdef",]vpc_id = "vpc-05208447cff1e3482"
Keep these output values handy. Your networking infrastructure (VPC and subnets) is now live in AWS, and we can proceed to the application deployment.
Step 3:Deploy the ECS application on LocalStack
Now, let’s attempt to deploy the ECS application on LocalStack. Start by launching the LocalStack container, if you haven’t already:
localstack auth set-token <your-auth-token>localstack startAfter LocalStack is running, navigate to the terraform/application directory and run:
terraform initterraform applyWhen prompted for an AWS profile, specify localstack. You will then be asked for the private subnets and VPC ID from the previous step:
var.private_subnets  List of private subnets where to deploy the application
  Enter a value: ["subnet-09a7b4d46eb9caf3c","subnet-057d7d4850b97b653","subnet-0a1c75851d185bdef"]
var.vpc_id  Vpc id to deploy the application
  Enter a value: vpc-05208447cff1e3482
Terraform will attempt to deploy the configuration in LocalStack but will fail with an error indicating that the specified subnet and VPC do not exist. This is expected, as these resources only exist in AWS, not yet in LocalStack.
In many real-world scenarios, you might not have an option to reapply the same Terraform configuration locally, since you may not even possess the Infrastructure as Code files for those shared resources or that they were created using AWS Management Console.
Here’s where LocalStack’s AWS Replicator comes in – it allows us to pull the actual VPC and subnet definitions from AWS into LocalStack before redeploying. Let’s explore how to do that next.
Step 4: Replicate the AWS resources in LocalStack
We will now use the AWS Replicator to pull the VPC and subnet definitions from AWS into LocalStack. The LocalStack CLI uses your existing AWS credentials to read the live configuration.
4.1: Set AWS credentials
You can set your AWS credentials for the CLI by specifying a profile with AWS_PROFILE or by exporting the required environment variables ((AWS_ACCESS_KEY_ID, AWS_SECRET_ACCESS_KEY, AWS_SESSION_TOKEN, and AWS_DEFAULT_REGION) directly. To export credentials from a profile, you can run:
eval $(AWS_PROFILE=default aws configure export-credentials --format env)4.2: Start a replication job for the VPC
Now, start a replication job for the VPC, using the VPC identifier (vpc-...) and the resource type (AWS::EC2::VPC):
AWS_PROFILE=default localstack replicator start \ --resource-identifier vpc-05208447cff1e3482 \ --resource-type AWS::EC2::VPCYou can replace the VPC ID with the one created in your setup.
The command initiates a replication job and returns a JSON payload with a job_id:
{ "job_id": "4bea1141-a822-4918-8a3d-c323938cc47e", "state": "TESTING_CONNECTION", "error_message": null, "type": "SINGLE_RESOURCE", "replication_config": { "resource_type": "AWS::EC2::VPC", "resource_identifier": "vpc-05208447cff1e3482" }}4.3: Monitor the replication job
You can use the job_id to monitor the status of the replication:
localstack replicator status 4bea1141-a822-4918-8a3d-c323938cc47eYou can replace the job ID with the one created in your case.
Once the VPC is replicated, repeat the process for each subnet (using the AWS::EC2::Subnet resource type):
AWS_PROFILE=default localstack replicator start --resource-identifier subnet-09a7b4d46eb9caf3c --resource-type AWS::EC2::SubnetAWS_PROFILE=default localstack replicator start --resource-identifier subnet-057d7d4850b97b653 --resource-type AWS::EC2::SubnetAWS_PROFILE=default localstack replicator start --resource-identifier subnet-0a1c75851d185bdef --resource-type AWS::EC2::SubnetAfter all jobs succeed, the VPC and subnets are now available in your LocalStack environment with their original AWS identifiers. You can now attempt the Terraform deployment again using these newly replicated resources.
Step 5: (Re-)Deploy the ECS application on LocalStack
With the VPC and subnets successfully replicated, you can now re-run the Terraform application deployment in your local environment.
Return to the terraform/application directory and run apply again:
terraform applyWhen prompted, specify your localstack profile, and then enter the previously replicated subnet IDs and VPC IDs (which match those from your AWS environment).
This time, Terraform will find the matching resources in LocalStack and proceed to create the ECS service, ALB, API Gateway, and other components. You should see a successful apply message:
Apply complete! Resources: 45 added, 0 changed, 0 destroyed.
Outputs:
api_url = "https://exemptioneventsapi.execute-api.us-east-1.amazonaws.com/local/v1/events"
Your ECS application has been deployed locally without any errors or code changes, using the same infrastructure references as in your real AWS environment. The logs, networking, and endpoints will behave as if running in an actual AWS environment, giving you a realistic testing ground without incurring real cloud costs.
Conclusion
LocalStack’s AWS Replicator currently supports a subset of resource types such as VPCs, subnets, security groups, IAM roles and policies, ECR repositories, Lambda Layers, and SSM parameters. You can find a full list of supported resources in the official Replicator documentation with plans to expand support for more resources in the future.
By removing the need to modify existing infrastructure or maintain specialized IaC configurations for local testing, LocalStack’s AWS Replicator will help streamline your workflow and make spinning up realistic, self-contained environments easier than ever by replicating external dependencies with minimal effort.