Running dbt workflows locally with LocalStack for Snowflake
LocalStack enables you to fully emulate and test dbt workflows locally, without consuming Snowflake credits. This tutorial shows how to set up and run a full data pipeline, from ingestion to transformation and visualization, using dbt and the LocalStack for Snowflake emulator.
Introduction
Running and testing dbt workflows usually needs an active connection to the Snowflake Cloud. This setup is slow and costly because development uses compute credits, has latency with large queries, and lacks quick feedback. This “testing tax” delays developers and increases cloud costs, making local development hard for data teams.
LocalStack for Snowflake changes this. It emulates the Snowflake data cloud locally in a Docker container, allowing you to run Snowflake SQL queries and more. By mimicking the Snowflake API surface, you can connect tools like dbt to your local instance for fast development and testing, without needing to use the Snowflake Cloud until deployment.
This tutorial shows how to set up and run a full data pipeline locally using dbt and the LocalStack for Snowflake emulator. It uses a sample Smart Factory Monitoring App to demonstrate local development, testing, and orchestration of dbt transformations.
How LocalStack works with dbt
LocalStack’s Snowflake emulator imitates the Snowflake Cloud in your local environment, so dbt interacts with it the same way as with the real cloud. When you run dbt run or dbt test, the dbt-snowflake adapter sends API requests to LocalStack instead of Snowflake.
To make this seamless, LocalStack uses the DNS name snowflake.localhost.localstack.cloud, which resolves to 127.0.0.1. This keeps all traffic local and also handles SSL certificates, enabling HTTPS without manual setup.
To connect dbt to LocalStack, you need to configure a dbt profile with the host pointing to the LocalStack DNS name and mock credentials.
Here is an example profiles.yml configuration:
localstack: outputs: dev: account: localstack host: snowflake.localhost.localstack.cloud port: 4566 database: test password: test role: test schema: public threads: 1 type: snowflake user: test warehouse: test target: devBy using the --profile localstack flag, all dbt commands are routed to the local Snowflake emulator. No changes are needed to dbt models, tests, or project structure, so you can develop and test data transformations entirely locally.
Prerequisites
Before you begin, ensure you have the following tools installed and configured:
- LocalStack CLI with a valid LocalStack Auth Token
- Docker
- Snowflake CLI with a
localstackconnection configured - Python &
pip
Step 1: Setup the project
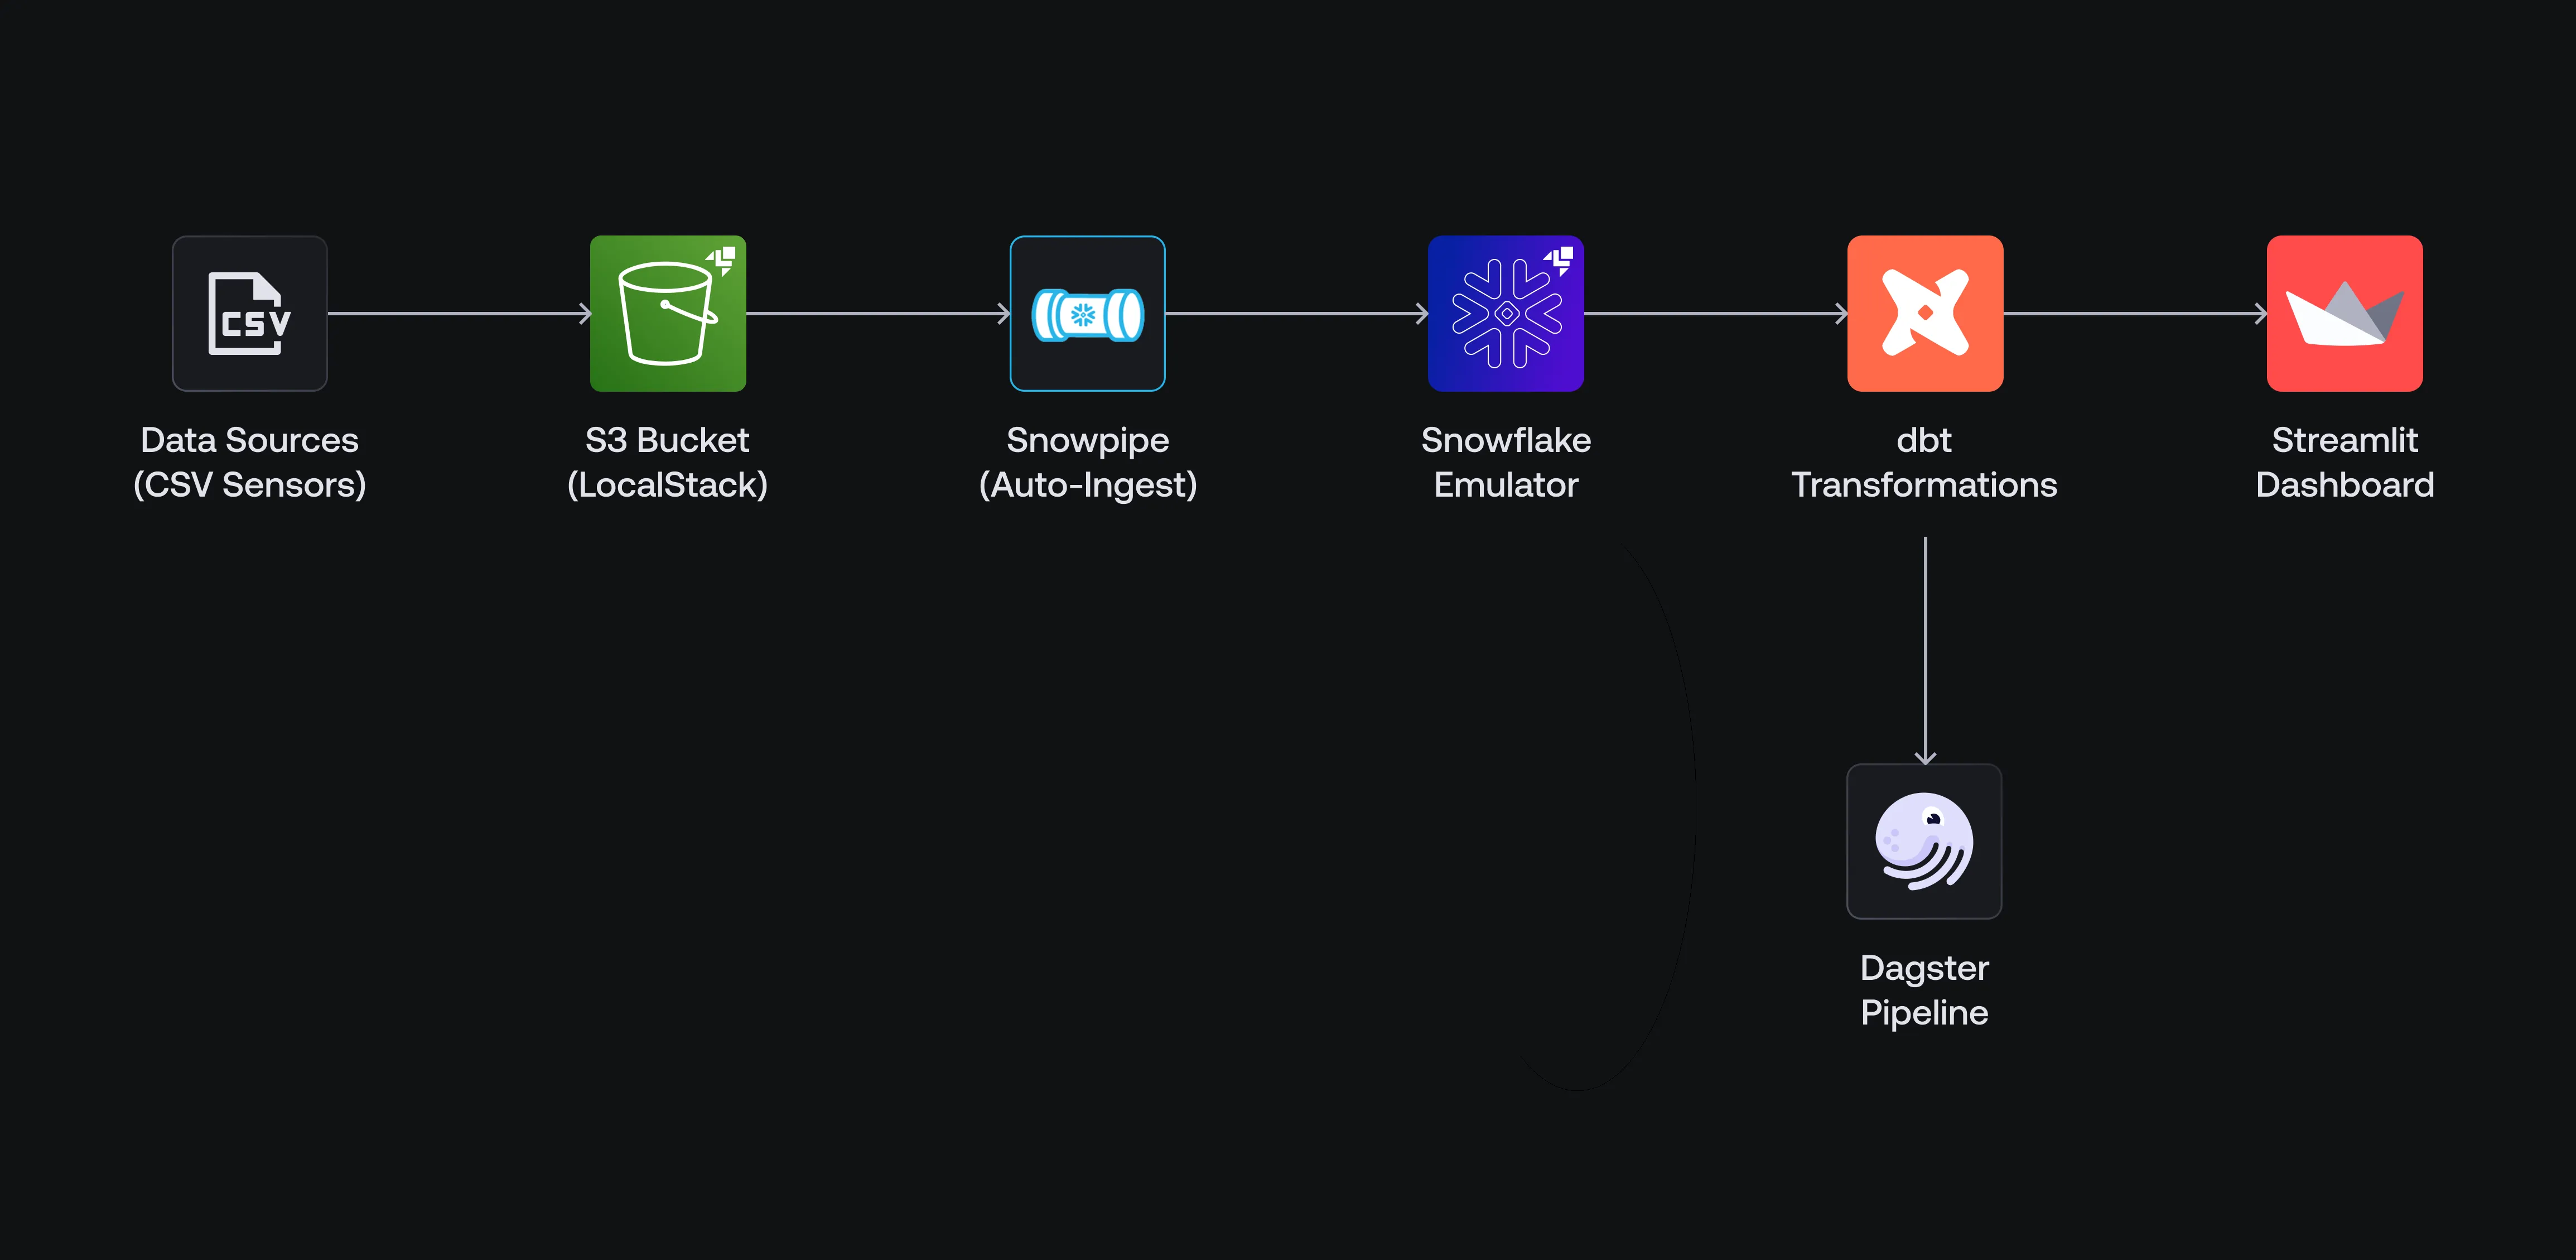
This tutorial builds and runs a Smart Factory Monitoring App. It ingests sensor data (in the form of CSV files) from an S3 bucket, loads it using Snowpipe, transforms it with dbt, and visualizes it in a Streamlit dashboard. The full workflow runs locally with the Snowflake emulator.
1.1: Clone the Repository
First, clone the sample application repository and go to the project directory:
git clone https://github.com/localstack-samples/snowflake-smart-factory-app.gitcd snowflake-smart-factory-app1.2: Install Dependencies
Next, install the required Python dependencies for the project by running:
virtualenv envsource env/bin/activatepip install -r requirements.txtdbt depsThese commands sets up the virtual environment and installs all necessary packages, including dbt-snowflake, streamlit, dbt project dependencies, and others.
Step 2: Configure dbt for the Snowflake Emulator
To connect dbt to the LocalStack Snowflake emulator, set up a dbt profile. The repo includes a sample profiles.yml file. You can use it as-is or delete it and create a new one.
localstack: target: dev outputs: dev: type: snowflake account: test user: test password: test role: test database: FACTORY_PIPELINE_DEMO schema: PUBLIC threads: 1 # For LocalStack, you need to specify host and port host: snowflake.localhost.localstack.cloud port: 4566The key configuration details are:
host:snowflake.localhost.localstack.cloudpoints to the local emulator.port:4566is the default LocalStack port.- Credentials: Set user, password, account, etc., to any test value.
For this tutorial, the sample app uses the database FACTORY_PIPELINE_DEMO and the PUBLIC schema.
Step 3: Create Snowflake & AWS resources
Now, let’s create the Snowflake and AWS resources needed for the application.
3.1: Start LocalStack for Snowflake
First, start the LocalStack container with the Snowflake emulator. Make sure you set your LOCALSTACK_AUTH_TOKEN using the LocalStack CLI.
localstack auth set-token YOUR_AUTH_TOKENlocalstack start --stack snowflakeReplace YOUR_AUTH_TOKEN with your actual LocalStack Auth Token. This command will start LocalStack, including the AWS services (S3) and the Snowflake emulator needed for the application.
3.2: Create Snowflake resources
To create your local Snowflake resources, you can run the SQL script (setup_snowflake.sql) provided in the repository.
To execute this script, you can use the Snowflake CLI (snow) with a LocalStack connection configured:
snow sql --file setup/01_setup_snowflake.sql --connection localstackThe script:
- Creates a database and table for sensor readings
- Sets up an external stage connected to a local S3 bucket
- Configures a Snowpipe with
AUTO_INGESTenabled
Any CSV file uploaded to the S3 bucket is then automatically ingested into the table for transformation.
3.3: Create AWS resources
Next, create a local S3 bucket to store raw sensor data. You also need to set up bucket notifications to trigger the Snowpipe on new file uploads.
Run the script that uses the AWS SDK for Python to configure this.
python setup/02_configure_s3_bucket.pyUse the AWS CLI or the LocalStack Web Application to list local buckets and verify the new bucket.

Step 4: Run the End-to-End Pipeline Locally
Now, let’s bring the entire data pipeline to life on your local machine.
4.1: Upload the initial data
To trigger the data pipeline, upload the first batch of sensor data (data/sensor_data_batch_1.csv) to the S3 bucket to trigger the data pipeline.
This triggers the Snowpipe, which ingests the data into the raw table in the local Snowflake instance. Run the script to upload the data:
python setup/03_upload_file.py4.2: Run dbt Transformations
With the raw data loaded, you can now run your dbt models to transform it. Run the following command:
dbt run --profile localstackThis command executes the dbt models defined in the project. The output would be:
01:15:21 Found 3 models, 39 data tests, 1 source, 573 macros01:15:2101:15:24 Concurrency: 1 threads (target='dev')01:15:2401:15:24 1 of 3 START sql incremental model PUBLIC_raw.sensor_data ...................... [RUN]01:15:27 1 of 3 OK created sql incremental model PUBLIC_raw.sensor_data ................. [SUCCESS 1 in 2.32s]01:15:27 2 of 3 START sql view model PUBLIC_staging.sensor_readings_view ................ [RUN]01:15:27 2 of 3 OK created sql view model PUBLIC_staging.sensor_readings_view ........... [SUCCESS 1 in 0.61s]01:15:27 3 of 3 START sql table model PUBLIC_marts.machine_health_metrics ............... [RUN]01:15:32 3 of 3 OK created sql table model PUBLIC_marts.machine_health_metrics .......... [SUCCESS 1 in 5.07s]01:15:3201:15:32 Finished running 1 incremental model, 1 view model, 1 table model in 0 hours 0 minutes and 11.47 seconds (11.47s).01:15:3201:15:32 Completed successfullyBecause LocalStack offers high parity with the real Snowflake API, you don’t need to change your models or SQL code. Your project just works locally.
4.3: Run dbt tests
After running dbt run to transform the data, use dbt test to check data quality and integrity. Tests can assert conditions like no nulls or unique primary keys. Running these tests locally provides an immediate feedback loop.
You can execute all the tests defined in the dbt project:
dbt test --profile localstackThe sample project includes several data quality tests defined in the schema.yml files.
The output will look similar to this, indicating that all tests have passed:
01:16:28 37 of 39 START test table_not_empty_processed_machine_health_ .................. [RUN]01:16:28 37 of 39 PASS table_not_empty_processed_machine_health_ ........................ [PASS in 0.77s]01:16:28 38 of 39 START test table_not_empty_sensor_readings_view_ ...................... [RUN]01:16:29 38 of 39 PASS table_not_empty_sensor_readings_view_ ............................ [PASS in 0.79s]01:16:29 39 of 39 START test unique_processed_machine_health_machine_id ................. [RUN]01:16:30 39 of 39 PASS unique_processed_machine_health_machine_id ....................... [PASS in 0.80s]01:16:3001:16:30 Finished running 39 data tests in 0 hours 0 minutes and 37.63 seconds (37.63s).01:16:3001:16:30 Completed successfully01:16:3001:16:30 Done. PASS=39 WARN=0 ERROR=0 SKIP=0 TOTAL=39This local validation helps catch issues early. For example, if the FILE_FORMAT in setup_snowflake.sql had a wrong delimiter, Snowpipe would load data incorrectly.
A not_null test would fail immediately, showing the problem before it affects production. This fast feedback loop is a key benefit of using LocalStack.
4.4: Visualize the Data
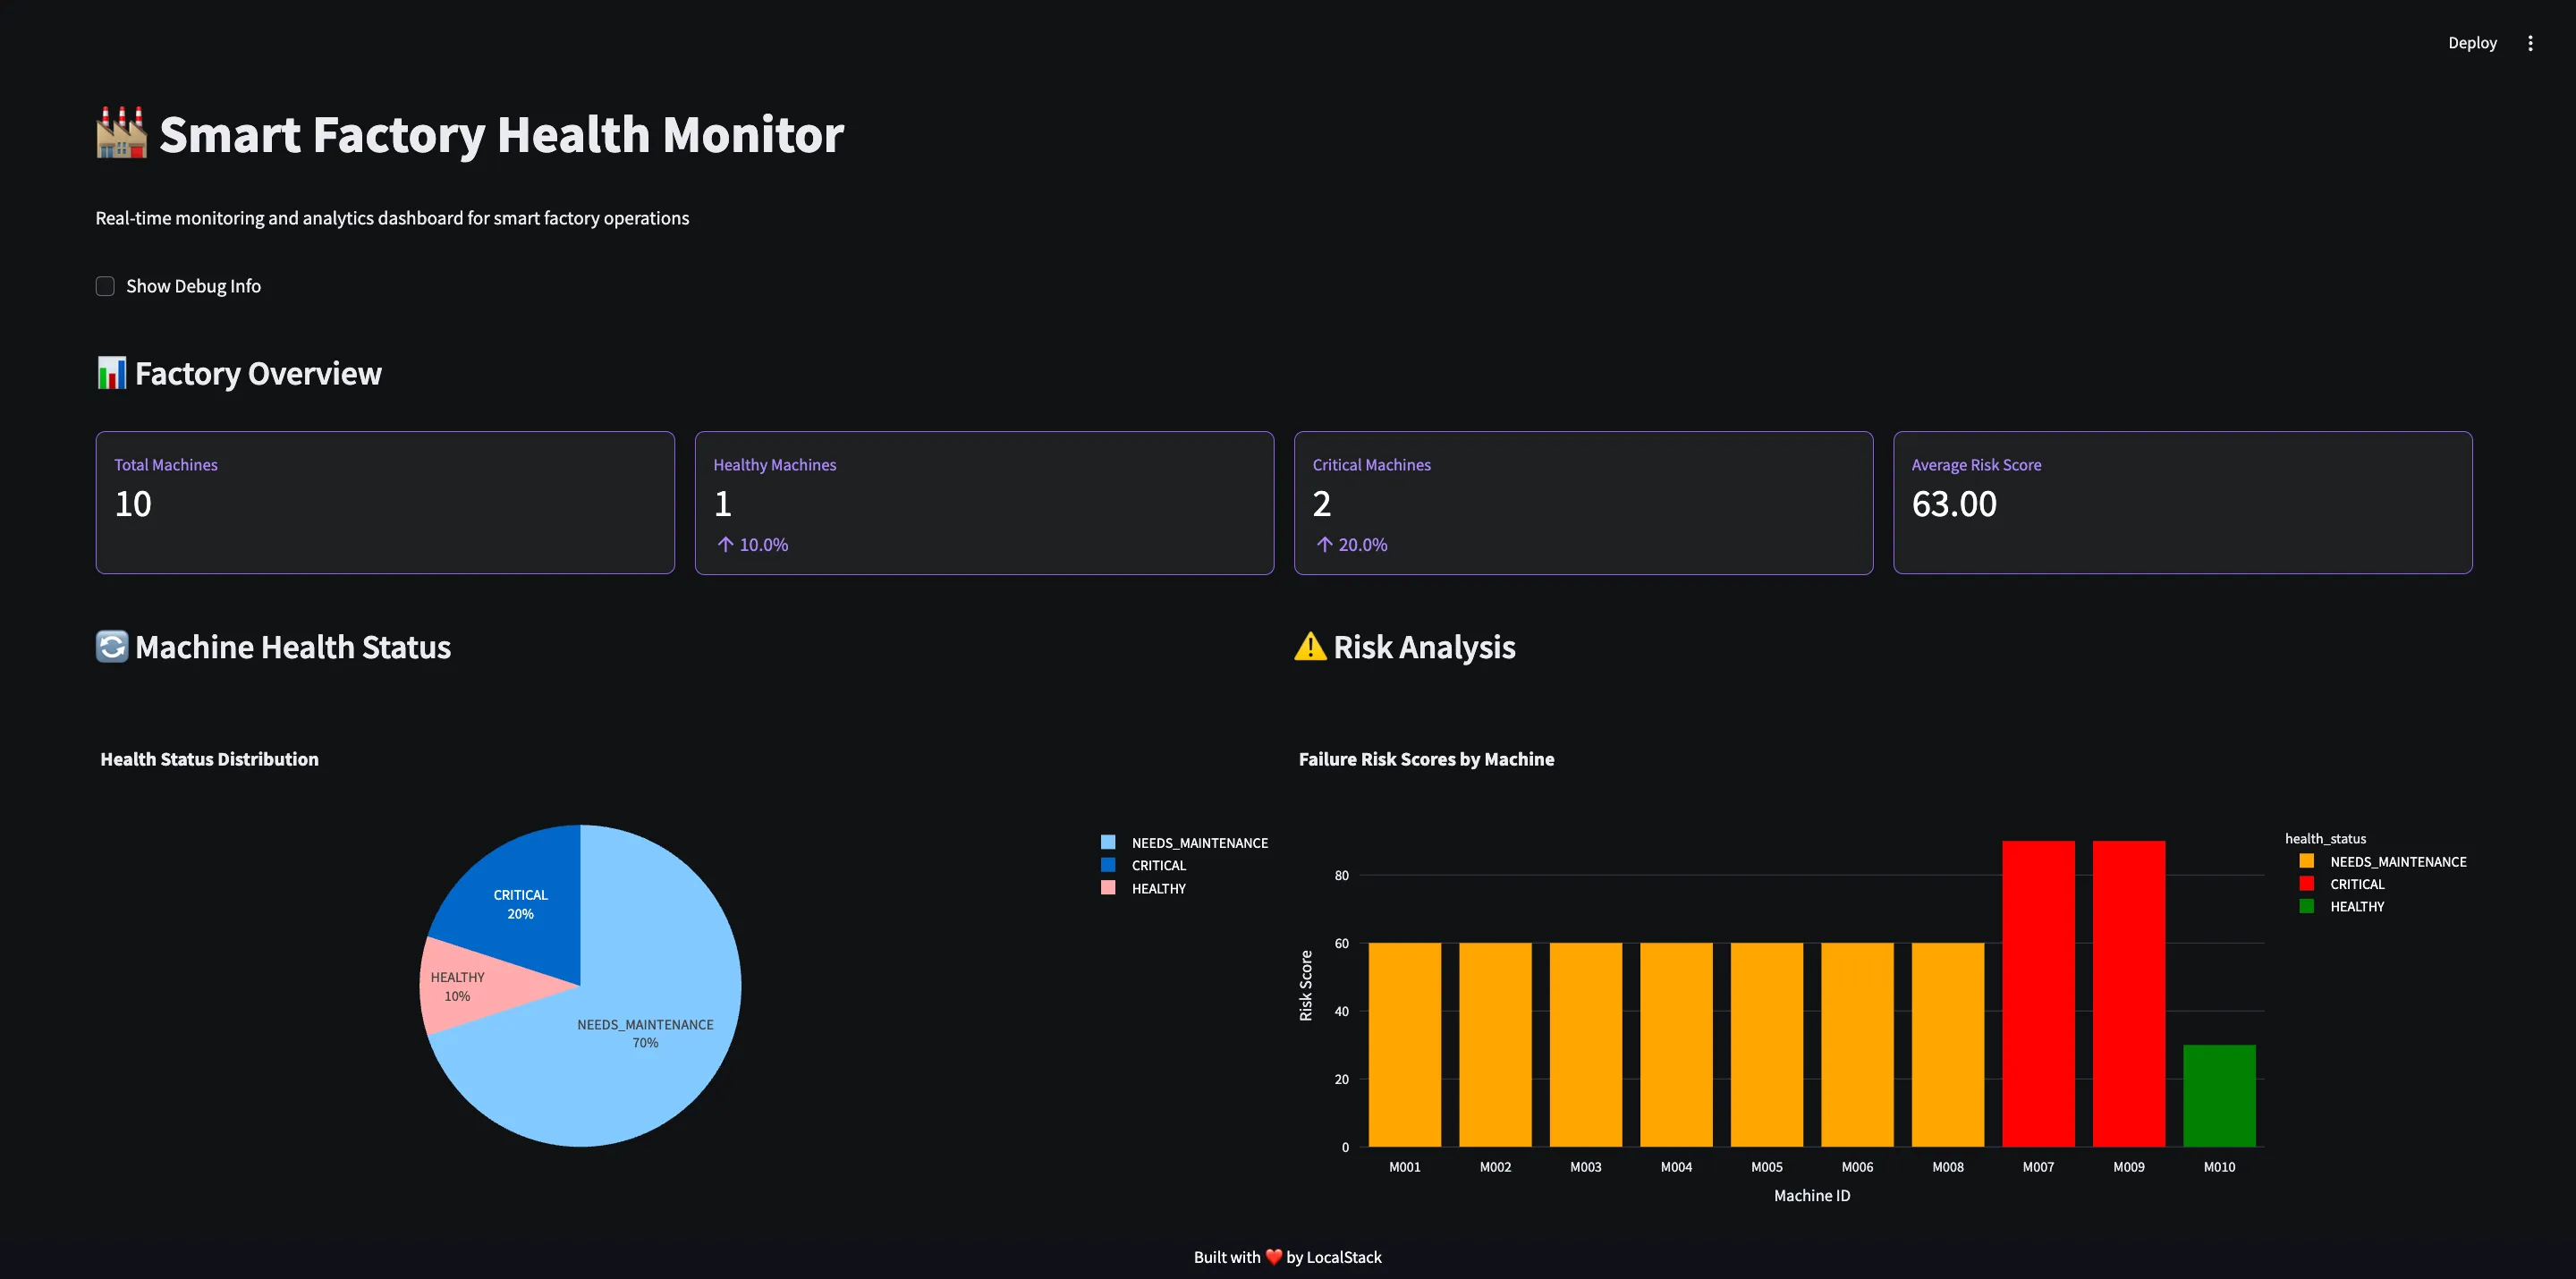
Finally, you can use a Streamlit web app to query and visualize the transformed data.
cd app/src/module-ui/src && streamlit run ui.pyThis starts the Streamlit dashboard, connects to the local Snowflake emulator, queries the machine_health_metrics model, and displays a real-time monitoring view for the smart factory.
Step 5: Automate with an Orchestration Pipeline
Beyond manual runs, you can also test and run automated data workflows. The sample project includes a Dagster pipeline for orchestrating dbt transformations.
Start the Dagster pipeline:
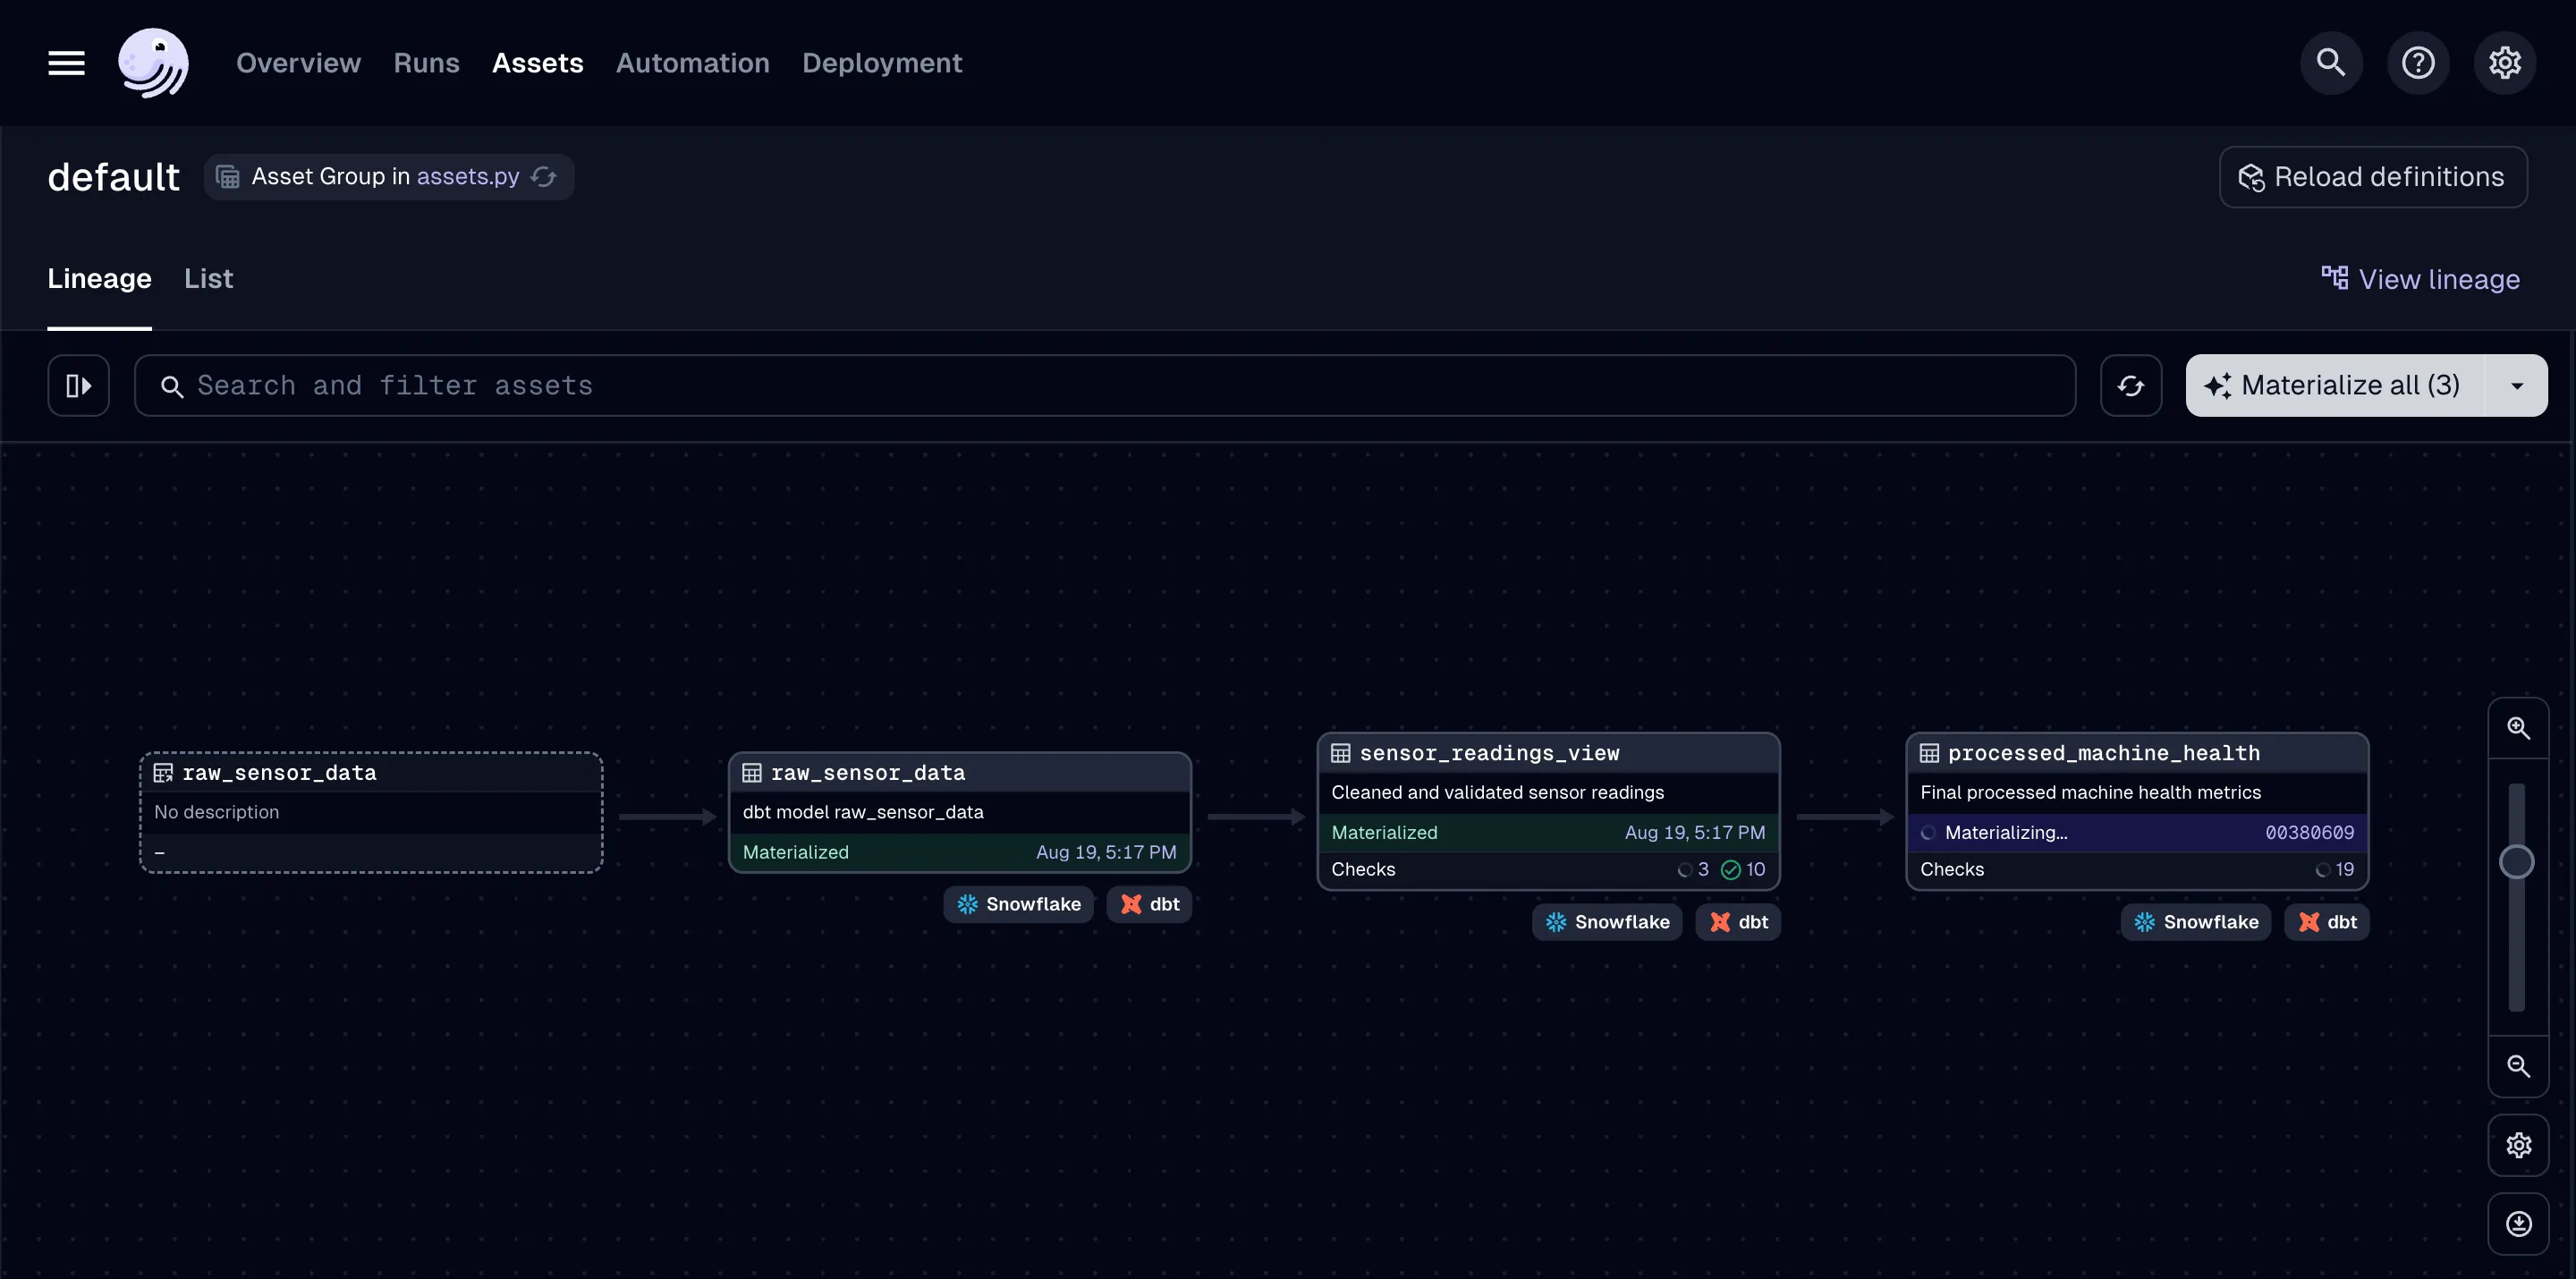
dagster dev -f pipeline/assets.pyThis launches the Dagster UI, where you can see your dbt assets. The pipeline includes an S3 sensor that automatically triggers your dbt models whenever a new file is uploaded.
To test this, upload a new batch of sensor data:
python setup/03_upload_file.py --latestThis command uploads sensor_data_batch_2.csv to S3. In the Dagster UI, a new run starts, triggering the dbt workflow to process the data.
This shows how to build and test full automated data pipelines locally, not just dbt models.
Conclusion
LocalStack for Snowflake enables data engineers to shift left by running the data cloud locally. This tutorial showed how to build, test, and run a full dbt data pipeline without cloud costs or remote infrastructure.
By using a local emulator, you can:
- Prototype quickly with safe tests and fast feedback
- Avoid testing tax from using the real cloud for development
- Test dbt models and full data workflows before production
- Share reproducible development environments using Cloud Pods
This local-first development model leads to higher-quality data products, faster development cycles, and more efficient data teams.