

Introduction
AWS Amplify Gen 2 is the code-first version of Amplify. It lets you define your web or mobile app’s backend in TypeScript. Run one command, and Amplify provisions the services your app needs, such as Cognito, AppSync, DynamoDB, and Lambda. Its developer sandbox redeploys whenever you save a file, creating a smooth development loop, as long as you have an AWS account to point it at.
That requirement creates several problems. Each sandbox is a real CloudFormation stack running in your real AWS account. New contributors need credentials, every developer creates a separate copy of the backend, and CI also needs access to an AWS account. A faulty schema change can affect live infrastructure. The Gen 1 CLI addressed this with the amplify-localstack plugin, but Gen 2 does not support a plugin system.
The good news is that LocalStack for AWS solves exactly these problems and now supports the Amplify Gen 2 toolchain . In this tutorial, you will deploy a small Amplify Gen 2 based todo app with ampx sandbox, connect its React frontend to a Cognito-backed data API, inspect its resources, and update its data model, with the entire workflow running locally.
What is Amplify Gen 2
Amplify Gen 1 used an interactive CLI. You answered prompts, and the CLI saved the configuration as JSON in the amplify/ directory. The amplify push command then converted that configuration into CloudFormation. Gen 2 replaces this process with TypeScript. You define the backend in amplify/backend.ts with a few functions:
import { defineBackend } from '@aws-amplify/backend';import { auth } from './auth/resource';import { data } from './data/resource';
defineBackend({ auth, data });
Each function creates a set of AWS resources:
defineAuthcreates Cognito resources and IAM roles for signed-in and guest users.defineDatacreates an AppSync GraphQL API, a DynamoDB table for each model, and the required resolvers.defineFunctioncreates Lambda functions.defineStoragecreates S3 buckets.
These functions use AWS CDK constructs and generate CloudFormation. You can also use standard CDK constructs for resources that the Amplify helpers do not support.
The Amplify Gen 2 CLI is called ampx and is included in @aws-amplify/backend-cli. For local development, run npx ampx sandbox. This command:
- Builds and deploys the backend.
- Names the stack after the project and developer.
- Writes the resource endpoints and IDs to
amplify_outputs.json. - Watches the
amplify/directory and redeploys your changes when you save a file.
Add --once to deploy one time and exit. This option is useful in scripts.
The amplify_outputs.json file connects the backend to the frontend. Pass it to Amplify.configure(outputs), and then use generateClient<Schema>() to create a typed data client. For example, you can call client.models.Todo.list() or client.models.Todo.create({ content }). The client types come from the schema in amplify/data/resource.ts. If you change the schema, TypeScript highlights any frontend code that also needs to change.
LocalStack and Amplify Gen 2
ampx uses the AWS SDK for JavaScript v3 to connect to AWS services such as CloudFormation, S3, SSM, STS, and Amplify. It gets the service endpoints from your environment and AWS profile instead of hard-coding them. An AWS profile can define a global endpoint_url or separate endpoints for individual services. When you point the profile to LocalStack, ampx sandbox deploys the backend there instead of AWS.
During deployment, ampx checks the CDK bootstrap stack, uploads assets to S3, and uses CloudFormation to deploy authentication and data stacks. Amplify also runs a Lambda function to create the DynamoDB tables. LocalStack supports this entire workflow. The following diagram shows the deployment path on the top row and the runtime path on the bottom row, all inside one LocalStack container:
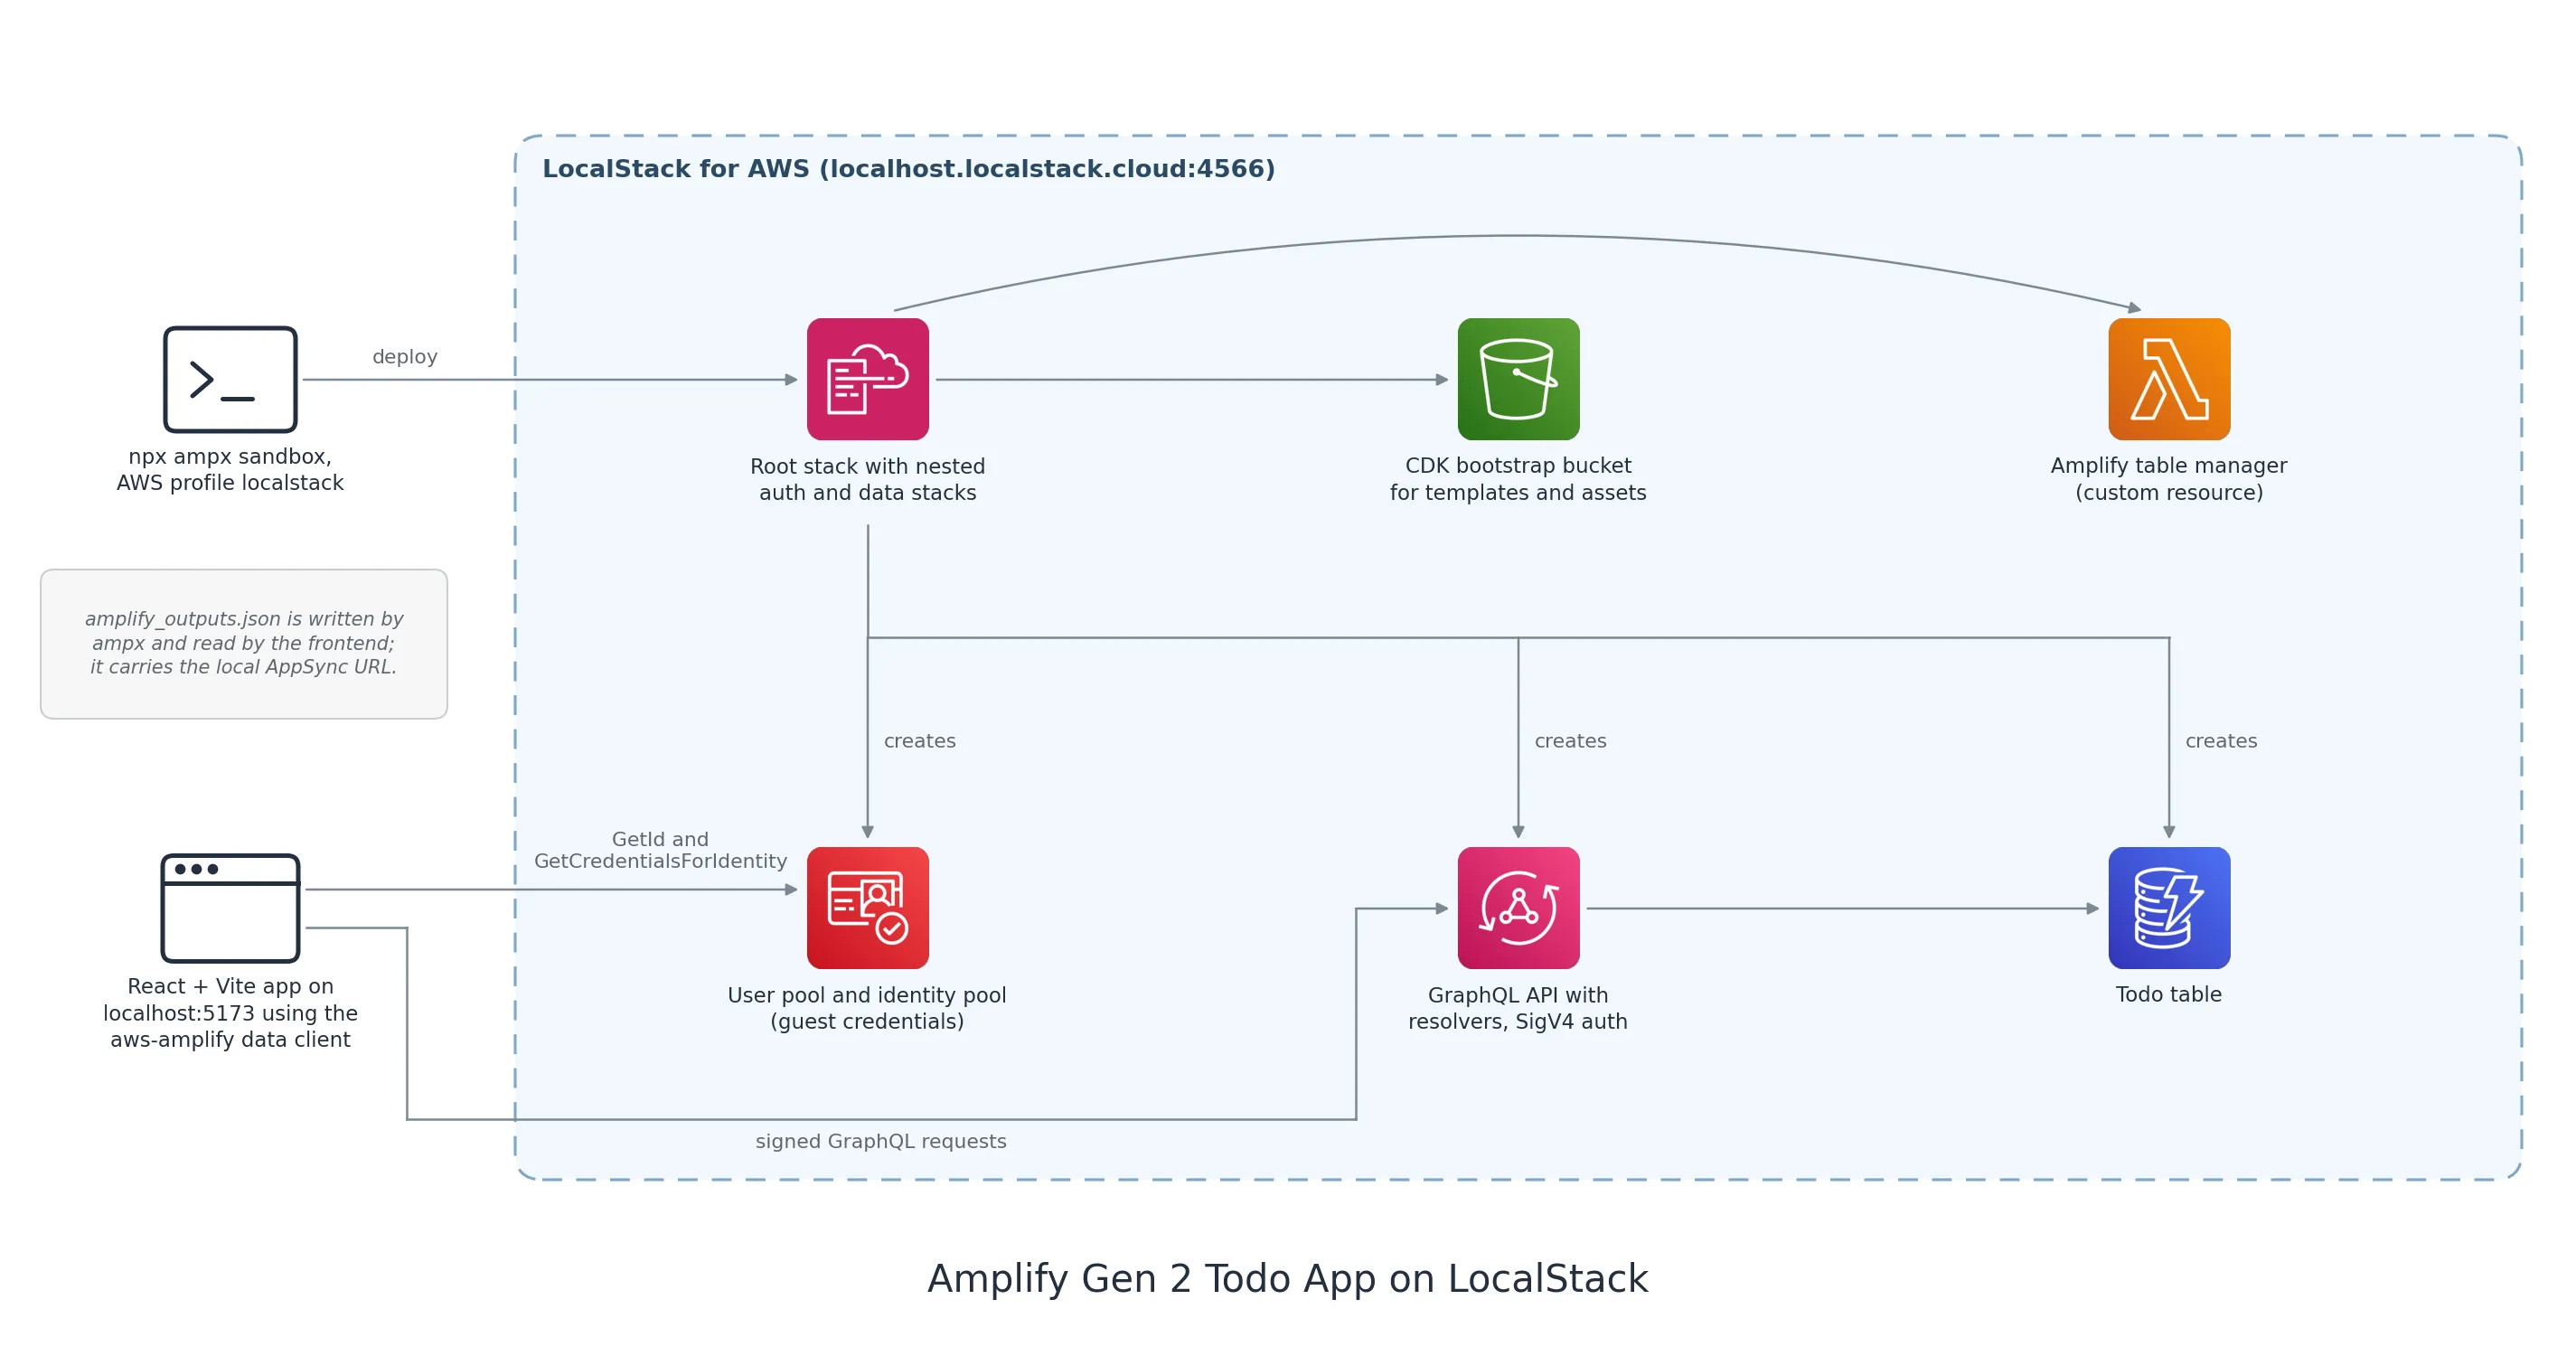
The frontend needs one small change. ampx writes the local AppSync URL to amplify_outputs.json, so the data layer works without extra configuration. Cognito is different because the outputs file does not include its endpoints. Instead, aws-amplify builds them from the AWS Region. The sample app overrides these endpoints when a specific environment variable is set. We will review this configuration in Step 1.
Throughout the tutorial, we use lstk, the new LocalStack CLI:
lstk startstarts LocalStack.lstk setup awscreates the AWS profile used byampx.lstk cdkruns CDK commands against LocalStack.lstk awsruns AWS CLI commands against LocalStack.
Prerequisites
lstk1.0 or later with a valid LocalStack Auth Token. Cognito and AppSync require an active trial or licensed plan.- Docker
- Node.js 22.12 or later. The sample’s frontend uses Vite 8, which needs it.
- The AWS CDK CLI (
npm install -g aws-cdk), whichlstk cdkwraps.
Step 1: Get the sample application
1.1: Clone the repository
Clone the sample and install its dependencies:
git clone https://github.com/localstack-samples/sample-amplify-gen2-todo-app.gitcd sample-amplify-gen2-todo-appnpm installThe sample uses an unmodified Amplify-generated backend and a small React frontend for managing todos. One additional file configures the app for LocalStack.
sample-amplify-gen2-todo-app/├── amplify/│ ├── backend.ts defineBackend({ auth, data })│ ├── auth/resource.ts Cognito user pool with email sign-in│ └── data/resource.ts the Todo model├── src/│ ├── amplify-config.ts Amplify.configure, with the LocalStack override│ └── App.tsx the todo UI├── .env.localstack VITE_LOCALSTACK_ENDPOINT└── package.jsonThe package.json file includes localstack:* scripts for the commands used in the next steps, and the repository’s Makefile wraps the same flow (make start, make deploy, make test) for CI.
1.2: The backend definition
The amplify/auth/resource.ts file enables email-based sign-in. Amplify uses this setting to create a Cognito user pool and identity pool:
import { defineAuth } from '@aws-amplify/backend';
export const auth = defineAuth({  loginWith: { email: true },});
amplify/data/resource.ts declares the data model:
import { type ClientSchema, a, defineData } from '@aws-amplify/backend';
const schema = a.schema({  Todo: a    .model({      content: a.string(),    })    .authorization((allow) => [allow.guest()]),});
export type Schema = ClientSchema<typeof schema>;
export const data = defineData({  schema,  authorizationModes: {    defaultAuthorizationMode: 'identityPool',  },});
A few things to note:
a.modelcreates a DynamoDB table forTodo. It also adds GraphQL operations to create, read, list, update, and delete todos. Amplify automatically adds theid,createdAt, andupdatedAtfields.allow.guest()lets users read and write todos without signing in. This keeps the tutorial focused on deployment instead of authentication.identityPooltells the client to get temporary AWS credentials from Cognito. The client uses these credentials to sign each GraphQL request with SigV4. AppSync verifies the signature and the guest role’s permissions. In output, this auth mode appears asAWS_IAM.
1.3: The frontend’s LocalStack switch
The frontend only refers to LocalStack in src/amplify-config.ts:
import { Amplify } from 'aws-amplify';import { parseAmplifyConfig } from 'aws-amplify/utils';import outputs from '../amplify_outputs.json';
export const LOCALSTACK_ENDPOINT: string | undefined = import.meta.env.VITE_LOCALSTACK_ENDPOINT;
function configureAmplify(): void {  const config = parseAmplifyConfig(outputs);
  if (LOCALSTACK_ENDPOINT && config.Auth) {    Object.assign(config.Auth.Cognito, {      userPoolEndpoint: LOCALSTACK_ENDPOINT,      identityPoolEndpoint: LOCALSTACK_ENDPOINT,    });  }
  Amplify.configure(config);}
configureAmplify();
Without VITE_LOCALSTACK_ENDPOINT, the app uses the standard Amplify configuration and connects to AWS.
For local development, .env.localstack sets the endpoint to http://localhost.localstack.cloud:4566. The dev:localstack script starts Vite with --mode localstack, which loads this environment file. The rest of the frontend uses the generated data client and does not need to know which endpoint it is using.
Step 2: Start LocalStack
The frontend calls Cognito and AppSync on LocalStack from the Vite development server. LocalStack must allow requests from Vite’s default origin, http://localhost:5173.
Set LOCALSTACK_EXTRA_CORS_ALLOWED_ORIGINS when you start LocalStack to allow this origin. A second setting, LAMBDA_IGNORE_ARCHITECTURE, is needed because Amplify pins one of its CloudFormation helper functions to the arm64 architecture; with the setting, LocalStack runs that function natively on x86_64 machines as well. The lstk CLI passes variables with the LOCALSTACK_ prefix to the LocalStack container:
LOCALSTACK_EXTRA_CORS_ALLOWED_ORIGINS=http://localhost:5173 \LOCALSTACK_LAMBDA_IGNORE_ARCHITECTURE=1 \lstk startStarting LocalStack...✔︎ LocalStack is running (containerId: 1fe91bfb2e36)• Endpoint: localhost.localstack.cloud:4566• Web app: https://app.localstack.cloudlstk status confirms that the emulator is up and that nothing is deployed yet:
lstk status✔︎ LocalStack AWS Emulator is running• Endpoint: localhost.localstack.cloud:4566• Container: localstack-aws> Note: No resources deployedStep 3: Configure the AWS profile and bootstrap CDK
3.1: Write the profile
ampx needs an AWS profile for deployments. Run the following command to create a profile named localstack in ~/.aws/config and ~/.aws/credentials:
lstk setup aws✔︎ Created LocalStack profile in ~/.awsThe profile sets the AWS Region and LocalStack endpoint. The credentials file also gets a matching entry with the test access key and secret key that LocalStack accepts:
[profile localstack]region = us-east-1output = jsonendpoint_url = http://localhost.localstack.cloud:45663.2: Give S3 its own endpoint
CDK uploads assets to S3 using virtual-hosted-style URLs, which include the bucket name in the hostname. LocalStack needs the hostname to include s3 to identify these requests as S3 traffic.
Set a separate S3 endpoint in the terminal where you will run ampx:
export AWS_ENDPOINT_URL_S3=http://s3.localhost.localstack.cloud:4566ampx and CDK will use this endpoint for S3 and the profile’s endpoint_url for all other services.
3.3: Bootstrap CDK
Amplify Gen 2 uses CDK for deployments. Before CDK can deploy resources, it needs a bootstrap stack named CDKToolkit. This stack contains an asset bucket, deployment roles, and an SSM parameter that records the bootstrap version. ampx checks this parameter before starting a deployment.
Create the bootstrap stack in LocalStack:
lstk cdk bootstrap aws://000000000000/us-east-1 ⏳ Bootstrapping environment aws://000000000000/us-east-1...CDKToolkit: creating CloudFormation changeset... ✅ Environment aws://000000000000/us-east-1 bootstrapped.000000000000 is LocalStack’s default account ID. Bootstrapping takes a few seconds. Repeat this step after starting a fresh LocalStack instance unless you have enabled persistence.
Step 4: Deploy the backend
4.1: Run the sandbox once
Run the sandbox once with the AWS profile from the previous step:
npx ampx sandbox --once --identifier local --profile localstackBy default, Amplify uses your operating system username in the stack name. The --identifier local option replaces it with local, giving everyone the same stack names. The command builds the backend, checks its types, uploads its assets, and deploys it with CloudFormation:
Amplify Sandbox Identifier: local Stack: amplify-amplifygen2localstacktodo-local-sandbox-26c8b1a1be Region: us-east-1✔ Backend synthesized in 1.88 seconds✔ Type checks completed in 5.52 seconds✔ Built and published assetsamplify-amplifygen2localstacktodo-local-sandbox-26c8b1a1be | CREATE_IN_PROGRESS | AWS::CloudFormation::Stack | amplify-amplifygen2localstacktodo-local-sandbox-26c8b1a1beamplify-amplifygen2localstacktodo-local-sandbox-26c8b1a1be | CREATE_COMPLETE | AWS::CloudFormation::Stack | auth.NestedStack/auth.NestedStackResourceamplify-amplifygen2localstacktodo-local-sandbox-26c8b1a1be | CREATE_COMPLETE | AWS::CloudFormation::Stack | data.NestedStack/data.NestedStackResourceamplify-amplifygen2localstacktodo-local-sandbox-26c8b1a1be | CREATE_COMPLETE | AWS::CloudFormation::Stack | amplify-amplifygen2localstacktodo-local-sandbox-26c8b1a1be✔ Deployment completed in 55.307 secondsAppSync API endpoint = http://localhost.localstack.cloud:4566/graphql/4f77b9c21fa740f885cfdc9594File written: amplify_outputs.jsonThe deployment takes about a minute. Most of this time is spent creating the data stack. Amplify runs a Lambda function to create the DynamoDB table and waits for the table to become active. The function runs inside LocalStack, so this part of the deployment stays inside the LocalStack container.
4.2: Read the outputs file
The deployment creates amplify_outputs.json in the project root. The important fields are:
{ "auth": { "user_pool_id": "us-east-1_e20c1a9a5cd84d26b43614489790aa5f", "user_pool_client_id": "dnynydkmb4s8qpj8jwk7ydovba", "identity_pool_id": "us-east-1:7fd216cc", "unauthenticated_identities_enabled": true, "aws_region": "us-east-1" }, "data": { "url": "http://localhost.localstack.cloud:4566/graphql/4f77b9c21fa740f885cfdc9594", "aws_region": "us-east-1", "default_authorization_type": "AWS_IAM", "authorization_types": ["AMAZON_COGNITO_USER_POOLS"] }, "version": "1.5"}The data.url field points to the local AppSync endpoint. The unauthenticated_identities_enabled field confirms that guest access is enabled for the frontend.
4.3: Look at what was created
Amplify creates a root stack with separate nested stacks for authentication and data. The data stack also contains nested stacks of its own:
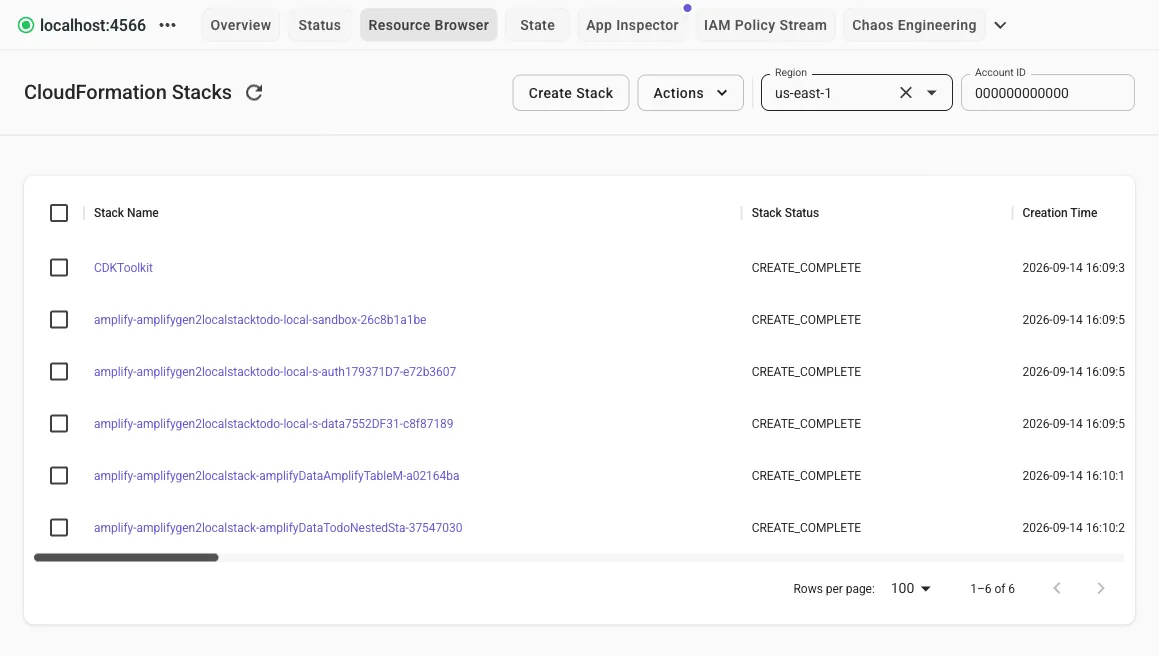
lstk aws cloudformation list-stacks --query 'StackSummaries[].StackName' --output textCDKToolkitamplify-amplifygen2localstacktodo-local-sandbox-26c8b1a1beamplify-amplifygen2localstacktodo-local-s-auth179371D7-e72b3607amplify-amplifygen2localstacktodo-local-s-data7552DF31-c8f87189amplify-amplifygen2localstack-amplifyDataAmplifyTableM-a02164baamplify-amplifygen2localstack-amplifyDataTodoNestedSta-37547030The final two stacks manage the DynamoDB table and the Todo model. You can inspect the AppSync API, DynamoDB table, and Cognito identity pool with AWS CLI commands:
lstk aws appsync list-graphql-apis --query 'graphqlApis[].[apiId,name,authenticationType]' --output textlstk aws dynamodb list-tables --output textlstk aws cognito-identity list-identity-pools --max-results 10 --query 'IdentityPools[].IdentityPoolId' --output text4f77b9c21fa740f885cfdc9594 amplifyData AWS_IAMTABLENAMES Todo-4f77b9c21fa740f885cfdc9594-NONEus-east-1:7fd216ccThe table name contains the model name, API ID, and environment suffix. The AppSync API uses AWS_IAM authentication because the data definition sets identityPool as its default authorization mode.
You can also view these resources in the LocalStack Web App. Its Resource Browser connects to the running container and displays the CloudFormation stacks created by ampx:
Step 5: Run the frontend
5.1: Start Vite in LocalStack mode
npm run dev:localstack VITE v8.3.0 localstack ready in 84 ms ➜ Local: http://localhost:5173/Open http://localhost:5173. Before loading the todos, the Amplify client:
- Calls
GetIdto create a guest identity for the browser session. - Calls
GetCredentialsForIdentityto get temporary AWS credentials. - Uses those credentials to sign the
listTodosrequest. - Sends the request to the AppSync URL in
amplify_outputs.json.
The first two requests use the local Cognito endpoint configured in Step 1: http://localhost.localstack.cloud:4566.
5.2: Use the app
Add a few todos, edit one, and delete another. Each change sends a GraphQL mutation and then runs listTodos again. The panel on the right displays the AppSync host, authorization mode, identity pool ID, and guest identity for your browser.
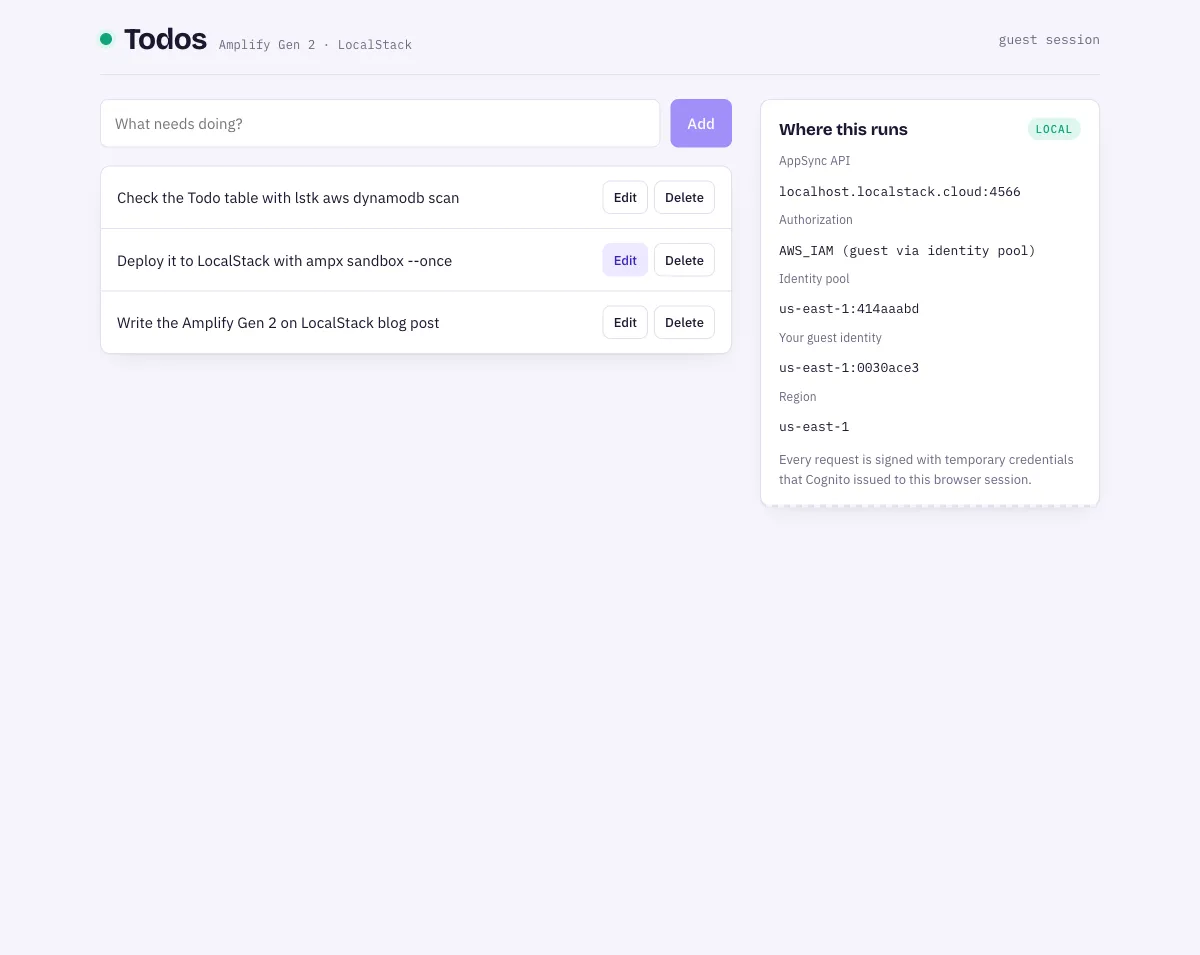
Open your browser’s network tab to inspect the requests. You will see POST requests to Cognito Identity, followed by one POST to /graphql/<api-id> for each data operation. Each GraphQL request includes an Authorization: AWS4-HMAC-SHA256 ... header, just as it would when using AWS.
Step 6: Inspect the data and the requests
6.1: The DynamoDB table
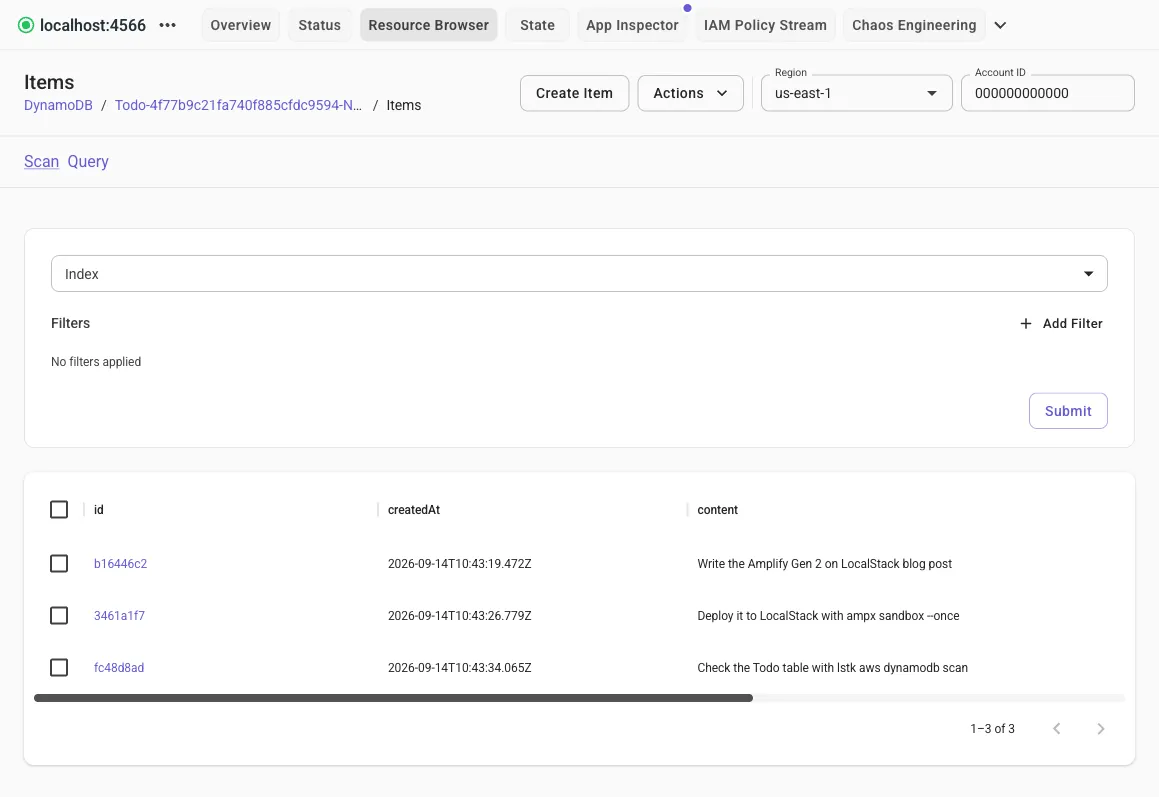
The todos are stored as items in the DynamoDB table created by Amplify:
lstk aws dynamodb scan --table-name Todo-4f77b9c21fa740f885cfdc9594-NONE \ --query 'Items[].content.S' --output textWrite the Amplify Gen 2 on LocalStack blog post Deploy it to LocalStack with ampx sandbox --once Check the Todo table with lstk aws dynamodb scanEach item also includes fields that Amplify manages automatically:
lstk aws dynamodb scan --table-name Todo-4f77b9c21fa740f885cfdc9594-NONE --query 'Items[0]'{ "id": {"S": "b16446c2"}, "content": {"S": "Write the Amplify Gen 2 on LocalStack blog post"}, "createdAt": {"S": "2026-09-14T10:43:19.472Z"}, "updatedAt": {"S": "2026-09-14T10:43:19.472Z"}, "__typename": {"S": "Todo"}}The DynamoDB view of the Resource Browser shows the same items:
6.2: The requests in the logs
Use lstk logs to watch requests arrive. Run it in a second terminal, and then use the app:
lstk logs --followlocalstack.request.aws : AWS cognito-identity.GetId => 200localstack.request.aws : AWS cognito-identity.GetCredentialsForIdentity => 200localstack.request.http : POST /graphql/4f77b9c21fa740f885cfdc9594 => 200localstack.request.http : POST /graphql/4f77b9c21fa740f885cfdc9594 => 200GraphQL calls appear as HTTP requests because AppSync serves each API on its own URL path.
Run lstk status to view all deployed resources, including the CloudFormation stacks, DynamoDB table, IAM roles, Lambda functions, S3 buckets, and SSM parameters.
Step 7: Change the schema with the sandbox running
7.1: Start the sandbox in watch mode
The --once option is useful for scripts, but the sandbox can also watch for changes. Keep the frontend running. Then, in the terminal where you set AWS_ENDPOINT_URL_S3, start the sandbox without --once:
npx ampx sandbox --identifier local --profile localstack✔ Deployment completed in 0.142 seconds[Sandbox] Watching for file changes...Because nothing has changed since the previous deployment, there is nothing to update.
7.2: Add a field to the model
Add a completion flag to the Todo model in amplify/data/resource.ts:
Todo: a .model({ content: a.string(), isDone: a.boolean(), }) .authorization((allow) => [allow.guest()]),Save the file. The sandbox detects the change, rebuilds the backend, and deploys the update:
[Sandbox] Triggered due to a file update event: amplify/data/resource.ts✔ Backend synthesized in 0.24 seconds✔ Type checks completed in 5.22 seconds✔ Built and published assets✔ Updated AWS::AppSync::GraphQLSchema data/amplifyData/GraphQLAPI/TransformerSchema✔ Deployment completed in 3.974 seconds[Sandbox] Watching for file changes...File written: amplify_outputs.jsonThis update uses a hotswap. The sandbox detects that only the GraphQL schema and two assets have changed. It updates them directly through AppSync and S3 instead of running a full CloudFormation update. The same process is used when the sandbox runs against AWS.
7.3: Confirm the new schema
Confirm that the API schema includes the new field:
lstk aws appsync get-introspection-schema --api-id 4f77b9c21fa740f885cfdc9594 \ --format SDL schema.graphqlgrep -A6 '^type Todo ' schema.graphqltype Todo { content: String isDone: Boolean id: ID! createdAt: AWSDateTime! updatedAt: AWSDateTime!}DynamoDB does not require a migration because its items do not share a fixed schema. Existing todos simply do not have an isDone field.
Amplify also adds the field to the model information in amplify_outputs.json. As a result:
- The frontend type
Schema['Todo']['type']includesisDone. client.models.Todo.create({ content, isDone: false })passes type checking.- You can add a checkbox to the React frontend for the new field.
The Vite server reloads when amplify_outputs.json changes, so the app continues to work while you develop the feature. This gives you the standard Amplify Gen 2 development loop entirely on your machine.
Step 8: Clean up
Stop the sandbox with Ctrl+C, then delete the stack:
npx ampx sandbox delete --identifier local --profile localstack --yesamplify-amplifygen2localstacktodo-local-sandbox-26c8b1a1be | DELETE_COMPLETE | AWS::CloudFormation::Stack | amplify-amplifygen2localstacktodo-local-sandbox-26c8b1a1be✔ Deployment completed in 45.308 seconds[Sandbox] Finished deleting.After deletion, only the CDKToolkit stack remains. Stop LocalStack:
lstk stopStopping LocalStack also removes its container state, so deleting the sandbox first is optional in this tutorial. However, it is good practice because you would need to delete the sandbox when working with a real AWS account.
Summary
In this tutorial, we deployed an Amplify Gen 2 backend to LocalStack with ampx sandbox, connected a React frontend to the local Cognito and AppSync endpoints, and inspected the generated resources. We also changed the schema in watch mode and updated the API through the same hotswap process Amplify uses on AWS.
You can find the sample application on GitHub at localstack-samples/sample-amplify-gen2-todo-app. To learn more, see:
- The Amplify Gen 2 documentation for schemas, authorization rules, and other backend features.
- The LocalStack documentation for Cognito, AppSync, and
lstk.